|
www.riscos.com Technical Support: |
If your computer is connected to a network - maybe it is part of your school or office network - you'll see the network icon on your icon bar. This chapter shows you how to use a network to communicate with other computers.
If your computer isn't connected to a network you don't need to read this chapter.
Networking uses many jargon terms - Econet, Ethernet, AUN, Level 4 and file server - to name a few. However, as you'll see from this chapter, using a network is actually quite easy. There's an overview of Acorn network types in the section Types of network.
The latest version of RISC OS supplied with your computer provides a more structured hard disc environment than earlier RISC OS computers. Before attaching this machine to an existing network, it is recommended that you or your network manager first checks out the differences between the new machine and existing computers on the network. To help you with this, Acorn Customer Services has prepared an application note (number 251) to help you integrate your computer into an existing network.
RISC OS computers use two types of networking:
You can use both these types of network at the same time, if you want.
Your computer has a complete set of networking modules resident inside for Acorn Access+ and for AUN. These modules are automatically disabled until required, to leave as much memory as possible free for running applications if your computer is not on a network.
If you plan to use your computer on a full Internet network (TCP/IP), you should ask your supplier about the Acorn TCP/IP Protocol Suite.
You use the Configure application (click on !Boot) to set up your computer for networking. How you do this depends on which type of network you will be using. Go to the sections Changing configuration settings with !Boot and Network to see how to do this, then come back to this chapter.
Acorn Access+ software is supplied as standard with this version of RISC OS. To connect your computer to an Acorn Access network, it will have to be fitted with a suitable network card using DCI4 network drivers - see your supplier for details.
If you have an icon like this on your icon bar it means you're connected to an Acorn Access network; there may be other discs on the network that you can access.
Click on the discs icon to display the available discs.
Double-click on the disc that you want to use. The disc name is displayed under the discs icon on your icon bar. You can now use the shared disc. It is also possible to share your own disc with other users and to print using a shared printer.
Discs with a lock on them are Protected - you can only read and write to files and directories where public access has specifically been given.
To share your hard disc with other users Press Menu over the hard disc icon on the icon bar. Choose Share unprotected from the Share menu.
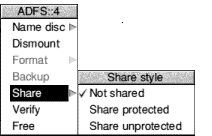
The disc will be made accessible to the network unprotected (see Protecting a shared disc below).
Note: If your disc has the same name as another on the network, you will be asked to change it (first choose Not shared, and follow the instructions in Naming discs if you need assistance on how to do this).
Remember to update your Desktop Boot file if you change names.
If you want to stop others reading, or even changing or deleting files on the shared disc (which they can otherwise do), choose Share protected from the Share sub-menu. If you do this, only files and directories you specifically grant public access to (using the Filer Access menu) can be read and written to by others.
Gateways are links between separate networks. You cannot normally share discs across gateways, although you can share CD-ROMs and directories using the authenticated share method (see Creating a 'structured' sharing method).
(This section contains rather technical information, aimed at the network manager.)
You may share any filing system or indeed any directory with Acorn Access+, but not all filer interfaces have the Share option included. To share any other filing system, you will need to either enter a * Command (type F12, followed by the command) or enter the command as a part of your Boot file. The syntax of the command is:
*Share <Pathname>[<Discname>][-protected][-noicon][-cdrom][-readonly]
For example, most SCSI filers now support the Share option, but if one did not, the command
*Share SCSI::4.$.Apps MyApps -protected
would share the directory SCSI::4.$.Apps as Acorn Access disc 'MyApps', in a protected mode.
Note that there is the option not to show the icon on the icon bar (reserved for certain applications).
You may stop sharing by using the command
*Unshare [<Discname>]
If you do not specify the share name, it will be shared with the disc or directory name.
Any number of CD-ROMs may be shared in much the same way as hard discs using Access, but with CD-ROMs you can also change the name they are known by on the network. (If you do not have the latest version of CDFSFiler loaded on your machine, booting !AccessCD will ensure that this module is loaded.)
If you want to, you can change the network name of the CD-ROM using the CDFS icon bar menu:
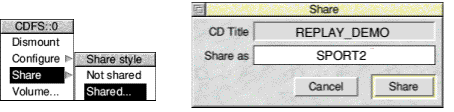
Type in the new name in the Share as box and click on OK.
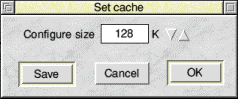
To obtain the best performance from your CD-ROM, and to be able to retain details of the share status between computer resets, the application !AccessCD is provided (in the Utilities directory of your hard disc). This application stores details of the shares, and also activates a cache module, which increases performance. To enable your computer to make use of !AccessCD, copy the application from the Access+ subdirectory into Utilities and add a line like
Filer_Boot ADFS::4.$.Utilities.!AccessCD
You can alter the size of the cache from the default 128K by double-clicking on the application icon and adjusting Cache size. The optimum size for your cache will be determined by the available memory (RAM) of your computer, network usage and CD-ROMs being accessed.
It is quite possible to share a CD-ROM over the network for browsing through encyclopædic data, or text and images. However, the network itself is not capable of supporting many copies of Replay movies due to the finite bandwidth of Ethernet. The access time from most CD-ROM drives will also limit the number of simultaneous users to one or two when running this type of application.
If you have obtained the CD-ROM server software (available from your supplier at extra cost), then you can dedicate a computer to act as a server for CD-ROMs on your network. This version of the software is not unlike AccessCD, but it contains a more sophisticated cache memory, which uses a part of the computer's hard disc to store recently-requested bits of the CD-ROMs you may be sharing over the network.
Full details of AccessCDS are provided in the Access CDShare pack. A NAME=MARKER-9-18>
| On the computer from which you wish to access shared discs or CD-ROMs, you will see the Discs icon on the lefthand side of the icon bar when Access+ is running. Click on this icon, and the discs you can access will be displayed. | |
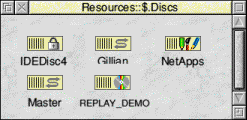
Discs with a lock on them are protected - you can only read and write to files and directories where public access has specifically been given. The ones with a CD-ROM symbol represent CD-ROMs of course, and those with an 'Apps' type symbol inside are read-only, or discs shared by the Level 4 Fileserver Application Accelerator. To access one (or more) of these discs, double-click on its icon; the discs icon will be replaced on your icon bar by the icon for that disc. Click on it to open a directory display for the disc, and use it just like you would your own hard disc or CD-ROM.
Click Menu on a shared disc icon on the icon bar to display the ShareFS menu:
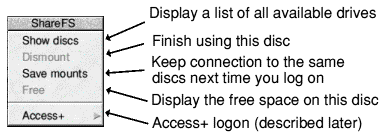
Saving your choice will ensure that your selection will be remembered when your machine is restarted.
You may wish to share data in such a way that it does not appear automatically in the Discs window, but only becomes available to those who know its name and a password.
| To do this, load !Access+ (in the Utilities directory on the hard disc) by double-clicking on its icon. The Access+ icon will appear on the righthand side of the icon bar. |
If you want to share a disc, or part of a disc, with chosen users, there are two ways in which you can do it:
The simplest method is by clicking on the Access+ icon to open a dialogue box:
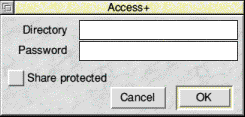
You may drag any directory into this box, from any filing system - it will then automatically fill in the directory pathname for you. You must then type in a password that others must enter if they want to access this directory. This password can be from zero to six characters long.
To share a whole disc, display the root directory of the disc, choose Select all and drop the selection into the dialogue box.
You also have the option to share the directory protected.
You can see what resources you are sharing from the !Access+ icon bar menu:
You can save or remove shared directories using this menu, too.
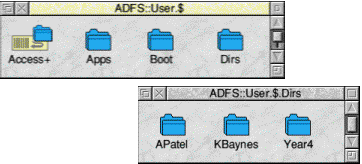
The structured sharing method allows a group of users to log on to their own 'world', which could include private data, common read-only applications and general read-write resources such as !Scrap. This makes possible a structure like this:
The network manager can set up this share structure on the server machine as follows:
Filer_Run ADFS::User.$.Access+.!Access+U KBayes abc123 P APatel xyz789 U year4 why234KBayes inside Dirs with a password of abc123. It is an unprotected mount (U) in this case. You may omit the password if you do not require this level of security. This text file can be removed by the network manager and used for reference (if someone forgets the name or password) to ensure security.
>
year4@Server2, for example), as well as the Apps directory containing commonly-used applications available to all users listed.
Note that this use of Access is designed for small groups of users - it is not intended to replace the appropriate use of a dedicated fileserver.
To access private data, users 'log on' at their computer, using the Access icon bar menu to enter their name and password.
They do not log on to a server machine in the traditional sense, but onto the network as a whole, as any computers that have data for a particular user will place their private disc into the window that opens up when the user logs on.
(See also the chapter Setting up printers.)
A printer connected to a computer on an Acorn Access network can be shared by other users on the network. The computer connected to the printer should have a hard disc with at least 5MB of free space at all times.
To print over an Acorn Access network, first go to the computer connected to the printer...
It is useful to set up a Boot file to run !Scrap, !System and !Printers when the computer is switched on.
Then on any other networked computer wishing to print...
A greyed-out printer with a question mark through it indicates that the printer is not available. Is it switched on?
You can now print using the remote printer.
Choose Save choices to remember this printer set up in future.
While a computer is rendering a picture (i.e. processing the display before sending it to the printer) an hourglass appears. At this stage, the computer is very busy, and requests from other machines to read or write to its shared disc will take some time to be met. The time taken to render is generally fairly short, but if a great deal of printing is to be performed by one computer, it might be preferable to ensure that this computer is not the same one which contains a frequently-used shared disc.
During the time that a 'server' machine is busy, and not communicating with other machines, the hourglass on other machines that are trying to communicate with it will turn red, and start counting down, until communication is re-established.
Note that there is a limit of about 35 print jobs that can be pending at any one time from any client, and up to 77 clients at a shared printer. Any attempt to have more than this will result in an error being returned to the client.
Re-starting !Printers at the server machine will result in any outstanding print jobs being flushed.
When printing to a dot-matrix or inkjet printer, use the lowest reasonable resolution (dots per inch) to get the desired result, as a client machine will take a long time to render a high-resolution page.
Note that the whole document or image is required before the printer will actually start, which will increase the time before printing is complete - especially if very high resolutions are selected from a relatively less powerful machine, such as an A3000. The size of available memory will also affect the speed of printing.
The copy of !Printers supplied supports multiple clients saving their own choices back into the application. This is achieved using a directory inside the application called Remote. When several clients have loaded and saved choices back to the application, you will see directories named, for example, ID2abcd123 inside the Remote directory, which contain the settings for each client. You can establish which belongs to which machine by going to the command line and typing show inet*. The machine will then display Internet information including the address used, e.g. Inet$LocalAddr : 2abcd123. Make sure that the Remote directory inside !Printers does not lose public write access.
Copying or creating large files, such as creating a PC partition, across a network using ShareFS can take a long time. It is quicker to perform such tasks locally from the machine sharing its hard disc.
Changing the Shared state of your hard disc causes other machines on your Access network to slow briefly. Try not to do this too often, to avoid delaying other users.
If you have any machines on your network still running RISC OS 3.1x, it is highly recommended that the application !NetUtils is placed on the network where it is 'seen' by all computers that wish to use the network - perhaps alongside !System or !Fonts, for example. This ensures that the error message 'Illegal Window Handle' is not generated if a Filer dialogue box is not open when a 'share' or 'unshare' takes place on the network. !NetUtils is available from the Acorn Customer Support ftp and Web sites.
If you have a Acorn Access (or Access+) network, and you also wish to communicate with a Level 4 Fileserver, or Spooler, every machine on the network must have a station number configured. This may be achieved by inserting a floppy disc with the SetStation utility on it, double-clicking on this utility, and typing in a unique number between 2 and 254 at the prompt. The range 250 to 254 is traditionally reserved for fileservers. You must also configure the software to use Level 4 protocols. To do this, press F12 at each machine, and type Configure Bootnet on at the * prompt. Reboot each machine before attempting to log on to the fileserver.
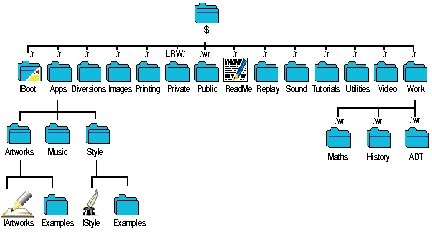
If you wish to share a disc that will be used by other machines to load applications and fonts and also be used to hold their !System and !Scrap, it is important that a sensible directory structure be adopted on the disc that is to be shared. The following illustration is given for a disc that is to be shared in Protected mode. Note that directory 'Private' cannot be opened over the network. !Scrap. ScrapDirs (inside !Boot) has both public read and write access:
Client computers can be set up to boot from a remote server and load the user's environment as required.
This can be set up as follows:
*Configure Boot *Configure FileSystem ShareIf you wish to reset your machine, always ensure a 'hard reset' is performed, never a 'soft reset'. A hard reset is performed by switching the machine off and then on, pressing Control-Reset, or Control-Break. Do not use Shift-Break or Reset, as this does not reset the network software completely, and leaves the machine in an undefined state. Do not use the *RMFaster WindowManager command, as this will remove the 'Discs' Icon from the Icon Bar.
Note that the Internet module supplied with Access+ is compatible with the Acorn TCP/IP Protocol Suite, so Access+ can be used with TCP/IP.
A file server network consists of a number of computers connected together to a dedicated computer called a file server.
This type of network is usually looked after by a network manager (a person, rather than a piece of software). The network manager often allocates each person a user name. This name is used to identify them to the file server.
Note that if you or your network manager uses the SetStation utility, you will need version 2.03 or later with this version of RISC OS.
A file server is a computer that holds a central store of computer programs and data. If your network manager allocates you storage space on the file server, you can store data there in your own special user area.
A network usually also includes a printer server. A printer server is a networked computer that is directly connected to a printer. All users of the network can use the printer.
You may also be able to use electronic mail (known as 'email') - a way of sending electronic messages between network users. Ask your network manager for more information.
Before you can use a file server, you need to log on to it using the Net Logon dialogue box. If there is more than one file server on your network, you will need to choose which one to log on to. Choose FS List from the network icon bar menu to open a display showing the file servers available; there is an icon for each file server. If a file server has more than one storage device available for you to use (for example, an extra hard disc) there is an icon for each device in the FS List window.
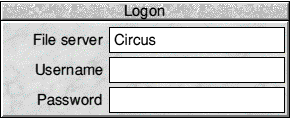
If you click on one of the file server icons, the Logon dialogue box appears, with the file server name already in the first writable icon. For example:
If you are not already logged on, you can also display this dialogue box by clicking on the Net icon on the icon bar. If you are logged on already, clicking on the Net icon will open your 'user directory' - there's more on this later.
To log on to a network file server:
Your user name is set by the network manager. Your password does not appear on the screen: this is to prevent other users seeing your password.
If you enter your user name and password correctly a directory display for your user directory (the top-level directory in your own network directory) is opened.
The Net icon on the icon bar will then change to show a connection (the text under the icon shows the file server's number or name).
If you get your user name or password wrong, an error message is displayed.
If you do not have a user directory, you are logged onto the root directory of the file server instead (but you'll only have limited access to its contents).
You can, of course, log on to several file servers; a Net icon is displayed on the icon bar for each file server.
You can set up the computer to fill in the file server entry automatically - see the chapter on Configuring under Network.
To check which file servers are available, choose FS list from the File server menu. A list of file servers is shown in a window. Full info, reached via the Display menu in this window, shows the file server net address (a number) as well as its name.
To log on to a network file server from the File server menu, move to the Logon dialogue box as previously described.
On a file server you log on to your user directory. This will normally be one or more levels down from the top level (root) directory. The user directory is sometimes referred to as the user root directory (URD). Pathnames to the user root directory begin with &.
In some cases, you may be prevented from looking at any directories other than your own. If you are not sure about your privileges, ask your network manager.
You can open the root directory of the file server by choosing
Open $
from the File server menu. If the file server has more than one disc, the disc names are displayed as a submenu; click on the disc whose root you want to display.To check how much space is available to you on a file server, choose Free from the File server menu. This displays the free space on the file server graphically in a similar manner to other disc free space displays. Free is the amount of space you have left in your user area. Used is the amount of space that has been used (by all users) on the file server. Size is the total size of the file server disc.
If you find that you are running out of space, ask your network manager for more.
When you have finished using a file server, log off by choosing Bye from the File server menu. Any directory displays for the file server will be closed. Choosing Shutdown from the Task Manager icon bar menu does this automatically.
To log on without displaying the user directory, hold down Shift and press Return for the last time when logging on; do not release Shift until the file server name or number appears under the Net icon, indicating that you are logged on.
If a file shown in a file server directory display on your screen is deleted by another user, your display is not updated automatically. If you try to open the deleted file, you will get a 'File not found' error message. The same applies to anything added. You can update the display by closing the directory display and opening it again.
Normally every user has their own directory on a file server in which they can work and save files. Your own network directory usually has the same name as your user name. It is represented on screen by the character &, so if you logged on to a file server on a hard disc called History, the directory display for your directory would have the title Net::History.&.
If the file server can't find your user directory, the directory display shows some or all of the files and directories in the root directory of the file server; however, you won't 'own' this directory (unless you are the network manager), and so your access to many of the files and directories it contains may be restricted.
You can use files and applications on the file server in the same way as you would use them directly from your own computer. They load from the hard disc on the file server into your own machine.
If you want to load applications automatically when you start up, you can save your own Desktop boot file (see Controlling tasks and memory).
When you want to save a file to your file server directory, just drag its icon into your network user directory. If you try to save a file in someone else's directory, and you do not have the privilege to do so, you will get the error message Insufficient access.
You may sometimes need to use a file that is stored in another user's directory. If the file has Public read access you can look at it, but not save any changes. However, you can change the file and then save it in your own directory by dragging the Save as icon to your own directory display.
To load a file from another user's directory, you need to display the file server's root directory, and then move down the directory structure into the other person's directory. To display the root directory, choose the menu option Open $.
The root directory display may allow access to all the user root directories. Double-click on the directory for the user whose files you want to use. There may be some icons missing from the directory display: these are for files that the owner has locked against all public access. If you try to load an application from someone else's directory, it will generate an error message if the owner has not given public read access to it. There are other reasons why you may get an error message doing this; ask your network manager for advice.
You can look at, change and delete any files in your own user directory, but you cannot change or delete files from someone else's user directory (though you may be able to look at them). Some files and directories may be hidden from you completely, so that you do not even see their icons in the directory display.
By default, other users will have no access to your files. This section gives you a quick overview of access permissions on networks. For a full explanation of access options see Setting file access permissions.
You can set the public access to your files using the Access command from the Filer menu.
The Owner access sets what you can do with the file; the Public access controls what other users can do with the file. You can lock a file against deletion to prevent you accidentally deleting it yourself, but you don't need to set this to prevent other users deleting your file as it is locked to them anyway.
If you allow public write access to your file, other users are able to alter it without your knowledge. If you allow public read access only, they can look at the file but not alter it. Never completely remove the access rights to your files by denying read and write access to yourself as well as to others.
You cannot specify the access rights to a directory, only to the files within it, but you can lock a directory against deletion using Access.
If you lock a directory or allow no public access to a file, and the network manager has enabled the hidden objects option (at the fileserver) the directory or file becomes a hidden object and is not visible to other users.
The password is a security measure to prevent other users logging on with your identity and gaining access to your protected files.
You should change your password occasionally to help preserve the security of your files. To change your password, use the *Pass command:
NET:PASS oldpassword newpasswordThe first time you set a password you may not have an old password, so use the null string "" in place of oldpassword. For example, to set your password for the first time to Hebrides, type:
Pass "" Hebrides
If you later wanted to change this to Shetland, you would type
Pass Hebrides Shetland
Your password must be at least six and not more than 22 characters long.
When you are choosing a password, do not select something very obvious that could be guessed by someone else. Do not, for example, use the date of your birthday, the name of a member of your family or a pet, your telephone number, or the registration number of your car.
In some cases, the network manager may prevent you resetting your password, or looking at any directories other than your own. If you are not sure about your privileges, ask your network manager.
If your file server also has a printer attached to it, this printer may be accessed by other users on the network. Use the Printer manager application, !Printers, to access a printer server in the same way as you would an ordinary printer.
Ask your network manager for details about which printer driver to use and the name of the network printer, then set up the printer according to the instructions given in 9 - Setting up printers on page 125.
If you want to communicate with other types of computer on the network, such as DOS and UNIX computers, you may be able to use Acorn OmniClient or the TCP/IP protocol suite software. Both of these are available from your Acorn dealer.
Acorn OmniClient is a universal desktop filer for network-based filing systems running on Acorn RISC OS computers. It allows Acorn platform users to store and retrieve files in conjunction with 'alternative' file servers, and makes the most of hardware and software located on local area networks (LANs) that use Acorn machines.
It embraces the following network filing systems:
The TCP/IP protocol suite also lets you communicate with non-Acorn computers. If the host computer is running the Network File System (NFS) then you can display files resident on the host computer in a RISC OS directory display. You can manipulate these files in the same way as you would files on your own computer.
The other item of TCP/IP software is the VT220 terminal emulator. This software lets your computer emulate a VT220 terminal in a RISC OS window. With this application you can log in to and use a remote computer. Contact your network manager for more information.
Acorn uses several types of networking systems, based on Ethernet and Econet cabling:
An easy-to-install Ethernet network for small to medium-sized installations. Allows simple disc and printer sharing between all Acorn RISC OS computers on the network. The software for this type of network is supplied as standard in your computer's ROM; all you need to do is purchase the necessary hardware.
An Ethernet network that goes one stage further than Acorn Access in that you can also have a dedicated computer that is used as a file server and a printer server (although this isn't necessarily recommended). It is also possible to use AUN on an Econet network or mixed Ethernet/Econet network, and to use Acorn Access together with file servers.
Large Ethernet networks can be set up to use TCP/IP-only protocols, as well as TCP/IP-AUN protocols, so you can connect to Acorn and non-Acorn computers.
Acorn OmniClient provides a simple, consistent view of network file services to RISC OS users, irrespective of the server type or protocol used.
Once the standard networking in schools, Econet hardware is cheap, and there are many networks already installed. However, by modern standards data transmission rates are fairly low. You can now run an AUN network with Econet.
If a new file server has been connected to your network, it will not automatically appear on the FS list. To make it do so, log on to the new file server explicitly using the file server number (ask your network manager). The next time you display the FS list, the new file server will be included.
If you copy an application from the network, you need to run the application from your local disc. If you don't do this, and try to load a file produced by the application after logging off the network, you will see the message Not logged on. This is because the computer, having 'seen' that the application came from the network, is still trying to find it there.
Note: Take care that you're not breaching any copyright by copying applications.
Serious errors, such as damage to the disc of a file server, should be handled by the network manager. The only error you are likely to meet when using the network is failure of the network itself, rather than the filing system. This can happen for a variety of reasons, both 'hard errors', such as the network becoming disconnected, and 'soft errors', such as the network becoming jammed as a result of too many people using it at the same time. Most problems tend to be soft and can be cured by trying the operation again, or by logging on to the file server again.
![]()