|
www.riscos.com Technical Support: |
Printing can be one of the most frustrating parts of using a computer. One problem faced by the people who produce software is that there is a wide range of printers working with a wide range of computers; and they don't all work the same way.
The RISC OS Printer Manager application, !Printers, has been designed to present a unified interface and consistent to applications that need to print their output.
Hundreds of articles have been written about printing with RISC OS, and almost as many about the pro's and con's of the various types of printer - inkjet, mono laser, colour laser, solid ink, etc. and this is not the place to go into the subject in depth. This chapter will just describe very briefly how to set up and use a printer under RISC OS and some of the problems you might encounter.
This normally means choosing between an inkjet or laser printer.
Inkjets are usually cheaper to buy, especially if you need colour, but more expensive to run. There is another problem in that almost all inkjet printers require special rather than generic printer drivers. Many modern inkjets, especially low cost ones, can only be used with Windows or a Mac and not with RISC OS, so be sure to check before you buy that a RISC OS printer driver is available.
The warning about low cost printers only working on Windows or Macs also applies to laser printers, but things are slightly better as many laser printers will work using PCL5 or 6 or PostScript. The first is a proprietary Hewlett Packard printer language systems and a printer that supports this (see the printer specification) will normally work with one of the HP Laserjet printer drivers supplied with RISC OS. Printers that support PostScript, both colour and mono, will usually work with the RISC OS PostScript printer driver.
In both these cases you may not be able to employ the full resolution or all the features of the printer but you should be able to use the printer at a basic level.
Unless you really know what you are doing you are strongly advised to seek expert advise from someone who understands printing with RISC OS before purchasing a printer.
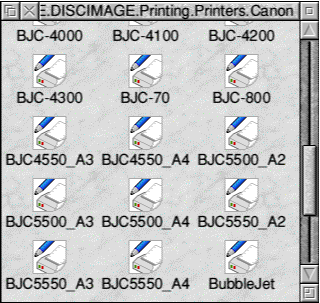
The !Printers application and the printer drivers supplied with it should be found in the Printers directory of the root directory of your hard disc. The contents of this directory should look like this;

You can ignore the Choices folder. It contains an application that can be used to hold choices files for older computers that do not have a modern !Boot application installed.
!FontPrint is a utility for setting up fonts used by PostScript printers. It has its own !Help file and if you are using a PostScript printer it is worthwhile installing !FontPrint otherwise you will not need it.
!Printers is the actual printing application. Double click on it and it will install on the icon bar. At this stage it can't be used, no printer driver has been installed. The icon will look like the one below with the word 'Printers' below it.
Printer drivers are in the Printers sub-directory of the Printers directory. Here you will find a lot more directories, one for each make of printer, plus PostScript printer drivers. To illustrate how a printer driver is installed, open the Canon directory. Part of what you will see is shown on the right. Each of these files is a Printer Definition File or PDF for a model of printer. Drag the file BJC-800 to the Printer icon on the icon bar. It will be recognised as a PDF and loaded by the Printer program and the icon will change to show that it is active. You will also see that the name of the printer driver will appear under the icon.
Click MENU on the icon and the menu shown below will appear.
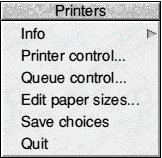
Click on Printer control and the window shown below will open. This gives brief information about the printer driver and tells you that it is the Active driver. (More about this later).

Close this window and click on Queue control. This will open the window below. Not a lot is going on here at the moment but if you click MENU over this window the menu that appears will give you some idea of its purpose.

When you begin printing each 'print job' is placed in a queue, and that queue is shown in this window. The reason for the queuing system is because printing can take some time, and if you wanted to print, say, three separate pages of text, instead of waiting for each page to finish before telling the printer to print the next you could tell it to print all three, one after the other. They would then be placed in the queue and would be printed one at a time.
The purpose of the queue window is not only to tell you what is in the queue but to give you control over it. If you change your mind about one of the items you can delete it before it's printed, or you can 'flush' the printer, that is, stop whatever it's doing and delete everything in the queue.
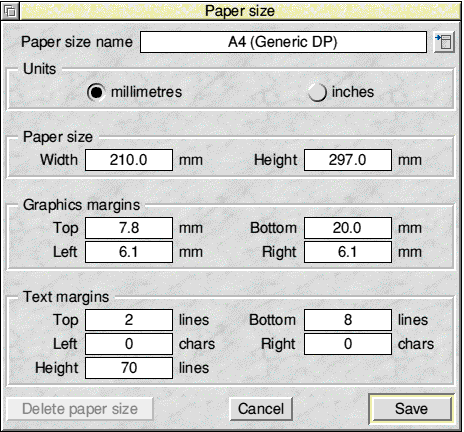
If you select Edit paper sizes from the menu the window shown below will appear. This lets you set the paper size and margins. If you are using the correct driver for your printer then these settings should be correct, unless you want to use a different paper size such as Legal. If you are using a slightly different driver, that is, one known to work with your printer but not the exact driver, then you should check the settings for the margins with your printer specification. This is particularly likely to be the case with laser printers, especially PostScript since these are generic drivers, not specific to your printer. Also modern inkjets can often print closer to the edges of the paper that older models so you may be able to reduce the margins.
When you have set everything as you want it click on Save choice s on the printer menu. This will save your settings inside !Boot and the next time you run !Printers it will start up with the correct driver, paper size, etc. ready to use.
It is now common for people to have both a mono laser printer for correspondence and a colour inkjet for printing pictures and use a two way switch in the printer lead to switch between them.
It would be inconvenient to have to install a complete new printer driver every time you changed printer. To install more than one printer driver, proceed as described above and install the driver for the first printer. Now open the Printer control window and drag the PDF for the second printer to the window. The information for the second printer will appear there and you will see that a second printer icon has appeared on the icon bar beside the first.
This icon will be pale grey. If you click on it it's colour will change, the original icon will become pale grey and you will see that the highlighted printer in the Printer control window changes.
You can now set up the second printer as previously described.
When you print anything the active printer driver is the one that will be used, that is, the one with the coloured icon on the icon bar, and you switch between them by just clicking on the icon for the printer you require.
When you have everything set click on Save choices just as before. You should note that whatever printer was active when you did this will be the one selected when you next run !Printers.
Don't forget to change both the printer switch and the printer driver when you change printers or you will get some very strange results.
This is also a good way to alternate between A4 and A3 paper sizes if you are using an A3 printer. Set the paper size on one printer to A4 and the other to A3. You will see that this has already been done for you with some of the Canon printer drivers.
Most of the time you will be printing directly from an application, but there may be times when you want to print a file without loading it into the program. The !Printer program can do this for some common file types such as a Draw or Text file.
Just drag the file icon to the printer icon on the icon bar and it will be printed.