| First Steps in Programming RISC OS Computers |
|
| Martyn Fox |
Chapter 14 : SWIs and Assembly Language
This section is intended to whet your appetite only. Entire books can be written about both these subjects and they can get very complicated.
The ARM or StrongARM processor in your machine doesn't actually know anything about Basic or even what to do with star commands. It works with very simple instructions called machine code. Basically, these instructions tell it to move numbers to and from the memory and shuffle them around within itself. RISC OS is written in machine code and when you're running a Basic program, you're actually running a part of RISC OS called the Basic interpreter. This is a large machine code program which looks at each line of your Basic program and works out what to do with it.
'Why learn machine code?', you may be wondering. For most things, you won't need to, as the version of Basic in your machine is very flexible. It's possible, though, that you'll come up with a requirement that Basic can't handle fast enough, especially when you're plotting graphics on the screen. A machine code program could probably do this faster for you. When you get more advanced, you may wish to write your own relocatable module for some purpose or other. These have to be written in machine code.
Software Interrupts
We'll concern ourselves with machine code in general later. Right now, we'll look at one particular instruction called a software interrupt or SWI. RISC OS uses this as a way of calling the many hundreds of routines contained within its ROM chip.It's worth learning about SWIs because they allow you to use parts of the operating system which do things that Basic doesn't have commands for.
The SWI instruction contains a number which can be up to 24 bits long, though only the bottom 20 bits, that is five hexadecimal digits, are used. The number determines which RISC OS routine is being called. Each SWI number also has a name which describes what it does.
An SWI is rather like a procedure in Basic. When the processor encounters one, it jumps to a particular address in RISC OS. The software there examines the number in the instruction, then executes one of the operating system routines. Afterwards, the processor returns to the instruction which followed the SWI.
The ARM processor contains a number of registers which are referred to as R0, R1, R2 and so on. Each of these can hold one 32-bit number. They have a great many uses, including passing parameters to and from the SWIs.
The SYS Command
We can use these software interrupts quite easily through the Basic SYS command. A typical command might look like this:
SYS "OS_WriteC",65
In this command, the keyword is followed by the name of the SWI in quotes. The number after the comma is put into register R0 before the SWI is called. There might be more numbers, separated by commas, in which case they are put into registers R1, R2 and so on.
If you type in this command, you must take care to get the name exactly right or you'll get an error message saying 'SWI name not known'. It's important to make the correct use of capital and lower case letters.
Each SWI name is in two parts, separated by an underline (_) symbol. The first part refers to the section of software which handles the SWI. This might be the central part or kernel which uses the prefix OS, as in this case, or it could be a relocatable module, either in the operating system ROM or loaded from disc. The second part of the name describes what the SWI does. In both cases, words are strung together without any spaces between them and each word begins with a capital letter.
When you press Return after typing in this command, the letter 'A' will appear on the screen - its ASCII code is, of course, 65. This command is the equivalent of the Basic VDU command; indeed, VDU uses this SWI. 'OS_WriteC' is short for 'Operating System Write Character' and its exact function is to send the character in register R0 to the screen.
Now let's try another one. Type:
SYS "OS_ReadC" TO a%
Notice this time the word TO before a%. Any numbers or values of variables after the SWI name but before TO are put into registers R0, R1, R2 and so on before the SWI call and any variables listed after TO are set to the numbers in the registers after the call. This means that a% will be set to whatever is in R0 after the SWI call.
When you type in this command and press Return, the Basic prompt will not reappear until you press another key. If you now type:
PRINT a%
you'll get the ASCII code for the character you typed. 'OS_ReadC' is short for 'Operating System Read Character' and there are no prizes for guessing that this SWI is the equivalent of the Basic keyword GET. It doesn't matter what is in the processor's registers when you call this SWI, but it returns with the code for the keypress in R0.
Status Flags
A SYS command might have the form:
SYS "Xxx_XxxXxx",a%,b%,c% TO x%,y%,z%;f%
In this case, 'Xxx_XxxXxx' is the name of the SWI and the values of a%, b% and c% are loaded into registers R0, R1 and R2 respectively. The SWI is then called and the contents of R0, R1 and R2 are put into x%, y% and z%respectively.
The processor also has a number of flags. These are single bits which indicate something about the last number that was processed. The ones of most interest to us at the moment are the Negative, Zero, Carry and oVerflow flags, known as N, Z, C and V respectively. These are put together to form a binary number. If the SYS command has a variable following a semi-colon (;), this variable is set to the number formed from the flags:
| Bit | Flag |
| 0 | oVerflow |
| 1 | Carry |
| 2 | Zero |
| 3 | Negative |
If you are writing a program which asks a question requiring a yes or no answer, you can use this SWI call:
SYS "OS_Confirm" TO key%;flags%
There are no parameters passed to the SWI so there are no numbers before the TO keyword.
This call waits for you to press a key. If the mouse pointer is turned on (with MOUSE ON), it changes shape to look like a mouse with the left-hand button highlighted to indicate that you should press this button to answer 'yes' and either of the other two to answer 'no'.

When you press a key or click the mouse, control is returned from the SWI to the program. The ASCII code for the key which you pressed, converted to lower case, is in R0 and is passed to key%. If you pressed 'Y' or the left-hand mouse button, the Zero flag is set which means that flags% will be 4. If you pressed Esc, the Carry flag will be set, making flags% 2. If you pressed another key or clicked one of the other mouse buttons, flags% will be zero.
Improving the Munchie Program
As we saw at the end of Section 11, the Munchie program would work better if it stored its sprites in a user sprite area within its own memory. This will not make any difference to how it looks and sounds but you will no longer have to allocate memory to the System sprite area as we won't be using it.Handling sprites in a user sprite area requires the use of SWIs, which is why we've left it until now. All sprite operations are dealt with by one SWI called OS_SpriteOp which can carry out over 40 different operations, selected by the number in R0. Complete details of this SWI are outside the scope of this guide; if you wish to use sprites extensively, you should consult the RISC OS Programmer's Reference Manual, published on CD-ROM by RISCOS Ltd., which has a complete list of SWIs and full details of how they work.
The listings in this section show modifications to the version of the program from Section 12, which has had sound added. Some of the line numbering is different as we change the number of lines in some procedures.
The first alteration is to the beginning of PROCinit:
  120 DEFPROCinit
  130 DIM sblock% 165620
  140 !sblock%=165620:sblock%!8=16
  150 SYS "OS_SpriteOp",9+256,sblock%
  160 SYS "OS_SpriteOp",10+256,sblock%,"MunSprites"
  170 dotnum%=9
In each of these listings, we'll include one or two lines before and after the ones which we modify to make it clear which part of the procedure we're looking at.
The first thing we need is a block of memory to hold our sprites. It needs to be at least as large as the MunSprites file, so we define a suitable block using the DIM keyword in line 130. As we saw in Section 9, this allocates a block of memory and sets the value of sblock% to the address of the first byte. The block needs to be just large enough to hold the sprites in the MunSprites file, plus a few extra bytes. In the mode 27 version, this is 165,620 bytes, but in the mode 12 version, we restrict it to 90,000 bytes in case you're short of memory.
Having defined our block, we need to initialise it. Before we do this, however, we must set the first word to contain the size of the block and the word beginning eight bytes in to contain the position of the start of the first sprite (16 in the case of an empty block).
All calls to OS_SpriteOp have a number called a reason code in R0 to indicate which operation we wish to carry out; the first two we shall use are reason code 9 in line 150 to initialise the block, and code 10 in line 160 to load the sprite file. The number in R0, however, indicates more than this. In order to tell the SWI that we're using a user sprite area, rather than the system sprite area, we have to set bit 8 of R0 to 1, which corresponds to adding 256 to the number. This will apply to all the calls to OS_SpriteOp in this program. To make it plain that we're calling operation number 9, we will write this as '9+256' rather than '265'.
OS_SpriteOp 9 sets up our user sprite area so that we can load a sprite file into it and the following line loads the file. In both cases, R1 contains the address of the sprite area, sblock%. In the case of OS_SpriteOp 10, R2 contains the filename or complete pathname. It's not possible, of course, to get a filename into a 32-bit register, but Basic's SYS command comes to our rescue here. What the SWI actually wants is the address of a string containing the filename and this is what the SYS command puts into R2. It can do this either with a string in quotes, as in this example, or a string variable.
The next modification is to PROCgame:
  330 FOR num%=0 TO dotnum%
  340   PROCsetdot(num%)
  350 NEXT
  360 xpos%=200:ypos%=200
  370 MOVE xpos%,ypos%
  380 SYS "OS_SpriteOp",256+28,sblock%,"mun_right",,,8
  390 start=TIME
This shows how we plot a sprite using OS_SpriteOp 28. The operation is a little different from the way we did it using star commands. Previously, we selected the sprite first, then plotted it with a PLOT instruction, quoting the coordinates of the bottom left-hand corner. In this case, we first use a MOVE command to put the graphics cursor where we want this corner to be, then call OS_SpriteOp. Once again, the address of the sprite area is in R1 and this time R2 contains the name of the sprite. The number 8 in R5 is the plot action, meaning that the sprite is plotted with a mask, if it has one.
The remaining modifications all make the same use of OS_SpriteOp 28:
  760 DEFPROCleft
  770 PROCrubout(xpos%,ypos%)
  780 xpos%-=hstep%
  790 PROCcollision
  800 MOVE xpos%,ypos%
  810 IFxpos% MOD (hstep%*2)=0 THEN SYS "OS_SpriteOp",28+256,sblock%,"mun_left"
,,,8 ELSE SYS "OS_SpriteOp",28+256,sblock%,"mun_left2",,,8
  820 ENDPROC
  830 :
PROCright, PROCup and PROCdown are modified in the same manner as PROCleft, with the appropriate sprite names and xpos% and hstep% replaced with ypos% and vstep% in PROCup and PROCdown.
The only other procedure to modify is PROCbackground:
 1240 DEFPROCbackground
 1250 MOVE 0,0
 1260 SYS "OS_SpriteOp",28+256,sblock%,"mun_bg"
 1270 ENDPROC
 1280 :
You will notice that the three commas and number 8 are missing from the end of line 1260. This is because there is no point in plotting the mun_bg sprite with a mask as it hasn't got one - it fills the whole screen. The number for simply plotting the sprite is zero. If we don't tell the SYS command which number to put in a particular register, it automatically gives it a zero, so there is no point in telling it to put zero in R5.
Assembly Language and Machine Code
As we saw at the beginning of this section, the ARM or StrongARM processor in your machine only understands a simple set of instructions called machine code. To understand what this is all about, let's look at some.Just suppose you had loaded a file into memory, beginning at address &9000. To see the first few bytes, you would type:
*Memory 9000
You would see something which starts like this:
Address  :  3 2 1 0  7 6 5 4  B A 9 8  F E D C :    ASCII Data
00009000 : E28F00F0 E28C2000 E04D3002 EF020049 : ð.?â. ...â.0MàI..ï
00009010 : 61A0F00E E4926004 E4D67001 E4D63001 : .ða.`«ä.pÖä.0Öä
00009020 : E0877403 E4924004 E4D45001 E4D43001 : .t...à.@«ä.PÔä.0Ôä
00009030 : E0855403 E3550004 3A000024 E5D43000 : .TYà..Uã$..:.0Ôå
00009040 : E333006E 1333004E 1A000020 E5D43001 : n.3ãN.3. ....0Ôå
and so on.
You'll no doubt agree that this is pretty well incomprehensible. You can certainly see the contents of each four-byte word but the numbers don't convey anything to us; neither do the equivalent characters shown on the right-hand side of the display.
Each word, however, contains an individual instruction telling the processor to do something. This is machine code but it's obvious that we need a much simpler way of reading, writing and understanding it.
Disassembling the Code
Now suppose you looked at the memory again, but this time typed:
*MemoryI 9000
Notice the letter I on the end of the command. This time, you would see:
00009000 : ð.?â : E28F00F0 : ADR    R0,&000090F8
00009004 : . .â : E28C2000 : ADD    R2,R12,#0
00009008 : .0Mà : E04D3002 : SUB    R3,R13,R2
0000900C : I..ï : EF020049 : SWI    XOS_ReadArgs
00009010 : .ð a : 61A0F00E : MOVVS  PC,R14
00009014 : .`«ä : E4926004 : LDR    R6,[R2],#4
00009018 : .pÖä : E4D67001 : LDRB   R7,[R6],#1
0000901C : .0Öä : E4D63001 : LDRB   R3,[R6],#1
00009020 : .t à : E0877403 : ADD    R7,R7,R3,LSL #8
00009024 : .@«ä : E4924004 : LDR    R4,[R2],#4
00009028 : .PÔä : E4D45001 : LDRB   R5,[R4],#1
0000902C : .0Ôä : E4D43001 : LDRB   R3,[R4],#1
00009030 : .TYà : E0855403 : ADD    R5,R5,R3,LSL #8
00009034 : ..Uã : E3550004 : CMP    R5,#4
00009038 : $..: : 3A000024 : BCC    &000090D0
0000903C : .0Ôå : E5D43000 : LDRB   R3,[R4,#0]
00009040 : n.3ã : E333006E : TEQ    R3,#&6E            ; ="n"
00009044 : N.3. : 1333004E : TEQNE  R3,#&4E            ; ="N"
00009048 :  ... : 1A000020 : BNE    &000090D0
0000904C : .0Ôå : E5D43001 : LDRB   R3,[R4,#1]
00009050 : e.3ã : E3330065 : TEQ    R3,#&65            ; ="e"
00009054 : E.3. : 13330045 : TEQNE  R3,#&45            ; ="E"
00009058 : .... : 1A00001C : BNE    &000090D0
0000905C : .0Ôå : E5D43002 : LDRB   R3,[R4,#2]
We have one line for each word this time, as you can see by the way the numbers increase down the left-hand side, and that means one line for each instruction. The second column shows the characters that the bytes would stand for if they were ASCII codes and the third column the contents of the word.
Mnemonics
It is the next two columns which are of most interest to us. The first of these contains some letters which make up a mnemonic - a description of what the instruction does - and the column next to it tells us which registers or numbers it works with. This is a big step towards understanding what all those numbers mean!As an example, look at the line at address &9008, which says:
SUB R3,R13,R2
This means 'subtract the number in register 2 from that in register 13 and store the result in register 3'. Not much in itself, but a vital small component of a much larger program.
It's possible to follow the workings of a program of this sort without troubling ourselves with the hexadecimal digits in the machine code instructions at all. We simply need to look at the mnemonics and the list of registers. Indeed, this is the way to create a machine code program - not by typing in all those incomprehensible numbers, but with the language of the mnemonics. This is known as Assembly Language and the software that you write it with is called an assembler. The software that we just showed being used to go the other way and produce assembly language from machine code is called a disassembler.
Writing Assembly Language
Fortunately for us, the Basic language in your machine includes a built-in assembler. We'll see how to use it shortly. First, though, we need to understand something about the internal structure of the ARM or StrongARM processor.As we saw at the beginning of this section, the processor contains a number of registers. In fact, there are 16 in action at any one time. The processor has several modes of operation and when it changes mode, some of the higher numbered registers are replaced by others. We'll only ever write code for it to run in its User mode, so we are just concerned with 16 registers, numbered R0 to R15.
Register R15 is a very special one, known as the program counter. This stores the address that the next instruction is to be taken from and is increased by 4 each time an instruction is read, ready for the next one. Some instructions, known as branches, make the program jump to a different address by changing the number in the program counter, rather like a GOTO instruction in Basic.
Some other instructions, known as branch linking instructions, make the program jump to a new address but keep a note of the old one, so that it may return. This is rather like using a GOSUB command or calling a procedure in Basic. Remembering the return address is where register R14 comes in. This is known as the link register and branch linking instructions automatically store their return addresses in it.
Now let's try writing some assembly language. The first thing we need is some memory in which to assembly the machine code. This is where our old friend the DIM command comes in. If you want to try it yourself, start up Basic and type in the following program, though you'll also find it in the listings. We'll look at how it works when you've done it:
    10 REM > M_Code1
    20 REM first experiment in assembly language
    30 ON ERROR REPORT:PRINT " at line ";ERL:END
    40 DIM code% 1000
    50 P%=code%
    60 [OPT 3
    70 MOV R0,#65
    80 SWI "OS_WriteC"
    90 MOV PC,R14
   100 ]
Line 40 sets aside a block of 1000 bytes for our machine code which is enough for 250 instructions. We're not going to write anything like this number but it gives us plenty of space to expand our program without having to remember to increase it.
Line 50 sets variable P% to the start of this block. When the assembler is at work, it treats P% as the program counter, putting each instruction word in the address which it contains, increasing it by 4 after each instruction and using it to work out the numbers in branch instructions. The result of line 50 is that the first instruction will go into the first word of the block.
Controlling Assembly With OPT
The square bracket in line 60 turns on the assembler. The number after the OPT keyword controls how the assembler behaves. If bit 0 is clear (a zero), the assembled program isn't shown on the screen. If it's set (a 1), you can see what the assembler has produced. If bit 1 is clear, the assembler ignores references to Basic variables which it doesn't know about, which usually refer to addresses further down the program. If it's set, unknown variables produce an error. The number after OPT in this case is 3, which has both bits set, so the assembly will be shown on the screen and any errors reported.Lines 70 to 90 contain the assembly language instructions which we'll look at in a moment. The closing square bracket in line 100 turns off the assembler.
When you RUN the program, you should see something like this:
 00008FC4                    OPT 3
 00008FC4 E3A00041           MOV R0,#65
 00008FC8 EF000000           SWI "OS_WriteC"
 00008FCC E1A0F00E           MOV PC,R14
 >
In this case Basic created the memory block at &8FC4. Your numbers may be different if you had more or fewer spaces in your program or some other difference.
The first instruction is a MOV command. This is one of the simplest commands and tells the processor to move a number into one of the registers. This might be the contents of another register, but in this case it's an immediate instruction, meaning 'move the number contained in this instruction into R0' - in other words, load R0 with 65. The thing that tells the assembler that it's an immediate instruction is the hash (#) symbol before the number.
The next instruction calls a software interrupt routine. You'll remember this one from the first part of this section. It's OS_WriteC which sends the number in R0 to the screen and you'll probably be aware that this short program is going to print an 'A' on the screen.
Getting Back to Basic
There's one last thing for the program to do, though. After printing the letter, it must return control to the Basic interpreter. When Basic makes the processor jump to your code, it does so with a branch linking instruction which means that the return address is stored in R14. To get back to Basic, all we have to do is copy this address into the program counter and that is what the MOV command in line 90 does. We can refer to R15 as 'PC' to remind us of what it does. Indeed, we can give any register the name of a Basic variable by setting up the variables before we start up the assembler.When you typed RUN, the program only assembled the machine code, it didn't actually run the code itself. That's why there is no letter 'A' on the screen. To run the code, you have to CALL it. Before you do this, though, there is one golden rule about writing assembly language which you should follow; always save it before you call the code. It's always a good idea to save programs before you run them anyway of course, but it's particularly important when dealing with machine code. The Basic interpreter is full of routines to check for mistakes, which is why it can produce so many error messages. Machine code has none of these checks (unless you write them into your program) and any mistake can easily cause the entire machine to crash. The only way out of this situation is often to press the reset button or switch the machine off and on again, which would cause the loss of your program, if you hadn't saved it.
Having ensured that your program is safely stored on disc, you can run the machine code by typing:
CALL code%
The file M_Code1a in the listings has this command added, preceded by a 'REPEAT UNTIL GET' loop which waits for you to press a key. Provided you've run the program to assemble the code, Basic will know the value of code% and will load this number into the processor's program counter to make it jump to your code, You should now have your 'A' on the screen, followed by the Basic prompt or a 'Press space or click mouse' message.
Using Basic Variables
Because the assembler is part of the Basic interpreter, you can use Basic variables to represent numbers and addresses. This can make writing your program a lot easier. In our first example program, for instance, we told the machine to load R0 with 65, which we knew was the ASCII code for 'A'. To save looking it up, we could have written the line as:
MOV R0,#ASC("A")
ASC, you will remember, gives the ASCII code of the character in brackets, so this line produces exactly the same machine code instruction as the previous version.
It's also possible to use a Basic variable as a label. This is a way of marking a particular address so that you can make the program branch to it or move numbers in and out of it.
Let's try a slightly more complicated program:
    10 REM > M_Code2
    20 REM Demonstrates use of labels in assembly language
    30 ON ERROR REPORT:PRINT " at line ";ERL:END
    40 DIM code% 1000
    50 P%=code%
    60 [OPT 3
    70 .data
    80 EQUD 65
    90 .start
   100 ADR R1,data
   110 LDR R0,[R1]
   120 SWI "OS_WriteC"
   130 MOV PC,R14
   140 ]
   150 REPEAT UNTIL GET
   160 CALL start
The word 'data' with a full stop in front of it in line 70 is a Basic variable used as a label. When the program gets to this line, data is given the current value of P% which, you will remember, is keeping track of the address of each instruction. In this example, in fact, data will have the same value as code%, the start of the block, but that doesn't matter.
The keyword EQUD is a way of putting a particular number into four bytes of memory when using the assembler. You could also use EQUW, which inserts two bytes, EQUB, which inserts one or EQUS, which inserts a string, as we shall see shortly.
To make it a little easier to remember which is which, EQUW means 'insert a word' and EQUD 'insert a double word'. This may seem a little strange as a word is four bytes.
The reason for this little anomaly is that BBC Basic was originally devised for the BBC Microcomputer, which was an 8-bit machine. It was decided at the time that 16 bits, or two bytes, would form a word. With the coming of 32-bit machines, 'word' has been redefined to mean 32 bits or four bytes. The original meanings of EQUW and EQUD have been kept for reasons of compatibility with the earlier machines.
Keeping Things Word-Aligned
Line 80, then, inserts number 65 into the first of four bytes at the beginning of the memory block. We're using EQUD rather than EQUB because it's important to use up four bytes so that the machine code instruction in the next line starts on a word-aligned address, that is one which is divisible by four. An alternative would be to use EQUB and add an extra line:
85 ALIGN
This increases P% if necessary, so that it's divisible by four.
Because the first word at the beginning of the block is no longer where the machine code instructions start, we need to tell the machine to jump to somewhere different when we call the code, so we'll use another label to mark the start of the code itself. What better name than 'start'! By the way, you can put a label on the same line as the instruction that follows it if you wish, provided you leave a space between the two. It's up to you. It's mainly a matter of making the program as readable and easy to understand as possible.
Instead of loading R0 directly with the number to be printed, we're going to load it from memory, so the first instruction has been altered. We can't directly tell the machine which address to load from because there are not enough spare bits available in the instruction word to hold an entire address, so we have to load the address into another register, R1. The simplest way to do this is with the ADR command. This isn't actually a machine code instruction at all. The assembler uses it to construct an instruction to add or subtract an appropriate number from the current value of the program counter.
Line 110 contains an instruction to load R0 from the address in R1, which is what we want.
To call this program, we mustn't CALL code% this time, or the processor will attempt to execute the 'instruction' in the first word which, of course, isn't an instruction at all. The result would be very unpredictable! To call the start of the code, we use the instruction:
CALL start
which will be executed when you press a key.
Because the number in the first byte is put there when the code is assembled, you can overwrite it between running the program and calling the machine code. If, for example, you were to type:
!data=66
the program would print 'B' instead of 'A'.
Two-Pass Assembly
You may be thinking 'Why not put the data after the code so that the code starts at the beginning of the memory block?'. We can certainly do this, but there's a snag. Line 100 refers to the label 'data', which is a Basic variable. As our program stands, Basic knows the value of data when it gets to this line, because it had already been set up in line 70. If data came at the end though, line 100 would have to set up an instruction referring to the value of a variable which it hadn't yet met.This is a job for OPT, which controls how the assembler behaves. You will remember that if bit 1 of the OPT number is zero, the assembler ignores errors of the 'Unknown or missing variable' type. It can't assemble all the instructions properly because it doesn't know the values to put in them but it can put something in their places.
The solution is to assemble the code twice. The first time, we go through it with an OPT value of zero (we don't need to display it both times). The code is assembled but not all of it is correct. At the end of this first pass, however, Basic knows the values of all the variables which are used as labels. On the second pass, we use an OPT number of 3 and it does the job properly, displaying the result.
What better way of doing a job twice in Basic than with a FOR ... NEXT loop:
    10 REM > M_Code2a
    20 REM two pass assembly
    30 ON ERROR REPORT:PRINT " at line ";ERL:END
    40 DIM code% 1000
    50 FOR pass%=0 TO 3 STEP 3
    60   P%=code%
    70   [OPT pass%
    80   .start
    90   ADR R1,data
   100   LDR R0,[R1]
   110   SWI "OS_WriteC"
   120   MOV PC,R14
   130   .data
   140   EQUD 65
   150   ]
   160 NEXT
   170 REPEAT UNTIL GET
   180 CALL start
Two Different Types of Pass
We need an OPT number of 0 for the first pass and 3 for the second. Line 50 provides this. Notice that the line setting up P% (line 60) is inside the FOR...NEXT loop. This is important because both passes of the assembler have to begin with the same value of P% in order to assemble the code at the same place each time. At the end of the first pass, P% would have been increased to the address where the assembled code ends and that is where the second pass would start if we didn't reset it.When line 90 is reached on the first pass, Basic doesn't know anything about the variable called data because it hasn't reached line 130 in which it's created, so it can't create the instruction properly. Instead, it allocates one word to it and continues. By the time it gets to the NEXT command in line 160, it knows all about data and any other labels we used in the program. On the second time round the loop, it's able to generate the ADR instruction properly.
Using Loops in Machine Code
Let's try just one more example before we leave machine code. You'll be very familiar now with things like REPEAT ... UNTIL loops and IF ... THEN structures. These devices are the key to any type of computer programming, whether in Basic, assembly language or anything else. We're going to use a couple of them to print a string backwards.Here is our final assembly language program in this guide, called M_Code3. It's a bit longer, so click here to load it into a separate window
We've dispensed with the loop that waits for you to press a key this time. When you run the program, the code will be assembled and CALLed immediately, and the cursor will appear on the next line, waiting for you to enter a string. Type in anything you like, then press Return. Your string will appear backwards on the next line.
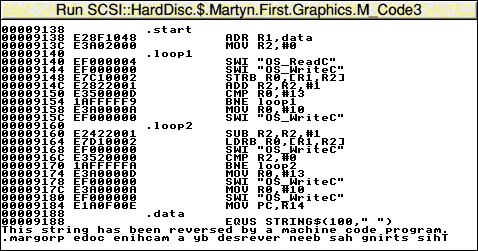
The beginning and end of the program are the same as before. Virtually all assembly language programs start and finish like this, defining a block of memory to hold the assembled code, setting up a FOR ... NEXT loop to do two-pass assembly and setting P% to the start of the block.
The string that we type in will be put into a block of memory called a buffer. This is set up by defining a string at the address where our 'data' label is located, consisting of 100 spaces (you can increase this up to 255, if you think you'll want to type in a longer string than this). As the block which holds the assembled program is 1000 bytes long and the rest of it isn't used for anything else, it probably doesn't matter whether we set up this string or not, but it would matter if we were to assemble some more code following this buffer.
The machine code starts in line 90 in the same way as in our previous program, by loading R1 with the address of the buffer. We also load zero into R2, using a MOV instruction in immediate mode.
Line 110 is the start of our first loop. There isn't a special instruction at the start of a loop - just a label so that we can set up a branch instruction to jump back to it at the end.
The first action of the loop is to read a character from the keyboard. You will remember we did this in the first part of this section, dealing with SWIs. We're doing it the same way here, using OS_ReadC which returns with the ASCII code for the character in R0. The following line prints the character on the screen so that we can see it.
Storing Bytes in Memory
Line 140 stores the character in the buffer. We saw an LDR instruction, which loads a word into a register, in our earlier examples. There is a similar instruction, STR, which stores a word. The instruction in line 140, though, is STRB, which means 'store a single byte'. It stores the bottom eight bits of R0 at an address determined by whatever is between the rectangular brackets.In this case, the instruction means 'store the byte that's in the bottom eight bits of R0 at the address found by adding the contents of R1 and R2 together'. Because R2 contains zero the first time round the loop, this is the same as the address in R1, which is the first byte of the buffer at the 'data' label. After doing this, though, we increase R2 by 1 which we do in line 150 by adding 1 to the number in R2 and storing the result back in R2. On the next time round the loop, the character will go into the next byte of the buffer. This process continues until we press Return.
The instruction in line 160 compares two numbers, in this case the contents of R0 and the immediate number 13. Doing this has an effect on the processor's flags which were referred to in the section of this section on SWIs. If the two numbers are equal, the zero flag will be set to one, otherwise it will be cleared to zero. We make use of this fact in the following line.
What the CMP instruction is doing is checking to see if we've pressed the Return key, which produced ASCII code 13. If we have, the instruction will set the zero flag.
The BNE instruction in line 170 means 'Branch if Not Equal'. This really means 'branch to the loop1 label if the zero flag isn't set'. As we've seen, this will be the case if the character we typed isn't a Return.
Once we type a Return, then, the program doesn't branch back to the beginning of the loop, but carries straight on. Imagine the situation if we had typed 'ABCDEFGH' and pressed Return. We would have gone round the loop a total of nine times and the buffer would contain nine characters - eight ASCII codes for letters A to H and one code 13 for the Return, which would have been stored in address data+8. The number in R2 would be 9 because it was increased by 1 after storing the Return code.
Reading the String Out Again
The effect of sending code 13 to the screen would have been to send the cursor back to the beginning of the line. To avoid overwriting the string we've just entered with the one we're about to produce, we need to move it down one line, which requires a Line Feed character (code 10). Lines 180 and 190 send this to the screen. Having done that, we can start reading the string backwards out of the buffer and printing it.Because of the way things were after we left the first loop, R1+R2 together contain the address of the byte following the Return character so we'll start our second loop by subtracting 1 from R2. We then read a byte from the buffer, send it to the screen and go back to subtract another 1 from R2. By this means, we read the string backwards. When we've dealt with the first character that we'd typed in, R2 will have zero in it. After printing each character, we check for this in line 240 and branch back for another character if we haven't reached the beginning of the string.
If we returned to Basic at this point, the Basic prompt would reappear on the end of the reversed string. It would be nice to tidy up the program by moving it to the beginning of the following line, which again needs a Return and a Line Feed. Lines 260 to 290 send these two characters to the screen and we finally return to Basic in line 300.
Graphics in Assembly Language
The previous example will have shown you how to use VDU calls in an assembly language program. If you look at Appendix 2 you will see that VDU calls can do a great many things, from making a beep to changing screen mode. You can do all these things using OS_WriteC.You will also discover from Appendixes 2 and 3 that virtually any graphics drawing operation can be done using a PLOT operation and that PLOT may be reduced to VDU 25 plus a further five bytes. You could certainly do this in assembly language by calling OS_WriteC six times but there is a quicker way. Basic's PLOT command uses a special SWI called OS_Plot, which cuts the number of operating system calls from six to one.
The PLOT code is in register R0, R1 contains the x coordinate and R2 the y coordinate. The Basic command:
PLOT 85,300,200
for example, draws a filled triangle between (300,200) and the previous two points visited by the graphics cursor. Using the SWI, this becomes:
SYS "OS_Plot",85,300,200
The Meaning of RISC
You may have noticed from these examples that the command for loading an immediate number into a register is the same as that for copying the contents of one register into another and it's even the same as the one which returns from a subroutine or hands back to Basic at the end of our machine code. In each case, it's done with a MOV command.This is an example of the way in which a few instructions have a great many uses in the ARM or StrongARM processor. Because it uses fewer instructions than some other processors, it's known as a Reduced Instruction Set Computer, or RISC for short.
The great advantage of a RISC processor is its speed - because there are fewer types of instruction, it takes less time to work out which one it's dealing with. That's why your RISCOS machine is so fast compared with some other computers with similar clock speeds.
Another reason for its high speed is that every instruction is contained within one four-byte word, including all the numbers that it has to work with. Because your data bus is 32 bits wide, these four bytes are loaded into the processor in one fell swoop.
Some other processors have to load an instruction, check what it is, then load some more bytes containing the required numbers. This takes more time. The ARM processor, in fact, loads one instruction, decodes it while loading the next one and executes it while loading the third one and decoding the second!
As you will appreciate, there is a great deal more to software interrupts and machine code than we've dealt with in this section. You should, however, have a good idea of how the SYS command allows you to use SWIs in Basic and how the assembler works.
We relied in this last program on the fact that both OS_ReadC and OS_WriteC had no effect on the contents of R0, R1 and R2, except for the action of OS_ReadC, which puts the code for the key pressed in R0. This isn't always the case; some SWIs change the numbers in some of the registers they use.
To use SWIs, you need complete details of what they do and which registers they use. All these details are to be found in the RISC OS Programmer's Reference Manual.
You'll also appreciate that we only scratched the surface of machine code and assembly language, just introducing the instructions that we needed for our little experiments.