
|
www.riscos.com Technical Support: |
This chapter describes the Window Manager. It provides the facilities you need to write applications that work in the Desktop windowing environment that RISC OS provides.
The Window Manager is an important part of RISC OS because:
This chapter also gives guidelines on how your applications should behave so that they are consistent with other RISC OS applications. This should make it easier for users to learn how to use your software, as they will already be familiar with the necessary techniques.
You will find it benefits both you and other programmers if you make all your applications run under the Window Manager (and in a consistent manner), since this will lead to a much richer RISC OS environment.
The Window Manager is designed to simplify the task of producing programs to run under a WIMP (Windows, Icons, Menus and Pointer) environment. The manager itself is usually referred to as the Wimp. Programs that run under the Wimp are often called tasks, because they are operating under a multi-tasking environment. In this section, the words task, program and application should be treated as synonyms.
An immediately recognisable feature of Wimp programs is their use of overlapping rectangular windows on the screen. These are used to implement a 'desktop' metaphor, where the windows represent documents on a desk. The responsibility of drawing and maintaining these windows is shared between the application(s) and the Window Manager.
The Wimp co-operates with the task in keeping the screen display correct by telling the task when something needs to be redrawn. Thus, the task needs to make as few intelligent decisions as possible. It merely has to respond appropriately to the messages it receives from the Wimp, in addition to performing its own processing (using the routines supplied to perform window operations).
Very often, much of the work of keeping a window's contents up to date can be delegated to the Wimp. This is especially true if a program takes advantage of icons. An icon is a rectangular area in a window whose contents can be text, a sprite, both, or user-drawn graphics. In the first three cases, the Wimp can maintain the icon automatically, even to the point of performing text input without the application's intervention.
Menus also form an important part of WIMP-based programs. RISC OS Wimp menus are pop-up. That is, they can be made to appear when the user clicks on the appropriate mouse button - the middle Menu button. This is an alternative to the menu bar approach, where an area of the screen is dedicated to providing a fixed set of menu headers. In a multi-tasking environment, pop-up menus are much more useable. Further, they can be context-sensitive, i.e. the menu that pops up is appropriate to the mouse pointer position when the Menu button was pressed.
The Wimp provides support for nested menus, where one menu entry can lead to another menu, to any desired depth. Moreover, the 'leaf' of a menu structure can be a general window, not just a fixed text item. This allows for very flexible selections to be made from menus.
A very powerful feature of the RISC OS Wimp is its support for co-operative multi-tasking. Several programs can be active at once. They gain control on return from the Wimp's polling routine, which is described below. There is normally no pre-emption. Pre-emption means the removal of control from a task at arbitrary times, without its prior knowledge. With polling, a task only relinquishes control when it chooses, so for the system to work, tasks must be well behaved. This means they must not spend too much time between polling, otherwise other tasks will be prevented from running. However, it is possible to enforce pre-emption for non-Wimp tasks, by running them in for example, the edit application's task window.
To allow several applications to run at once, the Wimp must also perform memory management. This allows each application to 'see' a standard address space starting at &8000 whenever it has control. As far as a task is concerned, it is the only user of the application workspace. The amount of workspace that a task has is settable before it starts up. A program does not therefore have to be written with multi-tasking in mind. A task that does everything correctly will work whether it is the only program running, or one of several.
Communication between tasks is possible. In fact, it is often necessary, as the Task Manager sometimes needs to 'talk' to the programs it is controlling. The Wimp implements a general and very powerful message-passing scheme. Messages are used to inform tasks of such events as screen mode and palette changes, and to implement a general purpose file transfer facility.
The next section gives an overview of the major components of the RISC OS Window Manager.
Central to any program running under the Wimp environment is its polling loop. Wimp programs are event driven. This means that instead of the program directing the user through various steps, the program waits for the user to control it. It responds to events. An event is a message sent to a task by the Wimp, or by another task. Events are usually generated in response to the user performing some action, such as clicking a mouse button, moving the pointer, selecting a menu item, etc. Inter-task ('user') messages are also passed through the polling loop.
An application calls the routine Wimp_Poll to find out which events, if any, are pending for it. This routine returns a number giving the event type, and some event-specific information in a parameter block supplied by the caller. One event is Null_Reason_Code (0), which means nothing in particular needs to be done. The program can use this event to perform any background processing.
In very broad terms, Wimp applications have the following (simplified) structure:
SYS "Wimp_Initialise"                      Tell the Wimp about the task
finished% = FALSE                          256-byte block for Wimp_Poll
DIM block% 255
REPEAT
  SYS "Wimp_Poll",0,block% TO event_code%  Get the event code to process
  CASE event_code% OF
    WHEN 0:
    ...                                    Do Null_Reason_Code
    WHEN 1:
    ...                                    Do Redraw_Window_Request
    ...                                    etc.
  ENDCASE
UNTIL finished%
SYS "Wimp_CloseDown"                       Tell Wimp we've finished
Currently, event codes in the range 0 to 19 are returned, though not all of these are used. A fully specified Wimp program will have WHEN (or equivalent) routines to deal with most of them.
Some of the event types are fairly esoteric and can be ignored by many programs. It is very important that tasks do not complain about unrecognised event codes; they should simply ignore them.
Better still is to avoid receiving them in the first place. When calling Wimp_Poll, the program can mask out certain events if it does not want to hear about them at the moment. For example, if the program doesn't need to know about the pointer leaving or entering a window, it could mask out these events. This makes the whole system more efficient, as the Wimp will not bother to pass control to a task which will simply ignore the event. Some events are unmaskable; for example, an application must respond to Open_Window_Request.
As noted above, events are usually generated internally by the Wimp. However, a user task may also send messages, which result in Wimp_Poll events being generated at the destination task. For example, the Madness application moves all of the windows around the screen by sending an Open_Window_Request message to their owners. A more useful use of messages is the data transfer protocol. Most messages sent between tasks are of type User_Message_xxx (17, 18 and 19). For details of these see the documentation of Wimp_SendMessage, and the Wimp messages.
If you don't really need Null_Reason_Code events, you should mask them out when you call Wimp_Poll. This avoids the Wimp passing control to your application, only for your application to immediately return control to the Wimp by calling Wimp_Poll again; this of course would slow the system down. If you do need to take null events you should use Wimp_PollIdle rather than Wimp_Poll, unless the user is directly involved (e.g. when dragging an object) and responsiveness is important.
All of the event types are described in the Wimp_Poll, along with descriptions of how the application should respond to them.
Much of what is said below is to do with consistency and standards. Providing the user with a consistent, reliable interface is the first step towards producing a powerful environment, and one that the user will want to work with instead of just being forced to. For a full description of the general principles you should adopt in writing an application to run under the Wimp see the chapter entitled General principles in the RISC OS Style Guide.
The following table outlines those sections in the chapter entitled General Principles, in the RISC OS Style Guide, which describe the basic principles you should follow:
| Section | describes: |
|---|---|
| Ease of use | how to make your application easy to use. |
| Consistency | how to make applications work together in a uniform way. |
| Quality | what not to do to ensure an application will continue to work with future operating system upgrades. |
| Different configurations | how to ensure your application works with any reasonable hardware configuration that runs RISC OS. |
| File handling | the rules for specifying files. |
| Naming fonts | the syntax to use in naming fonts. |
| Supporting !Help | what help you should provide in supporting the !Help application, and what you can assume the user knows. |
The following points should be noted, to ensure that your application is compatible with future versions of the Wimp and behaves as well as it can with old versions of the Wimp.
RISC OS system software has been written to allow you to write fast, responsive applications. For a description of how best to optimise the responsiveness of your application see the section entitled Responsiveness in the Screen handling chapter of the RISC OS Style Guide.
Covering a wide range of screen modes can seem troublesome when constructing an application, but it allows a wide price-range for the end user, who can choose between resolution and cost. Not relying on screen size allows your program to move easily to new better screens and modes when they become available.
Your application will be easier to understand if your prompts and documentation use the standard RISC OS terminology defined in the chapter entitled Terminology in the RISC OS Style Guide.
For a description of mouse buttons and operations see the section entitled Mouse buttons in the Terminology chapter in the RISC OS Style Guide.
Always use Select as the 'primary' button of the mouse, used for pointing at things, dragging etc. Adjust is used for less common or less obvious functions, or for slight variations and speedups. If you have no useful separate operation in any particular context, then make Adjust do nothing rather than duplicating the functionality of Select: this is all part of training the user to use Select first.
Another technique for speedups and variations on mouse operations is to look at the setting of the Shift key when the mouse event occurs. Such combinations should never be necessary to the operation of a program, for example, a user experimenting with your program should not be expected to try all such combinations.
The Wimp automatically detects double clicks, typically used to mean 'open object'. It should be noted that a double click causes a single click event to be sent to the program first. Some other systems avoid this, which may appear to simplify the task of programming but leads to reduced responsiveness to mouse operations (because the application doesn't get to hear about the first click until the WIMP system is sure it's not a double click). A double click should in any case be thought of as a consolidation of a single click.
Various parts of the Wimp enforce the interpretations given for the mouse buttons in the Style Guide. For example, icons may be programmed to respond in various ways to clicks with the Adjust and Select buttons, by setting their button type. On the other hand, a click on the Menu button is always reported in exactly the same way, regardless of where it occurs, as a Mouse_Click event with the button state set to 2. This is to encourage all programs to interpret a click on the middle button in the same way - as a request to open a menu.
Windows consist of a visible area, in which the task can draw graphics, and a surrounding 'system' area, comprising a Title Bar, scroll bar indicators and so on. The task does not normally draw directly in this area, except the Title Bar. The visible area provides a window into a larger region, called the work area. You can imagine the work area to be the complete document you are working with, and the visible area a window into this.
There are, therefore, two sets of coordinates to deal with when setting up a window. The visible area coordinates determine where the window will appear on the screen and its size. These are given in terms of OS graphics units, with the origin in its default position at the bottom left of the screen.
Then there are the work area coordinates. These give the minimum and maximum x and y coordinate of the whole document. The limits of the work area are sometimes called its extent. The work area is specified when a window is created, but can be altered using the Wimp_SetExtent call.
Between the work area coordinates and the visible area coordinates is a final pair which join the two together. These are the scroll offsets. They indicate which part of the work area is shown by the visible area - this is called the visible work area.
The scroll offsets give the coordinates of the pixel in the work area which is displayed at the top lefthand corner of the visible region. Suppose the visible region shows the very top left of the work area. Then the x scroll position would be 'work area x min', and the y scroll position would be 'work area y max'.
It is common to define the work area such that its origin (0,0) is at the top left of the document. This means that all x scroll offsets are positive (as you can only ever be on or to the right of the work area origin), and all y offsets are zero or negative (as you can only ever be on or below the work area origin).
To summarise, let's consider which part of the work area will be visible, and where it will appear on the screen, for a typical set of coordinates.
The following definitions give the total document size:
work_area_x_min = 0
work_area_y_min = -1500
work_area_x_max = 1000
work_area_y_max = 0
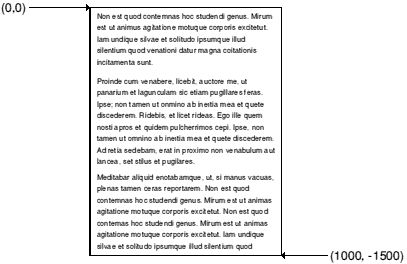
The document is therefore 1000 units wide by 1500 high, with the work area origin at the top left of the document.
The following definitions give the window's position on the screen and its size:
visible_area_x_min = 200
visible_area_y_min = 500
visible_area_x_max = 500
visible_area_y_max = 800
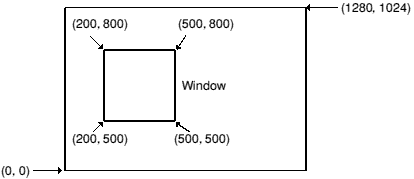
This gives a window 300 units wide by 300 high.
The following definitions determine which part of the work area is displayed:
scroll_offset_x = 250
scroll_offset_y = -400
Thus the pixel at the top left of the window is shown on the screen at coordinates (200,800), but represents the point (250,-400) in the work area:
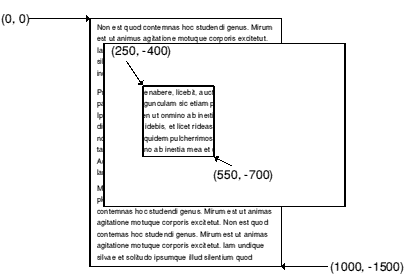
Combining the above bits of information, we can work out what portion of the work area is visible. By definition, the minimum x coordinate and the maximum y coordinate of the visible work area are just the scroll offsets. The maximum x and minimum y can then be derived by adding the width and subtracting the height respectively of the displayed window:
visible_work_area_min_x = scroll_offset_x = 250
visible_work_area_max_y = scroll_offset_y = -400
visible_work_area_max_x = scroll_offset_x + width = 550
visible_work_area_min_y = scroll_offset_y - height = -700
Thus on the screen at coordinates (200,500) - (500,800) would be a 300 pixel-square window showing the visible work area (250,-400) - (550,-700):
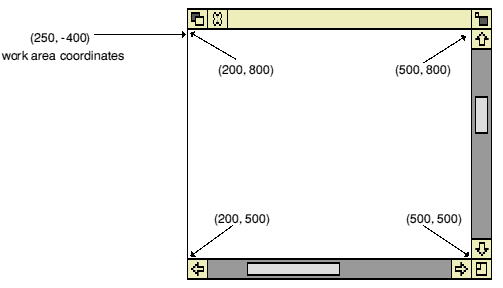
Moreover, the Sliders drawn by the system have a length proportional to the area that the window displays. The horizontal Slider would therefore occupy about 300/1000 = 0.3 of the horizontal scroll bar, and the vertical one would occupy 300/1500 = 0.2 of the scroll bar.
A commonly required calculation is one which gives the coordinates of a point in the work area of a window, given a screen position (for example, where a mouse button click occurred). This mapping obviously depends on the window's screen position and its scroll offsets. The algorithm breaks down into two steps:
Find the work area pixel that would be displayed at the screen origin.
The work area pixel displayed at the screen origin can be calculated as follows:
work_area_pixel_at_origin_x = scroll_offset_x - visible_area_min_x
work_area_pixel_at_origin_y = scroll_offset_y - visible_area_max_y
Add this to the given screen coordinates.
If the screen position is given by screen_x and screen_y the formula below will return the coordinates of a point in the work area of a window:
work area x = screen_x + work_area_pixel_at_origin_x
work area y = screen_y + work_area_pixel_at_origin_y
Thus the entire formula would be:
work area x = screen_x + (scroll_offset_x - visible_area_min_x)
work area y = screen_y + (scroll_offset_y - visible_area_max_y)
Generally, when this calculation is needed, the scroll offsets and visible work area coordinates are available (e.g. having been returned from Wimp_Poll). Even if they are not, a call to Wimp_GetWindowState will secure the information.
In addition to the coordinates described above, several other attributes have to be set when a window is created. These are described in detail in the entry on Wimp_CreateWindow.
Windows can overlap on the screen. In order to determine which windows obscure which, the Wimp maintains 'depth' as well as positional information. We say that there is a window stack. The window at the top of the stack obscures all others that occupy the same space on the screen; the one on the bottom of the stack is obscured by any other at the same coordinates.
Certain mouse operations alter a window's depth in the stack. A click with Select on the Title Bar (see below) brings the window to the top. Similarly you can give a window a Back icon, which, when clicked on, will send the window to the bottom of the stack. On opening a window, you can determine its depth in the stack by specifying the window that it must appear behind. Alternatively you can give its depth absolutely as 'top' or 'bottom'.
One 32-bit word of the window block contains flags. These control many of its attributes: which control icons it should have, whether it's movable, whether Scroll_Request events should be generated etc. Another word of flags control the appearance of the Title Bar, and yet another word set the button type of the work area. Both of these are actually icon attributes, the Title Bar being treated like an icon in many ways.
Finally there are miscellaneous properties such as the sprite area address to use for icon sprites, the minimum size of the window, and the icon data for the Title Bar.
Appended to the window definition are any initial icons that it owns. Further icons can be added using the call Wimp_CreateIcon.
For full details on how windows must behave on the RISC OS desktop see the chapters entitled Windows and Editors in the RISC OS Style Guide.
The window illustrated below has a fully defined system area showing all of the available controls. The control areas, going clockwise from the top-left corner, are described below. Where the effects of using Select and Adjust on them are different, this is noted.

A click on this icon causes the window to be moved to the back of the window stack, making it the 'least visible' one. A Redraw_Window_Request event is issued to any applications which have windows that were obscured by it and are now visible.
A click on this icon requests that a window be closed; the Wimp generates a Close_Window_Request event. It is then up to the application whether it responds with a Wimp_CloseWindow call, or ignores the event if it has good reason not to, such as unsaved data. Using Adjust should open the 'parent window', if such a thing exists. For example, the Filer closes a directory display, but opens its parent directory; an editor opens the home directory for the loaded document. When a window is closed, the Wimp issues Redraw_Window_Requests to those windows which were obscured by it and are now visible.
This contains the name of the window, which is set when the window is created. Dragging the Title Bar causes the whole window to be dragged. If Select is used for the drag, the window is also brought to the top; Adjust leaves it at the same depth. The Title Bar has many of the attributes of an icon (font type, indirection, centring etc). If the whole window is being dragged (and not just its outline), each movement will generate an Open_Window_Request for it, and Redraw_Window_Requests to windows that become unobscured.
A click in this icon toggles the window between its maximum size and the last user-set size. An Open_Window_Request event is generated to ask the application to update the work region of the resized window. The maximum size of a window depends on its work area extent and the size of the screen. Again, using Select uncovers the window; Adjust leaves it at the same depth in the stack. As usual, if the change in window size renders previously obscured window visible, Redraw_Window_Requests will be generated for them. When the window is toggled back to its small size, it goes back to its previous depth in the stack.
Although this is one object as far as the window definition is concerned, there are five regions within it. They are:
If the user clicks on one of the arrows with Select, the scroll offset for the window is adjusted by 32 units in the appropriate direction. Using Adjust scrolls in the reverse direction. Holding down either button causes the scrolling to auto-repeat. A click in the page up/down region adjusts the scroll offsets by the height of the window work area, with Adjust again giving the reverse effect from Select. An Open_Window_Request is generated to update the scrolled window.
If the window had one of the Scroll_Request flags set when it was created, a click in one of the arrows or page up/down areas causes a Scroll_Request event to be generated instead. The application can decide how much to scroll and call Wimp_OpenWindow to update its contents.
Finally, the Slider may be dragged to set the scroll offsets to any position in the work area. The Open_Window_Request events are returned either continuously or when the drag finishes, depending on the state of the Wimp drag configuration bits.
All scroll operations leave the window's depth unaltered.
Dragging on this icon causes the window to be resized. The limits of the new window size are determined by the work area extent and the minimum size given when the window was created. Depending on the state of the Wimp drag configuration flags the Wimp generates either continuous Open_Window_Requests (and possibly Redraw_Window_Requests for other windows) or a single one at the end of the drag. Select brings the window to the top; Adjust leaves it at the same depth.
This is exactly equivalent to the vertical scroll bar described above. For 'up' read 'right' and for 'down' read 'left', i.e. whereas scroll up increases the y scroll offset, scroll right increases the x scroll offset. The five regions within it are:
When a window is created, its control regions can be defined in one of two ways. The 'old' way is to use certain flags which specify in a limited fashion which of the regions should be present and which are omitted. The 'new' method uses one flag per control, and is much easier to use. The old way was used in Arthur, while the new is only available in RISC OS.
The Wimp and the application must cooperate to ensure that the windows on the screen remain up to date. The Wimp can't do all of the work, as it does not always know what the contents of a window should be.
When the task receives the event code Redraw_Window_Request from Wimp_Poll, it should enter a loop of the following form:
REM block% is the Wimp_Poll block
SYS "Wimp_RedrawWindow",,block% TO more%
WHILE more%
  Redraw contents of the appropriate window
  SYS "Wimp_GetRectangle",,block% TO more%
ENDWHILE
Return to polling loop
When a window has to be redrawn, often only part of it needs to be updated. The Wimp splits this area into a series of non-overlapping rectangles. The rectangles are returned as x0,y0,x1,y1 where (x0,y0) is inclusive and (x1,y1) is exclusive. This applies to all boxes, e.g. icons, work area, etc. The WHILE loop above is used to obtain all the rectangles so that they can be redrawn. The Wimp automatically sets the graphics clipping window to the rectangle to be redrawn. The task can take a simplistic view, and redraw its whole window contents each time round the loop, relying on the graphics window to clip the unwanted parts out. Alternatively, and much more efficiently, it can inspect the graphics window coordinates (which are returned by Wimp_RedrawWindow and Wimp_GetRectangle) and only draw the contents of that particular region.
For a description of improving redrawing speed see the section entitled Redrawing speed in the Screen handling chapter in the RISC OS Style Guide.
The areas to be redrawn are automatically cleared (to the window's background colour) by the Wimp. The task must determine what part of the workspace area is to be redrawn using the visible area coordinates and the current scroll offsets.
When redrawing a window's contents, you should normally use the overwrite GCOL action. You should use EOR mode when redrawing any currently dragged object. EOR mode is also useful when updating the window contents, such as dragging lines in Draw. As a rule, the contents of the document should not use EOR mode.
You should not use block operations such as Wimp_BlockCopy within the redraw or update loop, only outside it to move an area of workspace. These restrictions allow you to use the same code to draw the window contents and to print the document. If you use, for example, exclusive-OR plotting or block moves during the redraw these won't work on, say, a PostScript printer driver.
When a task wants to update a window's contents, it must not simply update the appropriate area of the screen. This is because the task does not know which other windows overlap the one to be updated, so it could overwrite their contents. As with all window operations, it must be done with the Wimp's co-operation. There are two possible approaches. The program can:
In both cases, you provide the window handle and the coordinates of the rectangular area of the work area to be updated. The Wimp works out which areas of this rectangle are visible, and marks them as invalid. If you use the first method, the Wimp will subsequently return a Redraw_Window_Request from Wimp_Poll, which you should respond to as already described. In the second case, a list of rectangles to be redrawn is returned immediately.
When Wimp_ForceRedraw is used, the Wimp clears the update area automatically. This should therefore be used when a permanent change has occurred in the window's contents, e.g. a paragraph has been reformatted in an editor. When you call Wimp_UpdateWindow, no such clearing takes place. This makes this call more suitable for temporary changes to the window, for example, when dragging objects or 'rubber-banding' in graphics programs.
It is simpler to use Wimp_ForceRedraw since, once it has been called, the task just returns to the central loop, from where the Redraw_Window_Request will be received. The code to handle this must already be present for the program to work at all. On the other hand, the second method is much quicker as the redrawing is performed immediately. Also, you can keep the original contents, using EOR to update part of the rectangle; for example, when dragging a line.
If you feel that your application must be able to take over the whole screen you can do so by opening a window the size of the screen on top of all other windows. For a description of how best to do this see the section entitled Taking over the screen in the Screen handling chapter in the RISC OS Style Guide.
The Window Manager provides an icon bar facility to allow tasks to register icons in a central place. It appears as a thick bar at the bottom of the screen, containing filing system and device icons on the left, and application icons on the right.
When an application is loaded, it registers an icon on the icon bar using Wimp_CreateIcon with window handle = -1 (or -2 for devices). The icon is typically the same as the one used to represent the application directory within the Filer, i.e. !Appl.
If there are so many icons on the icon bar that it fills up, the Wimp will automatically scroll the bar whenever the mouse pointer is moved close to either end of the bar.
When the mouse is clicked on one of the icons, the Wimp returns the Mouse_Click event (with window handle = -2) to the task which created the icon originally. Similarly, Wimp_GetPointerInfo returns -2 for the window handle when the pointer is over (either part of) the icon bar.
When Wimp_CreateIcon is called to put an icon on the bar, the Wimp uses the x coordinates of the icon only to determine its width, and then horizontally positions the icon as it sees fit. However, for reasons of flexibility, it does not vertically centre the icon, but actually uses both the y coordinates given to determine the icon's position. This means that applications must be aware of the 'standard' dimensions of the bar, in order to position their icons correctly.
Icons that appear on the icon bar should have bounding boxes 68 OS units square.
There are two main types of icon which are put onto the icon bar: those consisting simply of a sprite, and those consisting of a sprite with text written underneath (see Wimp_CreateIcon for details).
See the section entitled Positioning icons on the icon bar in the Sprites and icons chapter in the RISC OS Style Guide for a summary of the rules governing the positioning of such icons.
As mentioned earlier, an icon is a rectangular area of a window's workspace. Icons can be created at the same time as a window, by appending their definitions to a window block. Alternatively, you can create new icons as needed by calling Wimp_CreateIcon. A third possibility is to plot 'virtual' icons during a redraw or update loop using Wimp_PlotIcon. The advantage of this last technique is that the icons plotted don't occupy permanent storage.
Icons have handles that are unique within their parent window. Thus an icon is totally defined by a window/icon handle pair. User icon handles start from zero; the system areas of windows have negative icon numbers when returned by Wimp_GetPointerInfo.
The contents of an icon can be anything that the programmer desires. The Wimp provides a lot of help with this. It will perform automatic redrawing of icons whose contents are text strings, sprites, or both. Moreover, text icons can be writable, that is, the Wimp will deal with user input to the icon, and also handle certain editing functions such as Delete and left and right cursor movements.
Below is an overview of the information supplied when the program defines an icon. For a detailed description, see Wimp_CreateIcon.
Four coordinates define the rectangle that the icon occupies in the window's workspace. The Wimp uses this region when detecting mouse clicks or movements over the icon, when filling the icon background (if any) and drawing the icon border (if any).
This single word contains much of the information that make icon handling so flexible. It indicates:
Indirected icons use the last twelve bytes of the icon definition in a different way from non-indirected ones; see below.
The button type of an icon determines how the Wimp will deal with mouse movements and clicks over the icon. There are 16 possible types. Examples are: ignore all movements/clicks; report single clicks, double clicks and drags; select the icon on a single click; make the icon writable, and so on.
When Select is used to select an icon, its selected bit is set regardless of its previous state, and it is highlighted. When Adjust is used, its selected bit is toggled, de-selecting it if it was previously highlighted, and vice versa.
When an icon is selected, the Wimp indicates this visually by inverting the colours that are used to draw its text and/or sprite. Selecting an icon causes all other icons in its exclusive selection group to be de-selected. The ESG is in the range 0 to 31. Zero is special; this puts the icon in a group of its own, so selecting the icon will not affect any other icons, but each selection actually toggles its state.
Imagine a window has three icons with ESG=1. Only one of these can be selected at once: the selection (or toggling by Adjust) of one automatically cancels the other two. However, if the icon has its adjust bit set, then using Adjust to toggle the icon's state will not have any affect on the other icons in the same ESG.
When the icon's shaded bit is set, the Wimp draws the icon in a 'subdued' way, to indicate that it can't be selected. This also prevents selection by clicking.
Icon flags occur in other contexts. A window definition uses the button type bits to determine its work area's button type. The rest of the bits (with some restrictions) are used to determine the appearance of a window's Title Bar. Finally menu items have icon flags to determine their appearance.
The last 12 bytes of an icon definition are used in two different ways. If the icon is not indirected, these are used to hold a 12 byte text string. This is the text to be displayed for a text icon, the name of the sprite for a sprite icon, and both of these things for a text and sprite icon. Clearly the last is not very useful; it is unlikely that you will want to display an icon called sm!arcpaint along with the text sm!arcpaint.
If the icon button type is writable, clicking on the icon will position the caret at the nearest character and you can type into the icon, modifying the 12 byte text.
Indirected icons overcome the limitations of standard icons. Text can be more than 12 bytes long; the sprite in a text plus sprite icon can have a different name from the text displayed; sprite-only indirected icons can have a different sprite area pointer from their window; writable icons can have validation strings defining the acceptable characters, and anti-aliased text can have colours other than the default white foreground/black background.
The twelve data bytes of an indirected icon are interpreted as three words: a pointer to the icon text or icon sprite, a pointer to the validation string or sprite control block, and the maximum length of the icon text.
If an application wishes to update the contents of a writable icon directly, while the caret is inside the icon, then it cannot in general simply write to the icon's indirected buffer and make sure it gets redrawn.
The general routine goes as follows:
REM In: window% = window handle of icon to be updated
REM     icon%   = icon handle of icon to be updated
REM     buffer% = address of indirected icon text buffer
REM     string$ = new string to put into icon
DEF PROCwrite_icon(window%,icon%,buffer%,string$)
LOCAL cw%,ci%,cx%,cy%,ch%,ci%
$buffer%=string$
SYS "Wimp_GetCaretPosition" TO cw%,ci%,cx%,cy%,ch%,ci%
IF cw%=window% AND ci%=icon% THEN
  IF ci%>LEN($buffer%) THEN ci%=LEN($buffer%)
  SYS "Wimp_SetCaretPosition",cw%,ci%,cx%,cy%,-1,ci%
ENDIF
PROCseticonstate(window%,icon%,0,0) :REM redraw the icon
ENDPROC
Basically if the length of the string changes, it is possible for the caret to be positioned off the end of the string, in which case nasty effects can occur (especially if you delete the string terminator!).
Using Wimp_CreateIcon and Wimp_DeleteIcon to create and delete icons has certain disadvantages: the window is not redrawn, and the icon handles can change.
An alternative is to use Wimp_SetIconState to set and clear the icon's 'deleted' bit (bit 23).
However, it should be noted that when calling Wimp_SetIconState to set bit 23 of the icon flags (i.e. to delete it), the icon will not be 'undrawn' unless bit 7 of the icon flags ('needs help to be redrawn') is also set. This is because icons without this bit set are simply redrawn on top of their old selves without filling in the background, to avoid flicker.
Thus to delete an icon, use:
block%!0 = window_handle%
block%!4 = icon_handle%
block%!8 = &00800080        :REM set
block%!12= &00800080        :REM bits 7 and 23
SYS "Wimp_SetIconState",,block%
and to re-create it, use:
block%!0 = window_handle%
block%!4 = icon_handle%
block%!8 = &00000000        :REM clear
block%!12= &00800080        :REM bits 7 and 23
SYS "Wimp_SetIconState",,block%
Note that when re-creating the icon, bit 7 should normally be cleared, to avoid flicker when updating the icon.
For the rules governing how you must define the appearance and size of sprites, see the chapter entitled Sprites and icons in the RISC OS Style Guide.
The sprites that are used in icons can come from any source: the system sprite pool, the Wimp sprite pool, or a totally independent user area. The use of the system sprites is not recommended as certain operations (such as scaling and colour translation) can't be performed on them (see the section entitled Use of sprite pools in the Sprites and icons chapter in the RISC OS Style Guide for more details). Wimp sprites are useful for obtaining standard shapes without duplicating them for each application. User sprites are used when private sprites are required that aren't available in the Wimp sprite area.
The Wimp sprite area is accessed by specifying a sprite area control block pointer of +1 in a window definition or indirected icon data word. There are actually two parts to the area, a permanent part held in ROM, and a transient, expandable area held in the RMA. The call Wimp_SpriteOp allows automatic access to Wimp sprites by name. This is read-only access. The only operation allowed on Wimp sprites that changes them is the MergeSpriteFile reason code (11), or the equivalent *IconSprites command. These add further sprites to the Wimp area, expanding the RMA if necessary.
Below is a BASIC program to save the ROM sprites to a file. You can then use Paint to examine the sprites it contains.
SYS "Wimp_BaseOfSprites" TO rom%
SYS "OS_SpriteOp",&10C,rom%,"WSprites"
Amongst the ROM-based sprites are standard file-type icons (and half size versions of most of them), standard icon bar devices (printers, disk drives etc), common button types (radio buttons, option buttons) and the default pointer shape.
RISC OS 3 provides the following facilities for icons in addition to those provided in RISC OS 2:
From RISC OS 3 onwards, the Wimp uses ColourTrans when preparing sprites for plotting (such as icons); so the palette associated with a sprite defines how its logical colours are mapped to the available physical colours. It also provides support for 8-bit-per-pixel sprites.
RISC OS 3 draws the top, right and bottom bars of the window from icons to allow customisation in the future. A complete window icon set contains 176 icons, which consists of 4 custom sets:
The sets have equivalent designs, rendered as well as possible given the limitations of the various modes. (Note that RISC OS 2 effectively draws different things for 1, 2, 4/8 bpp, and for nx=2 or 4 and ny=2 or 4, and thus has 12 different behaviours; the 4 sets allow most of the main differences to be accommodated, but there will inevitably be slight differences for the 8 behaviours not directly supported.)
The icons are called xx, xx0, xx22 and xx23 following the Alternate Resolution Icon methodology for names (see Alternate Resolution Icons). RISC OS 3 displays different icons for 'pressed' icons on the window border. These icons are prefixed by 'p'. The 'p' form of an icon has to repaint over its unpressed form (and vice versa). If a 'p' form is not present, the corresponding unpressed icon is used.
There are 44 distinct designs (176/4) in the complete set. Many of the designs have defaults: all 'p' icons default to the unpressed icon. In addition, the title bar set, right scroll well and bottom scroll well will draw as RISC OS 2 if not present. The minimal set thus contains only the definitions of the corner icons: 10 designs (44 icons).
RISC OS 3 gets the sizes of the title bar, vertical scroll bar and horizontal scroll bar by reading the sizes of particular icons. All the other icons lying in the bar have to be of compatible size. There is no requirement that the icons for the different modes have compatible sizes; indeed, RISC OS 2 has bars that are 1 pixel different in size between 24 (e.g. mode 12) and 22 (e.g. mode 27) modes. Nor is there a requirement that the three bars in a mode have the same size.
All icons lying over highlighted sections of the window border (cream when selected, grey when not) must have transparent sections so that the colour can be seen. In the case of the title bar, this is plotted as four sections (left, top, bottom and right) so that a large expanse of transparency is not required.
The top, right and bottom window edge (black line) are drawn by the icons. We strongly recommend that you draw the outer edge of the top, right and bottom bars as a black line too.
The icons are:
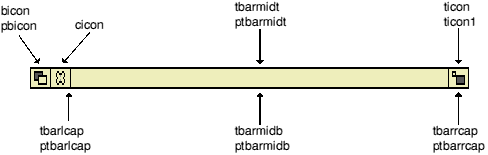
tbarmidt and tbarmidb have to be the same width, but can be different heights. The Window Manager will paint tbarmidt below the top of the title bar and tbarmidb at the bottom, leaving the space between transparent to allow the cream or grey background it paints to show through. All other top bar icons have to be the same height. ticon has to be the same width as the vertical scroll bar.
Icons are plotted in the order:
bicon, cicon,
tbarlcap, tbarmidb, tbarmidt, tbarrcap
such that the left pixel of the icon being painted overlaps the right pixel of the previously painted icon. (Left edges can be made transparent if this overlaid information has to be different). ticon is painted as a part of the right bar.
If tbarlcap is missing, the Window Manager paints the title section of the top bar using the RISC OS 2 style; otherwise it assumes that all necessary title bar icons are present.
Note that the top bar of menus is drawn with the same style as the title bar section of windows.
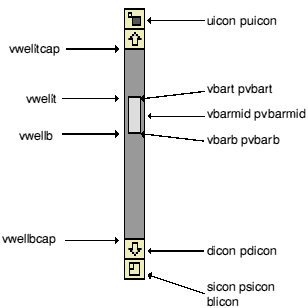
All these icons have to be the same width - as does ticon. sicon has to be the same height as the horizontal scroll bar.
Icons are plotted in the order:
uicon, dicon,
vwellbcap, vwellb, vbarb, vbarmid, vbart, vwellt, vwelltcap,
ticon, sicon
such that the top pixel of the previous icon overlaps the bottom pixel of the current icon. (Top edges can be made transparent if this overlaid information has to be different).
If vwellbcap is missing, the Window Manager paints the scroll bar section of the right bar using the RISC OS 2 style; otherwise it assumes that all necessary scroll bar icons are present.
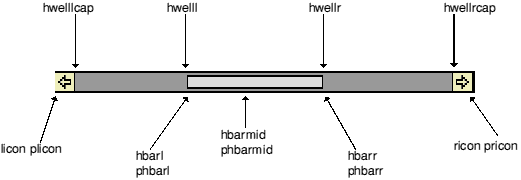
All these icons have to be the same height - as does sicon.
Icons are plotted in the order:
licon, ricon,
hwelllcap, hwelll, hbarl, hbarmid, hbarr, hwellr, hwellrcap
such that the right pixel of the previous icon overlaps the left pixel of the current icon. (Right edges can be made transparent if this overlaid information has to be different).
If hwelllcap is missing, the Window Manager paints the scroll bar section of the bottom bar using the RISC OS 2 style; otherwise it assumes that all necessary scroll bar icons are present.
A RISC OS 2 compatible set has these attributes:
| normal | 0 | 22 | 23 | |
| icons | 21×11 pixels | 21×11 pixels | 21×21 pixels | 21×21 pixels |
| hwelllcap | no mask | mask | no mask | mask |
| vwellbcap | no mask | mask | no mask | mask |
To be compatible with the RISC OS 2 scroll well colours requires some agility, since colours in icons do not get changed to dither patterns (as used in the one bit per pixel modes). Putting the dither pattern in the icon can be done in some cases - such as the scroll bar itself - but there may be a difference in the patterns alignment where the ends of the scroll well meet the well around the scroll bubble. Therefore transparent wells are used in these modes, and the Window Manager displays the dithered grey for the well interior. With solid colours this problem does not arise, and transparency masks in the icon would slow the system down, so the well colours come from the icons: this also has the benefit of improving the appearance of the scroll bar while it is being drawn.
Naturally, the minimal RISC OS 2 identical set would omit definition of the title bar and scroll wells entirely and rely on the Window Manager to draw these sections of the window outline.
To get the edges of the icons not to touch (if, for example, they are 3D plinthed, and so left and right edges must be different) some pixel rows and columns need to be made transparent:
| bicon: | right edge 1 pixel transparent |
| cicon: | right edge 1 pixel transparent |
| tbarlcap: | solid |
| tbarrcap: | solid |
| ticon: | left edge 1 pixel transparent |
| sicon: | top edge 1 pixel transparent |
| dicon: | top edge 1 pixel transparent |
| vwellbcap: | solid |
| vwelltcap: | solid |
| uicon: | top edge 1 pixel transparent |
| licon: | left edge includes black vertical pixel of left window edge |
| hwelllcap: | solid |
| hwellrcap: | solid |
| licon: | right edge 1 pixel transparent |
In order to get the best possible speed for drawing window boundaries, we recommend that you draw all the icons with the same number of bits per pixel as the modes with which they are to be used. For example, the default set for mode 12 are all drawn in mode 12; the xxx22 set are drawn in mode 20 or 27. The window manager can, like the filer, draw the icon correctly whatever source mode is used, but it will paint the borders more slowly.
In order to avoid time consuming searches for names, the window manager caches the addresses of all the window icons. This cache is updated after a *ToolSprites command, and after mode changes.
The icons which are replicated should be made appropriately wide and tall, but diminishing returns do set in. A special problem for the right and bottom bars is that some of the replicated icons are hardly displayed at all in some circumstances: for example, hwelll spends a lot of time just one pixel wide. Making hwelll very wide to speed the repainting in these situations is counter productive.
We recommended you use the following sizes:
RISC OS 2 allows for one icon file per application, which can be loaded automatically or under your control. Typically this contains the icons that the application needs the system to display on its behalf (eg those icons displayed by the filer). RISC OS 2 has all these icons at one particular resolution and number of colours: nx=2, ny=4, bpp=4 (mode 12). The appearance of these icons is often poor on other display modes, in particular high resolution monochrome and VGA or SuperVGA.
RISC OS 3 will load in different icon files automatically depending on the characteristics of the system's configured WimpMode. The nx and ny values are added to the end of any file, thus WimpMode 27 (VGA) will look for file22 by preference. If this fails file is used, which is expected to contain the mode 12 icons. No control over the number of bits per pixel is provided except for nx=2, ny=2, bpp=1 which will look for file23. Thus an application can be provided with icon files tailored to the various screens:
!Sprites
!Sprites22
!Sprites23
would be a standard configuration for the application providing icons optimised for normal TV standard monitor (AKA17), a VGA/SuperVGA monitor (or a Multisync monitor used as such) and a high resolution monochrome monitor.
The machine ends up with only one set of icons for the application being loaded into memory, thus using equivalent amounts of memory to RISC OS 2 (contrast with the multiple sets for the window icons). As standard, RISC OS 3 is provided with all its icons in the three above styles, though some are on disc.
The provided icon set is subdivided into 7 sections:
| directory | small_dir | application |
| small_app | file_xxx | small_xxx |
These six icons are provided first: they are the most frequently used icons, so it makes sense to put them first on the search order. application and file_xxx are used in the event of searching for !foo or file_ded and not finding it, so limiting the time to find them is important.
These are followed by file_fff, small_fff, file_ffe, small_ffe, etc...
Icons in !Sprites are 34×17 and 9×9. The black outline is 2×1 pixels wide.
Icons in !Sprites22 and !Sprites23 are 34×34 and 18×18. The black outline is 1 pixel wide.
| network | fileserver | small_fs |
| floppydisc | harddisc | ramfs |
| palette | romapps | switcher |
These icons almost always appear on the icon bar.
| yes | no | dontcare |
| radiooff | radioon | optoff |
| opton | tick | up |
| down | left | right |
| 3 (menu tick) |  (right submenu) (right submenu)
|  (left submenu) (left submenu)
|
These icons are provided for dialogue boxes and menus. The last three are used by the Window Manager for menu pointers to submenus and 'ticked' items in menus.
These icons are used to change the shape of the pointer (from ptr_default) when providing feedback to the user. The Window Manager automatically shows ptr_double during a double click.
A transparency mask in the pointer icons defines the position of the active point. If the mask is present, it is scanned from the top down and the active point set to the position of the first transparent pixel in the mask, completely ignoring any program specified active point offset (e.g. from OS_SpriteOp 36).
| ic_edit | ic_filer | ic_draw |
| ic_paint | ic_? |
These icons are displayed by the Pinboard for iconised applications or documents.
ic_? will be used if ic_app is not found.
ic_app should consist of ic_? with small_app in it. Its size should be the same as file_xxx.
| !edit | sm!edit | etc... |
These icons are used by the filer, and should have the same size as file_xxx and small_xxx icons.
| error | switcher |
These are used respectively in error dialogue boxes, and for the Task Manager.
Icons in the three sets must be as close to each other as possible. English text is not recommended in icons. Harmonisation of style with the provided icons is appreciated.
All the system provided icons, most particularly the Window Manager icons and the dialogue box and menu icons, are used pervasively. Applications must not modify these icons for their own purposes (unless they are applications specifically provided to modify the look of the system as a whole).
You may wish to give your application a 3D look and feel. To do so you should provide two sets of icons, one of which provides a standard RISC OS 2 appearance, and the other of which provides a 3D appearance. You should then use OS_Byte 161 to read the value of the 3D bit in CMOS RAM, which is bit 0 of byte 140; if it is clear load the RISC OS 2 style set, and if it is set load the 3D set.
The Wimp enforces some of the behaviour of menus, the following table outlines those sections in the chapter entitled Menus and dialogue boxes, in the RISC OS Style Guide, which describe the behaviour of menus under the Wimp:
| Section | describes: |
|---|---|
| Basic menu operation | the different methods of providing menus. |
| Shading menu items | the rules for shading menu items. |
| Menu colours | the standard colours you must use for a menu. |
| Menu size and position | the size and position of menus. |
| Other points | a list of other rules for formatting a menu. For example; menu titles, splitting items, item ticks. |
| Making menu choices | the action to perform when a user presses Select, Menu, or Adjust. |
The Wimp provides a way in which a task can define multi-level menu structures. By multi-level we mean that a menu item may have a submenu. The user activates this by moving the pointer over the right-arrow that indicates a submenu. The new menu is opened automatically, the Wimp keeping track of the 'selection so far'.
The application usually activates a menu by calling Wimp_CreateMenu in response to a Mouse_Click event of the appropriate type. It passes a pointer to a data structure that describes the list of menu items. Each of those items contains a pointer to its submenu, if required.
The click of the Menu button while the pointer is over a window is always reported, regardless of button types. You can use the window and icon handles to create a menu which accords to the context of the click. For example, the Filer varies its menu according to the current file selection (or pointer position if there is none).
When the user makes his or her menu choice by clicking on any of the mouse buttons while over an item, another event, Menu_Selection, is generated. The application responds to this by decoding the selected menu item(s) and performing appropriate actions.
Because menus can have a complex hierarchical structure (as opposed to the simple single level menus on some systems) a call Wimp_DecodeMenu is provided to help translate the selection made into a textual form.
Just as icons can be made writable, menu items can have that property too. This makes it very easy to obtain input from the user while a menu is open.
Menus are not restricted to text-only items. A leaf item (i.e. the last in a chain of selections) may be a window, which in turn contains a complete dialogue box. And of course, such windows can have as many icons as required, displaying sprites, text prompts, writable icon fields etc.
It could be annoying that choosing an item from deep within a menu structure causes the whole menu to disappear. For example, the user might be experimenting with different selections from a colour menu, and he doesn't necessarily want to perform the whole menu operation again each time he clicks the mouse. To overcome this, selections made using the Adjust button do not cancel the menu. The Wimp supports this directly, but needs some co-operation from the application to make it work. See Wimp_CreateMenu for details on how to implement persistent menus.
Finally, because the Wimp can inform a task when a submenu is being opened, the menu tree can be built dynamically, according to the selections that have gone before.
The Wimp enforces some of the behaviour of dialogue boxes, the following table outlines those sections in the chapter entitled Menus and dialogue boxes, in the RISC OS Style Guide, which describe the behaviour of dialogue boxes under the Wimp:
| Section | describes: |
|---|---|
| Types of dialogue box | the three basic types of dialogue box: ordinary dialogue boxes detached dialogue boxes static dialogue boxes. |
| Dialogue box colours | the standard colours you must use for a dialogue box. |
| Dialogue boxes and keyboard shortcuts | the rules for consistency. |
| Wording of dialogue boxes | how best to construct the wording in a dialogue box. |
| Default actions | how to ensure the default actions are correct. |
| Standard icons used in dialogue boxes | the various forms of icon: writable icons action icons option icons radio icons arrow icons and sliders. |
| Scrollable lists and pop-up menus | how to use scrollable lists and pop-up menus to present a list of alternative choices within a dialogue box. |
There is no direct way of setting up dialogue boxes under the Wimp. However, because icons can be handled in very versatile ways, it is quite straightforward to set up windows which act as dialogue boxes. If the necessary windows are permanently created and linked to the menu data structure, then the Wimp will handle all opening and closing automatically. The Wimp can be made to deal with button clicks within the window, for example automatically highlighting icons.
Also, because writable icons are available, it is a simple matter to input text supplied by the user, again with the Wimp doing most of the work. If required, the task can restrict the movement of the mouse to within the dialogue box, by defining a mouse rectangle (using OS_Word 21,1 - see OS_Word 21,1) which encloses the box. This ensures that the user can perform no other task until he or she responds to the dialogue box. The task should always reset the mouse rectangle to the whole screen once the dialogue is over. Also, open_window_requests for the dialogue box should cause the box to be reset. Note that usually the pointer is not restricted. The dialogue box is deleted if you click outside it.
Alternatively, the menu tree can be arranged so that the application is informed (by a message from the Wimp) when the dialogue box is being opened; this allows any computed data to be delayed until the last minute. For a large program with many dialogue boxes this is preferable.
This form of dialogue box can be visited by the user without clicking on mouse buttons, just like traversing other parts of the menu tree. This is possible because redraw is typically much faster than on previous systems, so popping up the dialogue box and then removing it does not cause a significant delay.
The 'About this program' dialogue box is a useful convention. Provide an 'Info' item at the top of the application's menu, and make the dialogue box its submenu. You should also have the 'Info' item at the top of the menu that you produce when the user clicks with Menu on your icon bar icon. Use Edit's template file to obtain an exact copy of the standard layout used in the Applications Suite programs.
If a menu operation leading to a dialogue box has a keyboard short-cut, Wimp_CreateMenu should be used to initially open the dialogue box, rather than Wimp_OpenWindow (although Wimp_OpenWindow should still be used in response to an Open_Window_Request event). This will ensure that it has the same behaviour concerning cancellation of the operation etc as when accessed through the menu tree.
A static dialogue box is opened using Wimp_OpenWindow rather than Wimp_CreateMenu. A static dialogue box matches normal ones in colours, but has a Close icon.
There are various forms of icon that occur within dialogue boxes, the most common forms are described here to improve consistency between applications.
Writable icons are used for various forms of textual fill-in field. They provide validation strings so that specific characters can be forbidden. Alternatively arbitrary filtering code can be added to the application to ensure that only legal strings (within this particular context) are entered.
When moving to a new writable icon, place the caret at the end of the existing text of the icon. See Wimp_SetCaretPosition for details of how to do this.
This term refers to 'buttons' on which the user clicks on in order to cause some event to occur, typically the event for which the parameters have just been entered in the dialogue box. An example is the OK button in a 'Save as' dialogue box.
The best button type to use is 7 (Menu), with non-zero ESG. This will cause the button to invert while the pointer is over it (like a menu item), and for a button press to be reported.
It is sometimes appropriate to provide keyboard equivalents for action buttons. For instance, if the dialogue box is available via a function key as well as on the menu (see Keystrokes below) then adding key equivalents for action icons may mean that the entire dialogue box can be driven from the keyboard. A conventional use of keys is:
This term refers to 'switches', which can either be on or off.
The best icon to use is a text plus sprite one. The text has the validation string Soptoff,opton, where the sprites optoff and opton are defined in the Wimp ROM sprite area. The HVR bits of the icon flags (3, 4 and 9) are set to 0,1 and 0 respectively (see Wimp_CreateIcon). This generates a box to the left of the text, with a star within it if the option is on (i.e. the icon is selected). The button type is 11.
The ESG can be zero to make Select and Adjust both toggle the icon state, or non-zero (and unique) to make Select select and Adjust toggle the icon state.
The Filer's menu item Access dialogue box for a particular file, uses this type of control (with ESG=0).
This term refers to a set of options where one, and only one, of a set of icons can be selected.
The text plus sprite form is again best, using the validation string Sradiooff,radioon from the Wimp sprite area, and a non-zero ESG shared by all the icons in the group, to force exclusive selection. If required, the icons can have their 'adjust' bit set to enable Adjust to toggle the state without deselecting the other icons.
A pane is a window which is 'fixed' to another window, but has different properties from it. For example, consider a drawing program. You might have a scrollable, movable main window for the drawing area. This is called the tool window. On the left edge of this might be a fixed window which contains icons for the various drawing options. This lefthand window (the pane) always moves with the main window, but does not have scroll bars, or any other control areas.
Dealing with panes is really entirely up to the task program. However, there are one or two things to bear in mind when using them. If a tool window is closed, all of its panes must be closed too. Similarly, when a tool window is opened (an Open_Window_Request is received), the task must inspect the coordinates of the main window returned by the Wimp, and use them to open the pane in the appropriate position.
One bit in a window's definition is used to tell the Wimp that this is a pane. This is used by the Wimp in two circumstances:
There are various optimisations that can be used. If you open the windows in the right order, unnecessary redraws can be avoided.
The following table outlines those sections in the chapter entitled Handling input, in the RISC OS Style Guide, which describe how you should implement input under the Wimp:
| Section | describes: |
|---|---|
| Gaining the caret | the conditions under which you may gain the caret. |
| Unknown keystrokes | what you should do if you receive a keystroke that you do not understand or use - hand it back using Wimp_ProcessKey. |
| Abbreviations | examples of abbreviations for menu operations useful to expert users. |
| Selections | the rules to follow when a user selects text (or objects) within your application. |
| Keyboard shortcuts | consistent shortcuts for common commands, including a table of shortcuts you should provide for particular functions (e.g. Help, Close window, Scroll window, Move etc). |
| International support | how to make an application more portable in the international market. |
A task running under the Wimp should perform all of its input using the Wimp_Poll routine, rather than calling OS_ReadC or OS_Byte &81 directly. It is permissible for a program to scan the keyboard using the - ve inkey OS_Bytes. Further details are given in the Character Output.
One window has what is termed the 'input focus'. For example, the main text window of an editor might be the current input window, and its system area is highlighted by the Wimp to show this. (A flag can also be read by the program to see if it has the input focus.) The input window or icon also has a caret (vertical bar text cursor) to show the current input position.
A window gains the input focus if it has a writable icon over which the user clicks with Select or Adjust. The caret is positioned and sized automatically by the Wimp in this case. It uses a height of 40 OS units for the system font.
Alternatively, the program can gain the input focus explicitly by calling Wimp_SetCaretPosition. This displays a caret of a specified height and colour at the position specified in the given window and, optionally, icon. If the icon is a writable one, the Wimp can automatically calculate the position and height from the index into the text, if required.
Generally Wimp_SetCaretPosition is called in response to a mouse click over a window's work area. The position within the window must be calculated using the pointer position, the window's screen position, and the current scroll offsets.
Wimp_SetCaretPosition causes a couple of events to occur if the input window actually changes: Gain_Caret and Lose_Caret. This enables tasks to respond to the change in caret position (and possibly the task that owns it) by updating their window contents appropriately. This is especially true if an application is drawing its own caret and not relying on the Wimp's vertical bar. Note that the Wimp's caret is automatically maintained by the Wimp in Wimp_RedrawWindow, so you don't have to redraw it yourself.
If the insertion point is within a writable icon, then many key presses are handled by the Wimp. The icon text is updated, and for certain cursor keys, the caret position and index within the string are updated. Other key presses, and all keys when the input focus is not in a writable icon, must be dealt with by the application itself.
A program gets to know about key presses through the Wimp_Poll Key_Pressed event. The data returned gives the standard caret information plus the code of the key pressed. It is up to the application to determine how the key-press is handled. There are certain standard operations for use in dialogue boxes, e.g. cursor down means go to the next item, but generally it will very much depend on what the application is doing.
Among the keys that the Wimp cannot respond to automatically are the function keys F1 to F12. These are passed to the application as special codes with bit 8 set (i.e. in the range 256 - 511). If the application can deal with function keys, it should process the key press appropriately. If not, it should pass the key back to the Wimp with the call Wimp_ProcessKey.
If a function key is passed back to the Wimp in this way and the input focus belongs to a writable icon, the Wimp will expand the function key definition and insert (as much as possible of) the string into the icon.
In general, a program should always pass back key presses it doesn't understand to the Wimp. This allows the writing of programs which are activated by 'hot keys', for example, a screen dump that occurs when Print (F0) is pressed. Keys passed to Wimp_ProcessKey are passed (through the Key_Pressed event) to tasks whose windows have the 'grab hot keys' bit set. They are called in the order they appear on the window stack, topmost first.
If a program can act on a hot key, it should perform its magic task and return via Wimp_Poll. If it doesn't recognise that particular key, it should pass it to the next grab-hot-keys window in the stack by calling Wimp_ProcessKey before it next calls Wimp_Poll.
Note that the caret may well not be in the window with the grab-hot-keys bit set, and of course the caret position returned by Wimp_Poll will correspond to the window with the caret. Also, note that all potential hot key grabbers take priority over icon soft key expansion, and that you should not process a key and hand it back to the Wimp. This could lead to user-confusion.
If the only reason for a window is to allow its creator to grab hot keys, i.e. if it will never appear, it should be created and opened off the screen (with a large negative x position). To allow this, its window flags bit 6 should be set.
An application should not change or use F12, or any of its shift variants, as it is used by RISC OS.
Use Alt as a shifting key rather than as a function key. Different forms of international keyboards have standardised the use of Alt for entering accented characters. See the section entitled Keyboard shortcuts in the Handling input chapter in the RISC OS Style Guide for details of how you should implement modifiers.
Do not forbid the use of top-bit-set characters in your program, as many standard accented characters are available in the ASCII range &A0 - &FF. The Wimp clearly distinguishes between these characters and the function keys, which are returned as codes with bit 8 set.
Due to their frequent polling, Wimp programs do not normally need to use escape conditions. The Wimp sets the Escape key to generate an ASCII ESC (&1B) character. If you perform a long calculation without calling Wimp_Poll, you may set the escape action of the machine to generate escape conditions (using *FX 229,0), as long as you set it back again (using *FX 229,1 and then *FX 124) before calling Wimp_Poll.
One of the Wimp's start-up actions (the first time Wimp_Initialise is called) is to make the Escape key return ASCII 27. It does this by issuing an OS_Byte with R0=229, R1=1, R2=0. Thus no Escape conditions or (RISC OS) events are normally generated. The task that has the input focus can respond to ASCII 27 in any way it wants.
If you want to allow the user to interrupt the program by pressing Escape during a long operation, you can re-enable it using OS_Byte with R0=229, R1=0, R2=0. The following restrictions must be observed. Escapes must only be enabled between calls to Wimp_Poll, i.e. you must not call that routine with Escape enabled. This is very important. If you detect an Escape, you must disable it before calling the Wimp again and then clear it using OS_Byte with R0=124.
Even if no Escape occurs, you should still disable it before you next call Wimp_Poll; it is a good idea to call OS_Byte with R0=124 just after disabling Escapes.
It is also a good idea to display the Hourglass pointer during long-winded operations, preferably with the percentage of completion if this is possible. The user is less likely to try to interrupt if they can see that the operation is progressing. Note that you should not attempt to change the pointer while the hourglass is still showing.
When Wimp_CloseDown is called for the last time (i.e. when the last task finishes), the Wimp restores the Escape key to its previous state, along with all the other settings it changed (function keys, cursor keys etc.)
You should not use the standard OS_Words and OS_Bytes to control the pointer shape under the Wimp. Instead, use the call Wimp_SpriteOp with R0 = 36 (SetPointerShape). This programs the pointer shape from a sprite definition, performing scaling and colour translation if required. Pointer sprites have names of the form ptr_xxxxx. The standard arrow shape is held in the Wimp ROM sprite area and is called ptr_default.
The call Wimp_SetPointerShape which was available before RISC OS 2 should no longer be used, although it is still provided for compatibility.
Pointer shape 1 is used by the Wimp as its default arrow pointer. Any program wishing to use a different shape must use shape 2, and program the pixels appropriately using the above call. Do not use logical colour 2 in pointer sprites, as this is unavailable in very high resolution modes. Shapes 3 and 4 are used by utilities such as the Hourglass module which changes the pointer shape under interrupts. For information about the SWIs supported by this module, refer to the Hourglass.
Note that when changing the pointer shape, it is recommended that the pointer palette is also reset. This is held in the sprite. Also, each sprite should have its own palette.
A task should only change the pointer when it is within the work area of one of its windows. The Wimp_Poll routine returns two event codes for detecting this: Pointer_Entering_Window and Pointer_Leaving_Window (5 and 4 respectively). Whenever the first code is received, the task can change the pointer to shape 2 for as long the pointer stays within the window. On receiving the second code, the task should reset the pointer to shape 1. The best way to achieve this is to use the *Pointer command.
Tasks should trap Message_ModeChange, as a mode change resets the pointer to its default shape. If, on a mode change, the task thinks that it 'owns' the pointer, i.e. it is over one of the task's windows, it should re-program the pointer shape, if required.
For a general description of providing mode independence see the sections entitled Modes and Screen size in the Screen handling chapter in the RISC OS Style Guide.
Programs should work in all screen modes in which the Wimp works. Read the current screen mode rather than setting it when your program is loaded, and call OS_ReadVduVariables to obtain resolution, aspect ratio, etc, instead of building these into the program.
The Wimp broadcasts a message when the mode changes, so any mode-specific data can be changed at that point.
Programs uninterested in colours must also check operation in 256-colour modes, e.g. some EOR (exclusive OR) tricks do not work quite the same. For instance, see Wimp_SetCaretPosition for a description of how the Wimp draws the caret using EOR plotting. Clock uses a similar trick for the second hand of the clock. As another example, Edit uses EORing with Wimp colour 7 (black) to indicate its selection, but redraws the text in 256-colour modes.
In two-colour modes the Wimp uses ECF patterns for Wimp colours 1 to 6 (grey levels). Note that certain EOR-ing tricks do not work on these, and that use of Wimp_CopyBlock can cause alignment problems for the patterns.
An important aspect of Wimp-based applications is that they do not depend for their operation on a particular screen mode. A corollary of this is that they should not explicitly change display attributes such as mode or colours. The motivation for this rule is to ensure that many separate tasks can be active without mutual interference.
To help programs operate in a consistent manner regardless of, say, the number of screen colours, the Wimp provides a variety of utility functions, such as colour translation and the scaling of sprites and text. In fact many of these features are provided by other parts of RISC OS, but are given Wimp calls to facilitate a more uniform interface.
See the chapter entitled Colour and sound in the RISC OS Style Guide for:
For a general description of colours and the palette see the section entitled Colours and the palette in the Screen handling chapter in the RISC OS Style Guide.
There are several colours used in drawing a window. For harmonious operation with other applications, several of these have been standardised: you should set the Title Bar colours, the scroll bar inner and outer colours and highlighted title colour to the values given in the table in the following section on colour handling, unless you have some good reason not to. On the other hand, the work area colours (which are set for you before an update or redraw) can be assigned any values required.
The Wimp's model of the display centres on the 16-colour modes. There are 16 Wimp colours defined, listed below. In other modes, the Wimp performs a mapping between these standard colours and those which are actually available. When setting colours for graphics (including VDU 5 text), or anti-aliased fonts, the application specifies standard colours to the appropriate Wimp routine, which translates them and generates the necessary VDU calls.
Here are the standard colours, and their usages:
| standard colour | usage |
|---|---|
| 0 - 7 | grey scale from white (0) to black (7) |
| colour 1 is icon bar and scroll bar inner colour | |
| colour 2 is standard window title background colour | |
| colour 3 is the scroll bar outer colour | |
| colour 4 is the desktop background colour | |
| 8 | dark blue |
| 9 | yellow |
| 10 | green |
| 11 | red |
| 12 | cream, window title background for input focus owner |
| 13 | army green |
| 14 | orange |
| 15 | light blue |
In non-16 colour modes, these standard colours are represented as follows:
| 2-colour modes | logical colour 0 is set to Wimp colour 0, i.e. white logical colour 1 is set to Wimp colour 7, i.e. black |
| 0 | logical colour 0 |
| 1 - 6 | decreasing brightness stippled patterns |
| 7 | logical colour 1 |
| 8 - 15 | logical colour 0 or 1, whichever is closer to standard colour's brightness level |
| 4-colour modes | logical colour 0 is set to Wimp colour 0, i.e. white logical colour 1 is set to Wimp colour 2, i.e. light grey logical colour 2 is set to Wimp colour 4, i.e. dark grey logical colour 3 is set to Wimp colour 7, i.e. black |
| 0 - 15 | set to the logical colour closest in brightness to the standard one |
| 256-colour modes | the default palette is used |
| 0 - 15 | set to the closest colour to the standard one obtainable |
As an example of the use of colour translation, if you were to set the graphics colour to 2 in a two-colour mode, using Wimp_SetColour, then the Wimp would actually set up an ECF pattern (number 4 is used) to be a lightish stippled pattern, and issue a GCOL to make ECF 4 the current graphics colour. On the other hand, in a 256-colour mode it would calculate the GCOL and TINT which gives the closest match to the standard light grey, and issue the appropriate VDUs.
In 256-colour modes, exact representations of the Wimp colours 0 - 7 (the grey scale) are available, but only approximate (albeit pretty close) representations of Wimp colours 8 - 15 can be obtained.
The Wimp utilises its colour translation mechanism in the following circumstances:
The palette utility produces a broadcast message when the user changes the palette settings, allowing such programs to repaint for the new palette. A module called ColourTrans (used by Paint and Draw) gives the closest setting possible to a given RGB value. This module is provided in the RISC OS 3 ROM and is available as a RAM loaded module for RISC OS 2.
If you want to override the Wimp's translation of colours, you can use the ColourTrans module and PutSpriteScaled to perform more sophisticated colour matching. The Draw and Paint applications do this.
The system font is the standard 8 by 8 pixel character set. It is used by OS_WriteC text printing codes. Under the Wimp, the system font is defined to be 16 units wide by 32 OS units high. This is true regardless of the actual screen resolution. The consequence of this is that system font characters are the same physical size, independent of the screen mode.
To obtain the appropriate sizing of characters, the Wimp uses the VDU driver's ability to scale characters printed in VDU 5 mode. Thus in mode 4, where a pixel is 4 OS units wide, system font characters are only four pixels wide, to maintain their 16 OS unit width. Similarly in 512-line modes, characters are plotted double height to give them the same appearance as in mode 12.
One of the recognisable features of most window systems is the ability to 'drag' items around the screen. The RISC OS Wimp is no exception, and provides extensive facilities for dragging objects.
Icons and window work areas can be given a button type which causes the Wimp to detect drag operations automatically. A 'drag' is defined as the Select or Adjust button being pressed for longer than about 0.2s. Alternatively, if the user clicks and then moves the mouse outside the icon rectangle before releasing, this also counts as a drag. The result is that a Mouse_Click event is returned by Wimp_Poll. Note that before a drag event is generated, the application will also be informed of the initial click, and the drag could in turn be followed by a double click event, depending on the button type.
The call Wimp_DragBox initiates a dragging operation. The user supplies the initial position and size of the box to be dragged, and a 'parent' rectangle within which the dragging must be confined. Normally, the initial position of the box will be such that the mouse pointer is positioned somewhere within the box. However, this is not mandatory; the Wimp, while performing the dragging, ensures that the relative positions of the pointer and the box remain constant.
There are two main types of drag operation: system and user. System types work on a given window, and drag its size, position or scroll offsets. These drags are normally performed automatically if the window has the appropriate control icon (e.g. a Title Bar to drag its position). However, you might want to allow a non-titled window to be moved, or a window without an Adjust Size icon to be resized; the system drag types cater for this sort of operation.
User drag boxes can be fixed size, where the whole of the box is moved along with the pointer, or variable sized, where the top left of the box is fixed, and the bottom-right moves with the pointer. (The fixed and movable corners can be varied by specifying the box's top left and bottom right coordinates in the reverse order.) The Wimp displays the drag box using dashed lines whose dash pattern changes cyclically.
There is an 'invisible' type of drag box. In this case, the mouse is simply constrained to the parent rectangle, which must be a single window, and the initial box coordinates are ignored. It is up to the task to draw the object being dragged. This usually involves setting a 'dragging' flag in the main poll loop, and the use of Wimp_UpdateWindow. The task must also ensure that the dragged object is redrawn if a Redraw_Window_Request is issued, and enable Null event codes and use them to perform tracking.
Finally, a program can arrange for the Wimp to call its own machine code routines during dragging, for the ultimate in flexibility. This enables the program to drag any object it likes, so long as it can draw it and then remove it without affecting the background. In this case, the object can go outside the window. The Wimp will ask for it to be removed at the appropriate times.
In all cases, the task is notified when the drag operation ends (when the user releases all mouse buttons) by Wimp_Poll returning the event code User_Drag_Box.
The Wimp's drag operations are specifically for drags that must occur outside all windows. As well as the cycling dashed box form, they allow the use of user-defined graphics, allowing arbitrary objects to be dragged between windows.
If you build drag operations within your window, check that redraw works correctly when things move in the background (the Madness application is useful for testing this). Also, it is important to note that such 'within-window' dragging must use Wimp_UpdateWindow to update the window, rather than drawing directly on the screen.
If the drag works with the mouse button up then menu selection and scrolling can happen during the drag, which is often useful. Stop following the drag on a Pointer_Leaving_Window event, and start again on a Pointer_Entering_Window event.
If the drag works with the button down, then it may continue to work if the pointer is moved out of the window with the button still down. Alternatively for button-down drags, you can restrict the pointer to the visible work area, and automatically scroll the window if the pointer gets close to the edge.
An editor presents files of a particular format (known as documents) as abstract objects which a user can load, edit, save, and print. Text editors, word processors, spreadsheets and draw programs are all editors in this context.
The following table outlines those sections in the chapter entitled Editors, in the RISC OS Style Guide, which describe how you should implement editors under the Wimp:
| Section | describes: |
|---|---|
| Editor windows | the title of an editor window and how to position it. the colours you should use for the editor window. |
| Starting an editor | when and how you should start your editor. |
| Creating a new document | when and how you should create a new document. |
| Loading a document | when you must load a document. |
| Inserting one document into another | when you must try to insert a document into the one you are editing. |
| Saving a document | how to save a document. |
| Internal RAM based filing system | how to provide an internal RAM based filing system for your editor. |
| Printing a document | when to print a document. |
| Closing documents | how and when to close a document. |
| Quitting editors | how to quit your editor. |
| Providing information about your editor | why you should include an 'About this program' dialogue box. |
Each document being edited is typically displayed in a window. Such windows are referred to as editor windows.
Most editors record, for each document currently being edited, whether the user has made any adjustments yet to the document. This is known as an updated flag.
Some editors are capable of editing several documents of the same type concurrently, while others can edit only one object at a time. Being able to edit several documents is frequently useful, and removes the need for multiple copies of the program to be loaded. Such programs are referred to here as multi-document editors. Edit, Draw and Paint are all multi-document editors, while Maestro and FormEd are not.
Editors use RISC OS file types to distinguish which application belongs to which file. Application !Boot files should define Alias$@RunType_ttt and File$Type_ttt variables, and !appl, sm!appl, file_ttt and small_ttt sprites (in the Wimp sprite area), as described earlier. File types are allocated as described in the Filetypes.
The user interface of RISC OS concerning loading and saving documents is rather different from that of other systems, because of the permanent availability of the Filer windows. This means that there is no need for a separate 'mini-Filer' which presents access to the filing system in a cut-down way. Although this may feel unusual at first to experienced users of other systems, it soon becomes natural and helps the feeling that applications are working together within the machine, rather than as separate entities.
Icons that appear on the icon bar should have bounding boxes 68 OS units square. Icons with a different height are strongly discouraged, as they will have their top edges aligned within the Filer Large icon display. A wider icon is permissible, but the size above should be thought of as standard. If the width is greater than 160 OS units then the edges will not be displayed in the Filer Large icon display.
Icons are often displayed half size to save screen space. The Filer will use sm!appl and small_ttt if these are defined, or scaled versions of !appl and file_ttt if not.
The standard ways to start an editor are to:
The action taken in the first case is to load a new copy of the application (by running its !Run file). The only visible effect to the user is that the application icon appears on the icon bar. So when you start up with no command line arguments, use Wimp_CreateIcon to put an icon containing your !app sprite onto the icon bar, then enter your polling loop quietly.
In the second case, create the icon bar icon, load the specified document and open a window onto it. This typically occurs by the activation of the run-type of the document file, which in turn will invoke the application by name with the pathname of the document file as its single argument.
For example, the run-type for a Draw file (type &AFF) is:
*Run <disc>.!Draw.!Run %*0
where <disc> is the name of the disc on which the Draw application resides. So when the user double-clicks on a type &AFF file, the Filer executes *Run pathname, which in turn executes <disc>.!Draw.!Run pathname.
Typically, the !Boot file of the application sets up the run-type for its data files when the application is first seen by the filer. In the case of Draw, the boot file says:
*Set Alias$@RunType_AFF *Run <Obey$Dir>.!Run %%*0
See the chapter entitled Application resource files for details.
When a document icon is double-clicked, and a multi-object editor of the appropriate type is already loaded, it is not necessary to reload the application. In this case, the active application will notice the broadcast message from the Filer announcing that a double click has occurred, and will open a window on the document itself. For details, see the chapter entitled Message_DataOpen (5).
A further way of opening an existing document is to drag its icon from the Filer onto the icon bar icon representing the editor. In this case, a DataLoad message is sent by the Filer to the editor, which can edit the file. This form is important because it specifies the intended editor precisely. For instance if both Paint and FormEd are being used (both can edit sprite files) then double-clicking on a sprite file could load into either.
Newly opened windows on documents should be horizontally centred in a mode 12 screen, and should not occupy the entire screen. This emphasises that the application does not replace the existing desktop world, but is merely added to it. Subsequent windows should not totally obscure ones that this application has already opened. Use a -48 OS unit y offset with each new window.
The window created from the loading or creation of a document should be no larger than about 700 OS units wide by 500 high. The first window should be centred horizontally and vertically on the screen. Open subsequent windows 48 OS units lower than the previous one, but if this would overlap the icon bar then return to the original starting position. The initial size and position of windows should be user-configurable, by editing a template file.
To open an existing document, double-click on the document in the Filer. This will cause a broadcast DataOpen message from the Filer, so if your editor can edit multiple documents it can intercept this and load the document into the existing editor.
To insert one document into another, drag the icon for the file to be inserted into the open window of the target document. The Filer will then send a message to that window, giving the type and name of the file dragged. The target (if the file is of a type that can be inserted) can now read the file. If the file is not of a type that can be inserted in this document then the editor should do nothing, i.e. it should not give an error.
More details of these operations can be found in the Wimp_SendMessage.
For a description of saving documents see the section entitled Saving a document in the Editors chapter in the RISC OS Style Guide.
To remove the Save dialogue box after saving a file use Wimp_CreateMenu (-1).
If the user clicks on the Close icon of a document window, and there is unsaved data, then you should pop up a dialogue box asking:
You can copy this dialogue box from Edit's template file. If the answer is Yes then pop up a Save dialogue box, and if the result is saved then close the document window. If the answer is No, or any cancel-menu (e.g. Escape) occurs, then the operation is abandoned.
If the user clicks Adjust on the Close icon, call Wimp_GetPointerInfo on receipt of the Close_Window_Request. Also, you must open the file's home directory after closing it. This can be obtained by removing the leafname from the end of the file's name and sending a Message_FilerOpenDir broadcast to open the directory.
You must supply a Quit option at the bottom of an editor's icon bar menu. For a description of how you should implement quitting editors see the section entitled Quitting editors in the Editors chapter in the RISC OS Style Guide.
See Message_PreQuit (8) for details of what to do if your editor receives a PreQuit broadcast message.
For a general description of how to use memory efficiently see the section entitled Use of memory in the General Principles chapter in the RISC OS Style Guide.
Part of the Wimp's job is to manage the system's memory resources. There are several areas: the screen, system sprites, fonts, the RMA, application space etc. Many of these are controllable through the Task Manager's bar display. The user can drag, say, the font cache bar to set the desired size.
The remainder, when all of the other requirements have been met, is called the free pool. The Wimp can 'grab' memory from this to increase another area's size, or to start a new application, and extend it when another area is made smaller, or an application terminates. Because the allocation of memory is always under the user's control, he or she can make most of the decisions concerned with effective utilisation.
Two important bars in the Task Manager's display are the 'Free' and 'Next' ones. These give respectively the size of the free memory pool, and the amount of memory that will be given to the next application. They can be dragged to give the desired effect. For example, the user can decrease the RAM disc slot to increase the 'Free' size, which will in turn allow another resource, e.g. the screen size, to be increased. This is only used if the task doesn't issue an explicit *WimpSlot command, though most will do so.
Using the memory mapping capabilities of the MEMC chip, the Wimp can make all applications' memory appear to start at address &8000. This is called logical memory, and is all the application need worry about. Logical memory is mapped via the MEMC into the physical memory of the machine. The smallest unit of mapping is called a page, and its size is typically 8K or 32K bytes. Before giving control to a task through Wimp_Poll, the Wimp ensures that the correct pages of physical memory are mapped into the application workspace at address &8000.
In general, then, the application need not concern itself with memory allocation. However, there are times when direct interaction between a task and the Wimp's allocation is desirable. For example, a program may need a certain minimum amount of memory to operate correctly. Conversely, when running an application might decide that it doesn't need all of the memory that was allocated to it, and give some back.
The SWI Wimp_SlotSize allows the size of the current task's memory and the 'Next' slot to be read or altered. See the description of that call for details of its entry and exit parameters and examples of its use. The command *WimpSlot uses the call.
A program may need a large amount of memory for a temporary buffer. Just as it is possible to claim the screen memory using OS_ClaimScreenMemory, a program can call Wimp_ClaimFreeMemory to obtain exclusive use of the Wimp's free pool. Only programs executing in SVC (supervisor) mode can make use of this memory, as it is protected against user-mode access. Furthermore, while the memory is claimed, the Wimp cannot dynamically alter the size of other areas, so programs should not 'hog' it for extended periods (i.e. across calls to Wimp_Poll).
Finally, just as built-in resources such as RMA size and sprite area size are alterable by dragging their respective bars, the Task Manager allows the user to perform the same operation on task bars. This is only possible with the task's cooperation. When a task starts up, the Task Manager asks it, by sending a message, if it will allow dynamic sizing of its memory allocation. If the program responds, the Task Manager will allow dragging of its bar, otherwise it won't. See the chapter entitled Message_SetSlot (&400C5) for details.
Applications with complex requirements can arrange to call Wimp_SlotSize at run-time to take (and give back) memory. BASIC programs may use the END=&xxxx construct to call Wimp_SlotSize.
C programs should call Wimp_SlotSize directly or use 'flex' (available with Release 3 or later of the Acorn C Compiler), which provides memory allocation for interactive programs requiring large chunks of store.
If Wimp_SlotSize is used directly, the language run-time library (and malloc()) will be entirely unaware that this is happening and so you must organise the extra memory yourself. A common way of doing this is to provide a shifting heap in which only large blocks of variable size data live. By performing shifting on this memory, pages can be given back to the Wimp when documents are unloaded.
Important:
Such sequences are quite likely to be hardware-dependent and OS version-dependent.
To facilitate the creation of windows, a 'template editor', called FormEd, has been written for the Wimp system. This allows you to use the mouse to design your own window layouts, and position icons as required. An extensive set of hierarchical menus provides a neat way of setting up all the relevant characteristics of the various windows and icons.
Once a window 'template' has been designed, it can be given an identifier (not necessarily the same as the window title) and saved in a template file along with any other templates which have been set up and identified. The Wimp provides a Wimp_OpenTemplate call, which makes it very simple for a task, on start up, to load a set of window definitions. The task can load a named template from the file, which can then be passed straight to Wimp_CreateWindow, or it can look for a wildcarded name, calling Wimp_LoadTemplate repeatedly for each match found.
Many of the templates used by the system are resident in ROM. They are held in Resources:$.Resources.*, where * is the name of the module. You can base your own templates on these by loading a ROM file into the template editor (FormEd - available with Release 3 or later of the Acorn C Compiler), modifying it and re-saving it in your own file. For example, the palette utility template file contains the 'Save as' dialogue box, which all applications should use (with a change of sprite name).
It is also possible to override the system's use of the ROM template files by setting App$Path, where App is the application name. These variables contain a comma-separated list of prefixes, usually directory names, in which the Wimp will search for the directory Templates when opening template files. Their default value points to the ROM, but you could change it to, say, ADFS::MyDisc.<old values> to make it look for modified, disc-resident versions of the standard template files first. Note that directory names must end in a dot.
There are two issues associated with the loading of window templates from a file. These concern the allocation of external resources:
In the first case, what happens is that the relevant indirected icon data is saved in the template file. When the template is loaded in, the task must provide a pointer to some free workspace where the Wimp can put the data, and redirect the relevant pointers to it. The workspace pointer will be updated on exit from the call to Wimp_LoadTemplate. If there is not enough room, an error is reported (the task must also provide a pointer to the end of the workspace). Having loaded the template, the program can inspect the icon block to determine where the indirected data has been put.
The issue concerning font handles is more difficult to solve. The template file provides the binding from its internal font handles to the appropriate font names and sizes. In addition, the Wimp must also have some way of telling the task which font handles it actually bound the font references to when the template was loaded. This is so the task can call Font_LoseFont as required when the window is deleted (or alternatively, when the task terminates).
To resolve this, the task must provide a pointer to a 256 byte array of font 'reference counts' when calling Wimp_LoadTemplate. Each element must be initialised to zero before the first call. Font handles received by the Wimp when calling Font_FindFont are used as indices into the array. Element i is incremented each time font handle i is returned.
So, when Load_Template returns, the array contains a count of how many times each font handle was allocated. On closing the window or terminating, the program must scan the array and call Font_LoseFont the given number of times for non-zero entries. As with icon pointers, the program can find out the actual font handles used by examining the window block returned by Wimp_LoadTemplate.
It is up to the programmer to decide whether it is sufficient to provide just one array of font reference counts, so that the fonts can be closed only when all the windows are deleted (or the task terminates), or whether a separate array is needed for each window. Of course, considerable space optimisations could be made in the latter case if the array were scanned on exit from Wimp_LoadTemplate and converted to a more compact form.
If a task is confident that its templates do not contain references to anti-aliased fonts, then the array pointer can be null, in which case the Wimp reports an error if any font references are encountered.
Note that if anti-aliased fonts are used, the program must also rescan its fonts when Message_ModeChange is received. This involves calling Font_ReadDefn for each relevant font handle, changing to the correct xy resolution, and calling Font_FindFont again. The new font handle can be put back in the window using Wimp_SetIconState.
For a general description of resource files see the section entitled Application resource files in the Application directories chapter in the RISC OS Style Guide.
The following table outlines those sections in the Application directories chapter in the RISC OS Style Guide which describe the standard resource files available under the Wimp:
| Section | describes: |
|---|---|
| The !Appl.!Boot file | the file which is *Run when the application is first 'seen' by the Filer. |
| The !Appl.!Sprites file | the sprite file that provides sprites for the Filer to use to represent your application's directory. |
| The !Appl.!Run file | the file which is *Run when the application directory is double-clicked. |
| The !Appl.!Messages file | the file used to store all of an application's textual messages. |
| The !Appl.!Help file | the file used to store plain text that provides brief help about your application. |
| The !Appl.!Choices file | the file used to store user-settable options so they are preserved from one invocation of the application to the next. |
| Shared resources | those resources of general interest to more than one program; for example, fonts. |
| Large applications | how to cope with very large applications. |
If an application is intended for international use then all textual messages within the program should be placed in a separate text file, so that they can be replaced with those of a different language. It may be unhelpful for the application to read such messages one by one, however, as this forces the user of a floppy disc-based system to have the disc containing the application permanently in the drive. Error messages should all be read in when the application starts up, so that producing an error message does not cause a Please insert disc disc title message to appear first.
Note that Obey$Dir and obey files are important here. Applications must always be invoked with their full pathnames, so that Obey$Dir is set correctly. For example, if a resource file is accessed later when the current directory has changed, using a full pathname means it will work OK.
Resources may also be updated by the program during the course of execution. For instance, if an application has user-settable options which should be preserved from one invocation of the program to the next, then saving them within the application directory means that the user does not have to worry about separate files containing such data. As a source of user-settable options this technique is preferable to reading an environment string, since with the latter system the user has to understand how to set up a boot file.
For rules about the size and appearance of sprites you use to represent an application see the section entitled Appearance of sprites in the chapter entitled Sprites and icons in the RISC OS Style Guide.
This file must be of type 'Sprite'.
For a general description of the !Appl.!Run file see the section entitled The !Appl.!Run file in the Application directories chapter in the RISC OS Style Guide.
Here is an example !Run file:
WimpSlot -min 260K -max 260K
RMEnsure FPEmulator 2.60 RMLoad System:Modules.FPEmulator
RMEnsure FPEmulator 2.60 Error You need FPEmulator 2.60 or later
|
| also RMEnsure SharedCLibrary and ColourTrans modules
|
Set Draw$Dir <Obey$Dir>
Set Draw$PrintFile printer:
Run "<Draw$Dir>.!RunImage" %*0
The action of these commands is to respectively
Draw, like many applications, knows exactly how much memory it should be loaded with. It acquires more memory once executing (without the knowledge of the language system underneath) by calling SWI Wimp_SlotSize. Paint, Draw and Edit all maintain shifting heaps above the initial start-up limit, ensuring that extra memory is always given back to the central system when it is not needed.
Applications can also arrange to have the user control dynamically how much memory they should have, by dragging the relevant bar in the Task Manager display. See the chapter entitled Message_SetSlot (&400C5) for details.
Other possible actions that may occur within !Run files are
*If "<System$Path>" = "" Then Error 0 System resources cannot be found
However, some applications wish to ensure that there is also some free memory after they have loaded, for example if they use the shifting heap strategy outlined above. Such applications may call *WimpSlot again just before executing !RunImage, with a slightly smaller slot setting, to leave just the right amount in the current slot while at the same time ensuring that there is some memory free.
It should be emphasised that the presence of multiple applications with the same name should be thought of as an unusual case, but should not cause anything to crash. Also, complain 'cleanly' if your resources can no longer be found after program start-up.
One point to note here is that when an application is starting up from its *Run file, if a screen mode change is to take place, you must call *WimpSlot 0 0 before the change and reset the slot size afterwards.
The recommended approach is to create an application directory whose !Boot file sets up an environment variable which other applications use to access the shared resources (within the shared resource directory).
!System is an example of such a shared resource, which provides shared resources for the RISC OS welcome disc applications. Note that other applications may rely on using !System resources, but further resources must not be put into !System. These should instead go into their own shared resource directories, with names obtained by applying to Acorn. (See the chapter entitled Shared resources.)
This approach ensures that users can view shared resources as fixed objects that must be present for other applications to work, and not have to worry about what is inside them.
Where upgrades of a particular shared resource are concerned, the old copy should be archived and deleted from view, to avoid the possibility of accidental access to the old information. Note that if this does occur, the resulting error messages should make it clear to the user what to do next.
A program using the Wimp can be loaded from disc into the application memory (&8000), or may be a relocatable module resident in the RMA (relocatable module area). In the main, Wimp tasks of both varieties work in the same way and have similar structures. However, module tasks must additionally cope with service calls generated at various times by the Wimp. They must also be able to terminate when asked to, e.g. during an *RMTidy operation.
In this section we describe the special requirements of module tasks, but not how to write modules from scratch. See the chapter entitled Modules for details. You may also like to read the sections on Wimp_Initialise and Wimp_CloseDown before going over the listings below.
Much of the following is concerned with service call handling. A general, and very important, aspect of this is register usage. A module service handler can modify registers R0 - R6 that have been explicitly stated to be return parameters for each individual service call. However, these registers should not be modified, except to produce a particular effect as defined below. Badly behaved service code which does not adhere to this can produce bugs which are very difficult to track down and cause the system to fail in unpredictable ways.
Tasks are started using a * Command. This is decoded by the module's command table and the appropriate code to handle the command is called automatically. This is standard module code, and looks like this:
;This is pointed to by the entry for the module's * Command
myCommandCode
        STMFD   SP!, {LR}               ; Save the link register
        MOV     R2, R0                  ; R2 points at command tail
        ADR     R1, titleStr            ; R1 points at title string of module
        MOV     R0, #2                  ; Module 'Enter' reason code
        SWI     XOS_Module              ; Enter the module as a language
        LDMFD   SP!, {PC}               ; Return (in case that failed)
WIMP_VER * 200
titleStr
        DCB     "MyModule",0            ; as returned by *Modules
        ALIGN
TASK  DCB       "TASK"
; This is the module's language entry point
startCode
        LDR     R12, [R12]              ; Get workspace pointer claimed in Init entry
        LDR     R0, taskHandle
        TEQ     R0, #0                  ; Are we already running?
        LDRGT   R1, TASK                ; Yes, so close down first
        SWIGT   XWimp_CloseDown
        MOVGT   R0, #0                  ; Mark as inactive
        STRGT   R0, taskHandle
; Now claim any workspace etc. required before initing the Wimp
; ...
; If all goes well, we end up here
        MOV     R0, #WIMP_VER           ; (re)start the task
        LDR     R1, TASK
        ADR     R2, titleStr
        SWI     XWimp_Initialise
        BVS     startupFailed           ; Tidy up and exit if something went wrong
        STR     R1, taskHandle          ; Save the non-zero handle
...
Thus when the user enters the appropriate * Command, the module is started as a language and the start code is called using the word at offset 0 in the module header. It is entered in user mode with interrupts enabled, and R12 pointing at its private word.
On entry, the task checks to see if it is already active. If it is, it closes down (to avoid running as two tasks at once). It also resets its taskHandle variable to indicate that it is inactive. It then performs any necessary pre-Wimp_Initialise code, such as claiming workspace from the RMA. If this succeeds, it calls Wimp_Initialise and saves the returned task handle.
Always check error returns from Wimp calls. Beware errors in redraw code; they are a common form of infinite loops (because the redraw fails, the Wimp asks you again to redraw, and so on). A suddenly missing font, for instance, should not lead to infinite looping. Check that the failure of Wimp_CreateWindow or Wimp_CreateIcon does not lead you to crash or lose data.
Check cases concerning running out of space.
If the user is asked to insert a floppy disc and selects Cancel, you get an error Disc not present (&108D5) or Disc not found (&108D4) from ADFS. If you get either of these errors from an operation you need not call Wimp_ReportError, just cancel the operation. This avoids the user getting two error boxes in a row.
Do not have phrases like 'at line 1230' in error messages from BASIC programs; '(internal error code 1230)' is preferable.
Most of the above errors are provided as debugging aids to development programmers, and should not occur when the system is working properly, except for Too many windows, which can happen if a task program allows the user to bring up more and more windows. The error is not serious, as long as the task program's error trapping is written properly - when creating a window, you should only update any data structures relating to it once the window has been successfully created.
There are two clocks that keep track of real time in the system, the hardware clock and a software centi-second timer. The two can diverge by a few seconds a day, but are resynchronised at machine reset. For consistency, always use the centi-second timer.
When using Wimp_PollIdle, remember that monotonic times can go negative (i.e. wrap round in a 32-bit representation) after around six weeks. So when comparing two times the expression
(newtime - oldtime) > 100
is a better comparison than
newtime > oldtime + 100.
As the Wimp is developed, it is often necessary to make alterations or additions to the application interface. Sometimes this can be done in such a way that the new behaviour is 'back-compatible' with the old (i.e. it will not confuse applications which do not know about the extension), for example, where a reserved field can be set non-zero to enable the new feature.
However, it is occasionally necessary to make changes that could potentially confuse an application which was not aware of them. In order to cope with this, the Wimp allows an application to inform it of how much it knows when it calls Wimp_Initialise, by supplying in R0 the version number of the latest release of the Wimp which the programmers have taken into account.
This allows the Wimp to provide 'incompatible' new facilities only to those applications which it knows are aware of them, thereby avoiding compatibility problems with the others.
In many cases a 'compatible' extension can be made, where it is clear to the Wimp whether or not the application is trying to use the new facility, so not all extensions require the application to 'know' about the later version of the Wimp.
Applications written for RISC OS 2 should all have R0 set to 200 when calling Wimp_Initialise.
Under RISC OS 3 an application can only pass 200, 300, or 310 to Wimp_Initialise. The Wimp will give an error if any other value is passed in.
The next section describes those service calls that are of particular relevance to you when you are writing modules to run under the Window Manager. The remaining service calls that RISC OS provides are documented in the Modules.
R0 = amount application space will change by
R1 = &11 (reason code)
R2 = current active object pointer (CAO)
R1 = 0 to prevent re-mapping taking place
This is issued when the contents-addressable memory in the memory controller is about to be remapped, which alters the memory map of the machine. You should claim this call if you don't want the remapping to take place.
A module will initially be given the current slot size for its application workspace starting at &8000. However, modules do not generally need this area, as they use the RMA for workspace. Therefore, when a task calls Wimp_Initialise, the Wimp inspects the CAO. If this is within application workspace, the Wimp does nothing. However, if the CAO is outside of application space (a module's CAO is its base address in the RMA or ROM), the Wimp will reduce the current slot size to zero automatically, except as described below.
Some modules, notably BASIC, do require application workspace. Therefore the Wimp makes this service call just before returning the application space to its free pool. A task can object to the remapping taking place by claiming the call. The Wimp will then leave the application space as it is.
R1 = &27 (reason code)
R1 preserved to pass on (do not claim)
This is issued at the end of a machine reset. It must never be claimed.
Since MessageTrans does not close message files on a soft reset, applications that do not wish their message files to be open once they leave the desktop should call MessageTrans_CloseFile for all their open files at this point. However, it is perfectly legal for message files to be left open over soft reset.
See also Service_Reset and Service_Reset.
R1 = &49 (reason code)
R0 = pointer to * Command to start module
R1 = 0 to claim call
The Desktop will try to start up any resident module tasks when it is called (using *Desktop or by making the task the start-up language). It does this by issuing a service call Service_StartWimp (&49). If this call is claimed, the Desktop starts the task by passing the * Command returned by the module to Wimp_StartTask. It then issues the service again, and repeats this until no-one claims it.
A module's service call handler should deal with this reason code as follows:
serviceCode
        LDR     R12, [R12]                      ; Load workspace pointer
        STMFD   SP!, {LR}                       ; Save link and make R14 available
        TEQ     R1, #Service_StartWimp          ; Is it service &49?
        BEQ     startWimp                       ; Yes
        ...                                     ; Otherwise try other services
        LDMFD   SP!, {PC}                       ; Return
startWimp
        LDR     R14, taskHandle                 ; Get task handle from workspace
        TEQ     R14, #0                         ; Am I already active?
        MOVEQ   R14, #-1                        ; No, so init handle to -1
        STREQ   R14, taskHandle                 ; R12 relative
        ADREQ   R0, myCommand                   ; Point R0 at command to start task
        MOVEQ   R1, #0                          ; (see earlier) and claim the service
        LDMFD   SP!, {PC}                       ; Return
Note that the taskHandle word of the module's workspace must be zero before the task has been started. This word should therefore be cleared in the module's initialisation code. If the task is not already running, the startWimp code should set the handle to -1, load the address of a command that can be used to start the module, and claim the call. Otherwise (if taskHandle is non-zero) it should ignore the call.
The automatic start-up process is made slightly more complex by the necessity to deal elegantly with errors that occur while a module is trying to start up. If the appropriate code is not executed, the Desktop can get into an infinite loop of trying to initialise unsuccessful modules.
This is avoided by the task setting its handle to -1 when it claims the StartWimp service. If the task fails to start, this will still be -1 the next time the Wimp issues a Service_StartWimp, and so it will not claim the service.
R1 = &4A or &27 (reason codes)
Module's taskHandle variable set to zero
A task which failed to initialise would have its taskHandle variable stuck at the value -1, which would prevent it from ever starting again (as Service_StartWimp would never be claimed). In order to avoid this, the two service calls above should be recognised by task modules. On either of them, the task handle should be set to zero:
serviceCode
        STMFD   sp!, {R14}
        LDR     R12, [R12]                      ; Get workspace pointer
...
        TEQ     R1, #Service_StartedWimp        ; Service &4A?
        BEQ     Service_StartedWimp
tryServiceReset
        TEQ     R1, #Service_Reset              ; Reset reason code?
        MOVEQ   R14, #0                         ; Yes, so zero handle
        STREQ   R14, taskHandle
        LDMFD   SP!, {PC}                       ; Return
...
        LDR     R14, taskHandle                 ; taskHandle = -1?
        CMN     R14, #1
        MOVEQ   R14, #0                         ; Yes, so zero it
        STREQ   R14, taskHandle
        LDMFD SP!, {PC}                         ; Return
Service_StartedWimp is issued when the last of the resident modules has been started, and Service_Reset is issued whenever the computer is soft reset.
Generally a module task will terminate itself in the usual fashion by calling Wimp_CloseDown just before it calls OS_Exit. This might be in response to a Quit selection from a menu, or after a Message_Quit has been received. Modules also have finalisation entry point, and Wimp_CloseDown should be called from within this:
finalCode
        STMFD   sp!, {R14}
        LDR     R12, [R12]                      ; Get workspace pointer
        LDR     R0, taskHandle                  ; Check task is active
        TEQ     R0, #0
        LDRGT   R1, TASK                        ; If so, close it down
        SWIGT   XWimp_CloseDown
        MOV     R1, #0                          ; always mark it as inactive
        STR     R1, taskHandle
; perform general finalisation code, possibly according to the value of R10
; (fatality indicator).
        LDMFD   sp!, {PC}                       ; Return with V and R0 intact in case
                                                ; an error occurred
It is important that when Wimp_CloseDown is called from the finalise code, the task handle is quoted, as the module may not necessarily be the currently active Wimp task. Additionally, whenever Wimp_CloseDown is called, even outside of the finalisation code, the taskHandle variable should be cleared to zero.
R0 = mouse x coordinate
R1 = &52 (reason code)
R2 = button state (from OS_Mouse)
R3 = time of mouse event (from OS_ReadMonotonicTime)
R4 = mouse y coordinate (NB R1 is already being used!)
All registers preserved
It is possible to write programs which record changes in the mouse button state and pointer position. The recording can be played back later to simulate the effect of a human manipulating the mouse. This is very useful for setting up unattended demonstrations.
To save memory or disc space, such programs usually only record the mouse position when the button state changes, or after a certain time interval, e.g. ten times a second. Some Wimp events are dependent on a change of mouse position, not button state. It is therefore possible for a mouse recorder program to miss a critical mouse movement if it doesn't happen to choose the correct time to make its recording. The replay will then give different results from the original.
Service_MouseTrap is designed to overcome the problem. Whenever the Wimp detects a significant mouse movement, e.g. the pointer moving over a submenu right arrow, it issues this call. A mouse recorder should include the data in its output, in addition to any other mouse movements and button events that it would ordinarily log.
Programs which react to particular mouse movements (e.g. certain types of dragging) should themselves generate this event, where there is no mouse button transition.
A mouse recorder program should also trap INKEY of positive and negative numbers.
Notification that the Window Manager is about to close down a task
R0 = 0 if Wimp_CloseDown called (i) or
R0 > 0 if Wimp_Initialise called in task's domain (ii)
R1 = &53 (reason code)
R2 = handle of task being closed down, (i) and (ii)
R0 preserved (i) or (ii), or set to error pointer (ii)
The Wimp passes this service around when someone calls Wimp_CloseDown. Usually a task knows that it has called Wimp_CloseDown, so this might not appear to be particularly informative. However, there are a couple of situations where the Wimp actually makes the call on a task's behalf. It is on these occasions that the service is useful.
If the original task does not want to be closed down, it should alter R0 so that it contains the pointer to a standard error block. The text 'Wimp is currently active' is regarded as a suitable message. (The task should compare the handle in R2 to its own to ensure that it is the task that is being asked to die.) The call should not be claimed, in order to allow others to receive the service, and R0 should not be altered except to point to an error.
If, on return from the service, R0 points to an error, the Wimp will return this to the new task trying to start up (it will also set the V flag). Thus, if the task is detecting errors correctly, it will abort its attempt to start up and call OS_Exit. This will happen if, for example, you try to start the Draw application from within a task window.
Request to suspend trapping of VDU output so an error can be displayed
R0 = 0 (window closing) or 1 (window opening)
R1 = &57 (reason code)
All registers preserved
This service is provided so that certain tasks which usually trap VDU output (e.g. the VDU module) can be asked to suspend their activities temporarily while an error window is displayed.
If the state of the trapping module is 'active' and the service call is received with R0=1, the module should stop trapping and set its state to 'suspended'. Similarly, if the state is suspended and the service is received with R0=0, the error window has disappeared and the module should re-enter the active state.
By taking note of this call, tasks running in an Edit window allow the standard filing system 'up-call' mechanism to continue operating, whereby users are asked to insert discs which the Filer cannot find in a drive.
R0 = flag word (as in Message_SaveDesktop)
R1 = &5C (reason code)
R2 = file handle of file to write *commands to
R0 = pointer to Error, if necessary, else preserved
R1 = 0 for error (i.e. claim), else preserved
All other registers preserved
This call is provided for modules which need to save some state to a desktop boot file, e.g. ColourTrans saves its calibration.
When a module receives this service code it should write out any * Commands, to the specified file handle, which should be performed by a Desktop Boot file on entry to the Desktop.
If an error occurs (Disc full, Can't extend, or even a module specific error like Can't save desktop now because...) then the service should be claimed, and R0 should point to the error block.
This service call is performed before the task manager issues the Wimp broadcast message Message_SaveDesktop.
This call is not available under RISC OS 2.
R1 = &5D (reason code)
All register preserved
This call is issued by the Window Manager when SWI Wimp_SetPalette is called to set the WIMP's palette. It can be used to tell when the palette has changed.
This service call should not be claimed.
This call is not available under RISC OS 2.
R1 = &7C (reason code)
R1= 0 to claim and stop startup screen from appearing.
This service call is issued just before the RISC OS 3 startup screen is drawn. It should be claimed if you want to replace the startup screen, or to prevent it from appearing.
This call is not available under RISC OS 2.
R1 = &7E (reason code)
R1= 0 to claim and stop shutdown.
This service call is issued by the Task manager when it is asked to perform a shutdown; it should be claimed to stop the shutdown from happening.
For example this is used by RamFS to warn the user that there are unsaved files in the RAM disc.
This call is not available under RISC OS 2.
R1 = &80 (reason code)
This service call should not be claimed.
This service call is issued when the machine has been brought to the state where it can be safely turned off and the shutdown message is on the screen.
This service call is not issued by RISC OS 2.
R1 = &85 (reason code)
R2 = pointer to ROM area
R3 = pointer to RAM area
All registers preserved
This service is provided if the sprite pools have to move. You must not claim it.
This service call is not issued by RISC OS 2.
Allows the Filter Manager to install filters with the Window Manager
R1 = &86 (reason code)
--
When the Window Manager is reset this service call is issued to allow tasks to install filters with it. This is used by the Filter Manager to register itself.
This is issued when the Wimp resets the filter table back to its default state.
This service should not be used unless you are providing a replacement for the Filter Manager.
See the chapter entitled The Filter Manager for more information on how to register filters for tasks.
This service call is not issued by RISC OS 2.
In the following section, we list all of the SWI calls provided by the Window Manager module. It is possible to make some generalisations about the routines, though there are inevitably exceptions:
The following SWIs can only operate on windows owned by the task that is active when the call is made, and will report the error Access to window denied if an attempt is made to access another task's window:
| Wimp_CreateIcon | except in the icon bar |
| Wimp_DeleteWindow | |
| Wimp_DeleteIcon | except in the icon bar |
| Wimp_OpenWindow | send Open_Window_Request instead |
| Wimp_CloseWindow | send Close_Window_Request instead |
| Wimp_RedrawWindow | |
| Wimp_SetIconState | except in the icon bar |
| Wimp_UpdateWindow | |
| Wimp_GetRectangle | |
| Wimp_SetExtent | |
| Wimp_BlockCopy |
This also means that a task cannot access its own windows unless it is a 'foreground' process, i.e. it has not gained control by means of an interrupt routine, or is inside its module Terminate entry.
Registers a task with the Wimp
R0 = last Wimp version number known to task × 100 (310 for RISC OS 3 applications)
R1 = 'TASK' (low byte = 'T', high byte = 'K', i.e. &4B534154)
R2 = pointer to short description of task, for use in Task Manager display
R3 = pointer to a list of message numbers terminated by a 0 word (not if R0 is less than 300). If Wimp version number is  310 then a null pointer indicates that no messages are important to this task, whereas a null list indicates that all messages are important; this is the reverse of what you might expect.
R0 = current Wimp version number × 100
R1 = task handle
Interrupts are not defined
Fast interrupts are enabled
Processor is in SVC mode
SWI is not re-entrant
This call registers a task with the Wimp, and must be called once only when the task starts up. The following is done when the first task starts up and when a 'grubby' task exits (i.e. a task that starts from and returns to the Desktop but does not use it) and there are more tasks running.
The task will only receive messages which are included in the list pointed to by R3. The list should not (and cannot) include Message_Quit (0) as this message will always be delivered to all tasks.
The messages list is not required if the value passed in R0 is 200.
Note that an application may still get a message that is not in the list if it is run under an older Wimp, you should not give an error in this case.
None
Tells the Wimp what the characteristics of a window are
R0 = window handle
Interrupts are not defined
Fast interrupts are enabled
Processor is in SVC mode
SWI is not re-entrant
This call tells the Wimp what the characteristics of a window are. You should subsequently call Wimp_OpenWindow to add it to the list of active windows (ones that are to be displayed). The format of a window block is as follows:
| R1 + 0 | visible area minimum x coordinate (inclusive) | |
| R1 + 4 | visible area minimum y coordinate (inclusive) | |
| R1 + 8 | visible area maximum x coordinate (exclusive) | |
| R1 + 12 | visible area maximum y coordinate (exclusive) | |
| R1 + 16 | scroll x offset relative to work area origin | |
| R1 + 20 | scroll y offset relative to work area origin | |
| R1 + 24 | handle to open window behind (-1 means top, -2 means bottom) | |
| R1 + 28 | window flags - see below | |
| R1 + 32 | title foreground and window frame colour - &FF means that the window has no control area or frame | |
| R1 + 33 | title background colour | |
| R1 + 34 | work area foreground colour | |
| R1 + 35 | work area background colour - & means 'transparent', so the Wimp won't clear the rectangles during a redraw operation | |
| R1 + 36 | scroll bar outer colour | |
| R1 + 37 | scroll bar inner (Slider) colour | |
| R1 + 38 | title background colour when highlighted for input focus | |
| R1 + 39 | reserved - must be 0 | |
| R1 + 40 | work area minimum x coordinate | |
| R1 + 44 | work area minimum y coordinate | |
| R1 + 48 | work area maximum x coordinate | |
| R1 + 52 | work area maximum y coordinate | |
| R1 + 56 | Title Bar icon flags - see below | |
| R1 + 60 | work area flags giving button type - see below | |
| R1 + 64 | sprite area control block pointer (+1 for Wimp sprite area) | |
| R1 + 68 | minimum width of window | NB two-byte quantities 0,0 means use title width instead |
| R1 + 70 | minimum height of window | |
| R1 + 72 | title data - see below | |
| R1 + 84 | number of icons in initial definition (can be 0) | |
| R1 + 88 | icon blocks, 32 bytes each - see Wimp_CreateIcon. | |
Note that the entries from R1+0 to R1+24 are not used unless Wimp_GetWindowState is called.
From RISC OS 3 onwards the Window extent is automatically rounded to be a whole number of pixels (and is re-rounded on a mode change).
Note: this call does not affect the screen unless the window handle is -2 (i.e. the iconbar). You must make a call to Wimp_ForceRedraw to remove the icon(s) deleted, passing a bounding box containing the icons.
Fields requiring further explanation are:
Window flags and status information are held in the word at offsets +28 to +31.
| Bit | Meaning when set |
|---|---|
| 0 † | window has a Title Bar |
| 1 | window is moveable, i.e. it can be dragged by the user |
| 2 † | window has a vertical scroll bar |
| 3 † | window has a horizontal scroll bar |
| 4 | window can be redrawn entirely by the Wimp, i.e. there are no user graphics in the work area. Redraw window requests won't be generated if this bit is set |
| 5 | window is a pane, i.e. it is on top of a tool window |
| 6 | window can be opened (or dragged) outside the screen area (see also *Configure WimpFlags) |
| 7 † | window has no Back icons or Close icons |
| 8 | a Scroll_Request event is returned when a mouse button is clicked on one of the arrow icons (with auto-repeat) or in the outer scroll bar region (no auto-repeat) |
| 9 | as above but no auto-repeat on the arrow icons |
| 10 | treat the window colours given as GCOL numbers instead of standard Wimp colours. This allows access to colours 0 - 254 in 256-colour modes (255 always has a special meaning) |
| 11 | don't allow any other windows to be opened below this one (used by the icon bar, and the backdrop for pre-RISC OS style applications) |
| 12 | generate events for 'hot keys' passed back through Wimp_ProcessKey if the window is open |
| 13 | forces window to stay on screen (not in RISC OS 2) |
| 14 | ignore right-hand extent if the size box of the window is dragged (not in RISC OS 2) |
| 15 | ignore lower extent if the size box of the window is dragged (not in RISC OS 2) |
Flags marked † are old-style control icon flags. You should use bits 24 to 31 in preference.
The five bits below are set by the Wimp and may be read using Wimp_GetWindowState.
| Bit | Meaning when set |
|---|---|
| 16 | window is open |
| 17 | window is fully visible, i.e. not covered at all |
| 18 | window has been toggled to full size |
| 19 | the current Open_Window_Request was caused by a click on the Toggle Size icon |
| 20 | window has the input focus |
| 21 | force window to screen once on the next Open_Window |
If any of the following circumstances occur, the Wimp sets bit 21 of the window flags, which causes the window to be restricted to the screen area for one call to Wimp_OpenWindow only (this causes the bit to be cleared):
When a window is first opened it will be forced onto the screen, but can subsequently be dragged off by the user. If you are dragging the size box of a window, and you move the pointer off the bottom-right of the screen, the Wimp will try to make the window bigger. If it succeeds, the window will be forced onto the screen, so it will appear to grow upwards and left. The speed of growing can be controlled by how far the pointer is off-screen. Window flags bit 21 is also set automatically by the Wimp when a menu or a dialogue window is opened as a result of the pointer moving over the relevant submenu icon, or as a result of a call to Wimp_CreateMenu or Wimp_CreateSubMenu. This forces the menus onto the screen normally, but allows them to be dragged off-screen if desired. This bit is not supported in RISC OS 2. | |
| Bit | Meaning when set |
| 22 - 23 | reserved; must be 0 |
The eight bits below provide an alternative way of determining which control icons a window has when it is created. If bit 31 is set, bits 24 to 30 determine the presence of one system icon, otherwise the 'old style' control icon flags noted above are used.
| Bit | Meaning when set |
|---|---|
| 24 | window has a Back icon |
| 25 | window has a Close icon |
| 26 | window has a Title Bar |
| 27 | window has a Toggle Size icon |
| 28 | window has a vertical scroll bar |
| 29 | window has a Adjust Size icon |
| 30 | window has a horizontal scroll bar |
| 31 | use bits 24 - 30 to determine the control icons, otherwise use bits 0, 2, 3 and 7 |
A window may only have a quit and/or Back icon if it has a Title Bar, and a Size icon if it has one or two scroll bars. A Toggle Size icon needs a vertical scroll bar or a Title Bar. We recommend that new applications use the bit 31 set method of determining the control icons.
Bits 24 to 30 are also returned by Wimp_GetWindowState, updated to reflect what actually happened, so you can use this to ensure that the control icons used by the Wimp are as specified when the window was created, i.e. it was a valid specification.
Title bar flags are held in the four bytes +56 to +59 of a window block. They correspond to the icon flags used in an icon block, described under Wimp_CreateIcon below. They determine how the contents of the Title Bar are derived and displayed. Note the following differences from proper icon flags though:
So, the title may be text or a sprite, may be indirected (but not writable), use normal or anti-aliased text, and may be positioned within the Title Bar as required.
Title data is held in the twelve bytes at +72 to +83 of a window block. It has the same interpretation as the icon data bytes described under Wimp_CreateIcon. In summary:
See the section on icon data under Wimp_CreateIcon for more details.
The word at offset +26 in a window block is used to determine the 'button type' of the work area. Only bits 12 to 15 of this word are used. The 16 possible button types are much as described in the section on icon creation below. Note though that there is no concept of a window's work area being 'selected' by the Wimp; the user is simply informed of button clicks through the Mouse_Click event.
Note that as stated previously, the button type only determines how Select and Adjust are handled; Menu is always reported. The interpretations of the button types for windows then are:
| Bits 12 - 15 | Meaning |
|---|---|
| 0 | ignore all clicks |
| 1 | notify task continually while pointer is over the work area |
| 2 | click notifies task (auto-repeat) |
| 3 | click notifies task (once only) |
| 4 | release over the work area notifies task |
| 5 | double click notifies task |
| 6 | as 3, but can also drag (returns button state * 16) |
| 7 | as 4, but can also drag (returns button state * 16) |
| 8 | as 5, but can also drag (returns button state * 16) |
| 9 | as 3 |
| 10 | click returns button state * 256 |
| drag returns button state * 16 | |
| double click returns button state * 1 | |
| 11 | click returns button state |
| drag returns button state * 16 | |
| 12 - 14 | reserved |
| 15 | mouse clicks cause the window to gain the input focus. |
The handles of any icons defined in this call are numbered from zero upwards, in the same order that they appear in the block. For details of the 32-byte definitions, see the next section.
Note: the Wimp_CreateWindow call may produce a Bad work area extent error if the visible area and scroll offsets combine to give a visible work area that does not lie totally within the work area extent.
Tells the Wimp what the characteristics of an icon are
R0 = icon handle
Interrupts are not defined
Fast interrupts are enabled
Processor is in SVC mode
SWI is not re-entrant
This call tells the Wimp what the characteristics of an icon are.
The block contains the following:
| R1 + 0 | window handle or: -1 for right of icon bar -2 left of icon bar The following are not available in RISC OS 2: -3 create icon on icon bar to left of icon handle R0-4 create icon on icon bar to right of icon handle R0-5 create icon on left side, scanning from the left-6 create icon on left side, scanning from the right-7 create icon on right side, scanning from the left-8 create icon on right side, scanning from the right
|
| R1 + 4 | icon block |
where an icon block is defined as:
| + 0 | minimum x coordinate of icon bounding box |
| + 4 | minimum y coordinate of icon bounding box |
| + 8 | maximum x coordinate of icon bounding box |
| + 12 | maximum y coordinate of icon bounding box |
| + 16 | icon flags |
| + 20 | 12 bytes of icon data |
This call does not affect the screen, except when creating an icon on the icon bar. Use Wimp_ForceRedraw to do this.
Icon blocks are also used in the Wimp_CreateWindow block and returned by Wimp_GetWindowInfo.
Once you have defined the icon, you can only make these changes to it:
Wimp_SetCaretPosition
Wimp_GetCaretPosition
Wimp_Poll Key_Pressed 8 event on Key_Pressed 8.
The window handle at R1+0 may be an application window, or:
-1 for the right half of the icon bar (applications)
-2 for the left half of the icon bar (devices)
Note that creating an icon on the icon bar may cause other icons to 'shuffle', changing their x coordinates.
The window handle at R1+0 can also be:
-3 to create an icon on the icon bar to the left of icon handle R0, or
-4 to create an icon on the icon bar to the right of icon handle R0
where R0 = handle of icon to open next to, if [R1+0] = -3 or -4
= -1 create icon at the extreme left (-3) or right (-4)
This allows icons to be recreated and deleted (in order to change their width, for example) such that they stay in the same relative position on the icon bar. It also allows applications to keep groups of icon bar icons together.
Iconbar icons can also be prioritised, so that, for example, the RAM disc icon can be positioned immediately to the right of the Apps icon. Instead of using window handle values -1, -2, -3 or -4 you are advised to prioritise icon bar icons using the following values:
-5 create icon on left side, scanning from the left
-6 create icon on left side, scanning from the right
-7 create icon on right side, scanning from the left
-8 create icon on right side, scanning from the right
where R0 = signed 32-bit priority (higher priority towards outside)
The Wimp positions the icons so that they are sorted, with those of higher priority nearer the extreme ends of the icon bar. Where icons are of equal priority, the position of the new icon is determined by the scan direction.
The priorities assumed for the other possible window handle values are:
| Window handle values | Priority |
|---|---|
| handle = -1 | 0 |
| handle = -2 | 0 |
| handle = -3, R0 = icon handle | same as matched icon |
| handle = -3, R0 = -1 | &78000000 |
| handle = -4, R0 = icon handle | same as matched icon |
| handle = -4, R0 = -1 | &78000000 |
The various Desktop modules create icons with the following priorities:
| Module | Priority |
|---|---|
| Task Manager | &60000000 |
| !Help | &40000000 |
| Palette Utility | &20000000 |
| Applications | 0 |
| ADFS hard discs | &70000000 |
| ADFS floppy discs | &60000000 |
| 'Apps' icon | &50000000 |
| RAM disc | &40000000 |
| Ethernet | &30000000 |
| Econet | &20000000 |
| Other filing systems | &10000000 |
| Printer drivers | &0F000000 |
| TinyDir | &0E000000 |
The bounding box coordinates at R1+4 are given relative to the window's work area origin, except that the horizontal offset may be applied to an icon created on the icon bar. Note that if an icon is writable, the icon bounding box determines how much of the string is displayed at once. Typing into the icon or moving the caret left or right can cause the string to scroll within this box. The buffer length entry in the icon data determines the maximum number of characters that can be entered into a writable icon. One character is used for the terminator.
Note that icon strings can be terminated by any character from 0 to 31, and are preserved during editing operations by the Wimp. However, in template files, the terminator must be 13 (Return).
As noted earlier, subsets of these flags are used in Wimp_CreateWindow blocks to control how the contents of a window's Title Bar is defined, and the button type bits are used to determine how clicks within a window's work area are processed.
The full list of flags for a proper icon is:
These are much the same as window button types. However, icons can be 'selected' (inverted) by the Wimp automatically, so there are some additional effects to those already described for windows:
| 0 | ignore mouse clicks or movements over the icon (except Menu) |
| 1 | notify task continuously while pointer is over this icon |
| 2 | click notifies task (auto-repeat) |
| 3 | click notifies task (once only) |
| 4 | click selects the icon; release over the icon notifies task; moving the pointer away deselects the icon |
| 5 | click selects; double click notifies task |
| 6 | as 3, but can also drag (returns button state * 16) |
| 7 | as 4, but can also drag (returns button state * 16) and moving away from the icon doesn't deselect it |
| 8 | as 5, but can also drag (returns button state * 16) |
| 9 | pointer over icon selects; moving away from icon deselects; click over icon notifies task ('menu' icon) |
| 10 | click returns button state * 256 drag returns button state * 16 double click returns button state * 1 |
| 11 | click selects icon and returns button state drag returns button state*16 |
| 12 - 13 | reserved |
| 14 | clicks cause the icon to gain the caret and its parent window to become the input focus and can also drag (writable icon). For example, this is used by the FormEd application |
| 15 | clicks cause the icon to gain the caret and its parent window to become the input focus (writable icon) |
All the above return Mouse_Click events (6), where the button state is:
| Bit | Meaning when set |
|---|---|
| 0 | Adjust pressed |
| 1 | Menu pressed |
| 2 | Select pressed, or combination of above |
A drag is initiated by the button being held down for more than about a fifth of a second. A double click is reported if the button is clicked twice in one second and the second click is within 16 OS units of the first. Note that button types which report double clicks will also report the initial click first.
The icon data at +20 to +31 is interpreted according to the settings of three of the icon flags. The three bits are Indirected (bit 8), Sprite (bit 1) and Text (bit 0). The eight possible combinations and the eight interpretations of the icon data are:
| IST | Meaning of 12 bytes/3 words | |
|---|---|---|
| 000 | non-indirected, non-sprite, non-text icon | |
| + 20 | icon data not used in this case | |
| 001 | non-indirected, text-only icon | |
| + 20 | the text string to be used for the icon, control-terminated | |
| 010 | non-indirected, sprite-only icon | |
| + 20 | the sprite name to be used for the icon, control-terminated | |
| 011 | non-indirected, text plus sprite icon | |
| + 20 | the text and sprite name to be used - not especially useful | |
| 100 | indirected, non-sprite, non-text icon | |
| + 20 | icon data not used in this case | |
| 101 | indirected, text-only icon | |
| + 20 | pointer to text buffer | |
| + 24 | pointer to validation string - see below | |
| + 28 | buffer length | |
| 110 | indirected, sprite-only icon | |
| + 20 | pointer to sprite or to sprite name; see +28 | |
| + 24 | pointer to sprite area control block, +1 for Wimp sprite area | |
| + 28 | 0 if [+20] is a sprite pointer, length if it's a sprite name pointer | |
| 111 | indirected, text plus sprite icon | |
| + 20 | pointer to text buffer | |
| + 24 | pointer to validation string, which can contain sprite name | |
| + 28 | buffer length | |
Note that the icon bar's sprite area pointer is set to +1, so icons there use Wimp sprites. If you want to put an icon on the icon bar that isn't from the Wimp area, you must use an indirected sprite-only icon, type 110 above.
It is not possible to set the caret in the icon bar, so writable icons should not be used.
An indirected text icon can have a validation string which is used to pass further information to the Wimp, such as what characters can be inserted directly into the string and which should be passed to the user via the Key_Pressed event for processing by the application. The syntax of a validation string is:
The spaces in the above definition are for clarity only, and a validation string will normally have no spaces in it.
Icon validation strings are order dependent; they are scanned from left to right.
In simple terms, a validation string consists of a series of 'commands', each starting with a single letter and separated from the following command by a semicolon. { }* means zero or more of the thing inside the { }. The following commands are available:
The (A)llow command tells the Wimp which characters are to be allowed in the icon. Characters are inserted into the string if:
Otherwise:
Each char-spec in the 'allow' string specifies a character or range of characters; the ~ character toggles whether they are included or excluded from the icon text string:
A0-9a-z~dpu
allows the digits 0 - 9 and the lower-case letters a - z, except for 'd', 'p' and 'u'
If the first character following the A command is a ~ all normal characters are initially included:
A~0-9
allows all characters except for the digits 0 - 9
If you use any of the four special characters - ; ~ \ in a char-spec you must precede them with a backslash \:
A~\-\;\~\\
allows all characters except the four special ones - ; ~ \
The (D)isplay command is used for password icons to avoid onlookers seeing what is typed. It is followed by a character that is used to echo all allowed characters:
D*
displays the password as a row of asterisks
Note that if the character is any of the four 'special' characters above, you must precede it by a \:
D\-
displays the password as a row of dashes
The (F)ont colours command is used to specify the foreground and background colours used in text icons with an anti-aliased font. The F is followed by two hexadecimal digits, which specify the background and foreground Wimp colours respectively:
Fa3
sets background to 10 (&a hex), and foreground to 3.
This command uses the call Wimp_SetFontColours. If you do not use this command, the colours 0 and 7 (black on white) are used by default.
The (K)eys command is used to assign specific functionalities to various keys. You should follow the K with any or all of R, A, T, D, or N:
| Option | Action |
|---|---|
| R | If the icon is not the last icon in the window, pressing Return in the icon will move the caret to the beginning of the next writable icon in the window. If the icon is the last writable icon in the window then Return (code 13) will be passed to the application. |
| A | Pressing the up or down arrow keys will move the caret to the end of the next writable icon in the window. Pressing the up arrow key in the first writable icon in a window will move the caret to the last writable icon. Pressing the down arrow key in the last icon will move the caret to the first icon. |
| T | Pressing Tab in the icon will move the caret to the beginning of the next writable icon in the window. Pressing Shift-Tab will move the caret to the beginning of the previous writable icon in the window. The caret wraps around from last to first in the same way as in the A option. |
| D | Pressing any of Copy, Delete, Shift-Copy, Ctrl-U, or Ctrl-Copy will notify the application with the appropriate key codes as well as doing its defined action as specified in the Key_Pressed 8. |
| N | The application will be notified about all key presses in the icon, even if they are handled by the Wimp. |
Options can be combined by including more than one option letter after the K command. For example:
| KA | will give the arrow keys functionality |
| KAR | will give the arrow keys and the Return functionalities |
The (K)eys command is not available in RISC OS 2. In future releases of RISC OS this command will restrict the caret to icons in the same ESG group, rather than cycling through all icons.
The (L)ine spacing command is used to tell the Wimp that a text icon may be formatted. If the text is too wide for the icon it is split over several lines. You should follow the L with a decimal number giving the vertical spacing between lines of text in OS units - if omitted, the default used is 40 units. (A system font character is 32 OS units high.)
The current version of RISC OS ignores the number following the L, so no number can be specified. However, this option may be implemented in future versions of RISC OS.
This option can only be used with icons which are horizontally and vertically centred, and do not contain an anti-aliased font. The icon must not be writable, since the caret would not be positioned correctly inside it.
The (P)ointer Shape command changes the pointer shape while over the icon.
Pspritename,active_x,active_y or
Pspritename; coordinates default to (0, 0)
The sprites must be 4-colour sprites in the Wimp sprite area.
The (P)ointer command is not available in RISC OS 2
The Bo(R)der command sets the border type for the icon. The border will only be drawn if the border bit for the icon is also set. This command will override the Wimp's default border for the icon.
Rtype slab_in_colour
type - 0 normal single pixel border
1 slab out
2 slab in
3 ridge
4 channel
5 action button (highlights when icon selected)
6 default action button (highlights when icon selected)
7 editable field
8 normal single pixel border
slab_in_colour - relates to the highlight colour applied to border types 5 & 6. By default this is 14, but the validation string can over-ride this, when the icon is selected the foreground colour is retained and the background changes to the highlight colour.
The Bo(R)der command is not available in RISC OS 2, and does not correctly highlight fancy font icons under RISC OS 3.
The (S)prite name command is used to give a text and sprite icon a different sprite name from the text it contains, for example, Sfile_abc. No space should follow the S, and the sprite name should be no more than 12 characters long.
If a second name is given, separated from the first by a comma, this is used when the icon is highlighted. In this case, both icons must be the same size. If it is omitted, the sprite is highlighted by plotting it with its original colours exclusive-OR'ed with the icon foreground colour.
If an icon has both its text and sprite bits (0 and 1) set, then it will contain both objects. The text must be indirected, so that the validation string can be used to give the sprite name(s) to use (see the S command above).
Three flags in the icon flags are used to determine the relative positions of the text and sprite. These are the Horizontal, Vertical and Right justified bits (3, 4, and 9 respectively). The eight possible combinations of these bits, and how they position the sprite and text within the icon bounding box, are as follows:
| HVR | Horizontal | Vertical |
|---|---|---|
| 000 | text and sprite left justified | text at bottom, sprite at top |
| 001 | text and sprite right justified | text at bottom, sprite at top |
| 010 | sprite at left, text +12 units right of it | text and sprite centred |
| 011 | text at left, sprite at right | text and sprite centred |
| 100 | text and sprite centred | text at bottom, sprite at top |
| 101 | text and sprite centred | text at top, sprite at bottom |
| 110 | text and sprite centred (text on top) | text and sprite centred |
| 111 | text at right, sprite at left | text and sprite centred |
The following points should be noted about text plus sprite icons:
An important use of this type of icon is displaying a text plus sprite pair in the icon bar.
Closes a specified window if it is still open, and then removes its definition
R0 corrupted
Interrupts are not defined
Fast interrupts are enabled
Processor is in SVC mode
SWI is not re-entrant
This call closes the specified window if it is still open, and then removes the definition of the window and of all the icons within it. The memory used is re-allocated, except for the indirected data, which is in the task's own workspace.
The block contains the following:
| R1+ 0 | window handle |
If a window is deleted while being dragged, an error is reported by the Wimp, except in the case of a menu, where pressing Escape causes the drag to terminate and the menu tree to be deleted.
This error is not returned under RISC OS 2.
None
Removes the definition of a specified icon
R0 corrupted
Interrupts are not defined
Fast interrupts are enabled
Processor is in SVC mode
SWI is not re-entrant
This call removes the definition of the specified icon. If the icon is not the last one in its window's list it is marked as deleted, so that the handles of the other icons within the window are not altered. If the icon is the last one in the list, the memory is reallocated.
The block contains the following:
| R1+ 0 | window handle (-2 for icon bar) |
| R1+ 4 | icon handle |
Note: this call does not affect the screen unless the window handle is -2 (i.e. the icon bar). You must make a call to Wimp_ForceRedraw to remove the icon(s) deleted, passing a bounding box containing the icons.
None
Updates the list of active windows (ones that are to be displayed)
R0 corrupted
Interrupts are not defined
Fast interrupts are enabled
Processor is in SVC mode
SWI is not re-entrant
This call updates the list of active windows (ones that are to be displayed). The window may either be a new one being displayed for the first time, or an already open one that has had its parameters altered.
The block contains the following:
| R1+ 0 | window handle |
| R1+ 4 | visible area minimum x coordinate |
| R1+ 8 | visible area minimum y coordinate |
| R1+ 12 | visible area maximum x coordinate |
| R1+ 16 | visible area maximum y coordinate |
| R1+ 20 | scroll x offset relative to work area origin |
| R1+ 24 | scroll y offset relative to work area origin |
| R1 + 28 | handle to open window behind -1 means top of window stack -2 means bottom -3 means the window behind the Wimp's backwindow, hiding it from sight (-3 not available in RISC OS 2) |
Note that coordinates (x0,y0,x1,y1,scroll x,scroll y) are all rounded down to whole numbers of pixels. This also happens on a mode change automatically.
If a window that has the input focus is opened behind the backdrop (behind window -3) the input focus will be taken away from it before it is opened.
None
Removes the specified window from the active list
R0 corrupted
Interrupts are not defined
Fast interrupts are enabled
Processor is in SVC mode
SWI is not re-entrant
This call removes the specified window from the active list; it is no longer marked as one to be displayed. The Wimp will issue redraw requests to other windows that were previously obscured by the closed one.
The block contains the following:
| R1+ 0 | window handle |
None
R0 = mask
R1 = pointer to 256 byte block (used for return data)
R3 = pointer to poll word if R0 bit 22 set (not in RISC OS 2)
R0 = event code
R1 = pointer to block (data depends on event code returned)
If R0 is 18 (User_Message_Recorded), then R2 = task handle of sender
Interrupts are not defined
Fast interrupts are enabled
Processor is in SVC mode
SWI is not re-entrant
This call polls the Wimp to see whether certain events have occurred, and oversees such things as screen updating, keyboard and mouse handling, and menu selections. You must call it in the main loop of any program you write to run under the Wimp, and provide handlers for each event code it can return.
If any error occurs inside Wimp_Poll (apart from an error in the parameters to the call), it is reported by the Wimp itself, and is not passed back to any of the applications.
If an escape condition is pending when Wimp_Poll is called, or if escape conditions are enabled, the Wimp will report an error, and will cancel the escape condition and disable escape condition generation.
These errors are not returned under RISC OS 2.
The following event codes may be returned:
| Code | Reason |
|---|---|
| 0 | Null_Reason_Code |
| 1 | Redraw_Window_Request |
| 2 | Open_Window_Request |
| 3 | Close_Window_Request |
| 4 | Pointer_Leaving_Window |
| 5 | Pointer_Entering_Window |
| 6 | Mouse_Click |
| 7 | User_Drag_Box |
| 8 | Key_Pressed |
| 9 | Menu_Selection |
| 10 | Scroll_Request |
| 11 | Lose_Caret |
| 12 | Gain_Caret |
| 13 | Poll word non-zero |
| 14 - 16 | reserved |
| 17 | User_Message |
| 18 | User_Message_Recorded |
| 19 | User_Message_Acknowledge |
The highest priority are types 17 - 19, however, any event sent using Wimp_SendMessage has the same priority as a type 17, 18 or 19. In particular, this means that types 11 and 12 are higher in priority than type 1 (because the Wimp sends them using Wimp_SendMessage).
The remaining event codes are next and the lowest priority type is 0.
You can disable some of the event codes; they are neither checked for nor returned, and need not have handlers provided. You must do this for as many codes as possible, especially the Null_Reason_Code, if your task is to run efficiently under the Wimp. Some of the remaining event codes can be temporarily queued to prevent their return at times when they would otherwise interfere with the task running.
Both the above are done by setting bits in the mask passed in R0:
| Bit | Meaning when set |
|---|---|
| 0 | do not return Null_Reason_Code |
| 1 | do not return Redraw_Window_Request; queue for later handling |
| 2 - 3 | must be 0 |
| 4 | do not return Pointer_Leaving_Window |
| 5 | do not return Pointer_Entering_Window |
| 6 | do not return Mouse_Click; queue for later handling |
| 7 | must be 0 |
| 8 | do not return Key_Pressed; queue for later handling |
| 9 - 10 | must be 0 |
| 11 | do not return Lose_Caret |
| 12 | do not return Gain_Caret |
| 13 | do not return PollWord_NonZero (not in RISC OS 2) |
| 14 - 16 | must be 0 |
| 17 | do not return User_Message |
| 18 | do not return User_Message_Recorded |
| 19 | do not return User_Message_Acknowledge |
| 20 - 21 | must be 0 |
| 22 | R3 on entry is pointer to poll word (not in RISC OS 2) |
| 23 | scan poll word at high priority (not in RISC OS 2) |
| 24 | save or restore floating point registers (not in RISC OS 2) |
| 25 - 31 | must be 0 |
Note that the bits above which are marked 'queue for later handling' stop the Wimp from proceeding, i.e. it stops all other tasks too.
If R0 bit 24 is set (not available in RISC OS 2) the floating point registers will be preserved over calls to Wimp_Poll.
The floating point registers should only be saved if one or more of the following is true:
This is because in general other C programs running under the Wimp that use floating point will not save their floating point registers, but will assume that the status register is still correct for the C run-time environment.
To enable this to work, the Wimp resets the floating point status register to the correct value for the C run-time environment immediately after saving the floating point registers for a task that requests it.
There is one complication with this: when the Wimp comes to save the floating point registers for a task, it is possible (when using the actual floating point hardware, as opposed to the emulator) for an asynchronous exception to be generated (for example, after a divide by 0, the next floating point instruction is the one that actually generates the error).
In this case OS_GenerateError is called by the floating point support code, once it has determined the cause of the exception. The important point here is that the error is passed to the task whose floating point registers were being saved. When OS_GenerateError is called, the supervisor stack is cleared out, so it is as though the Wimp_Poll call never happened. Note that the error number here has the top bit set, which indicates to the error handler that execution cannot be resumed after the PC address where the error occurred.
As you can see, certain events cannot be masked out and the task must always be prepared to handle them. Each event code has one Wimp SWI that is most likely to be called in response. The block returned by Wimp_Poll is formatted ready to be passed directly to this call.
The event codes are as follows:
This event code is returned when none of the others are applicable. It should be masked out whenever possible to minimise the overheads incurred by the Wimp, so it doesn't have to set-up the task's memory and return control to it, only to find the task isn't interested anyway.
| R1 + 0 | window handle |
This event code indicates that some of the window is out of date and needs redrawing. You should call Wimp_RedrawWindow using the returned block, and then call Wimp_GetRectangle as necessary. See their entries for further details and a scheme of the code required.
| R1 + 0 | window handle |
| R1 + 4 | visible area minimum x coordinate |
| R1 + 8 | visible area minimum y coordinate |
| R1 + 12 | visible area maximum x coordinate |
| R1 + 16 | visible area maximum y coordinate |
| R1 + 20 | scroll x offset relative to work area origin |
| R1 + 24 | scroll y offset relative to work area origin |
| R1 + 28 | handle to open window behind (-1 means top of window stack, -2 means bottom) |
This event code is returned as a result of the Adjust Size icon or the Title Bar of a window being selected, or as a result of the scroll bars being dragged to a new position. The dragging process is performed by the Wimp itself before it returns this event code to the task.
Following detection, the Wimp sets five bits that determine the action on the window. These bits can be read using Wimp_GetWindowState - refer to Wimp_CreateWindow for more information.
You should call Wimp_OpenWindow using the returned block and also call it for any pane windows that are attached to this one, using the coordinates in the block to determine the pane's position.
| R1 + 0 | window handle |
This event code is returned when you click with the mouse on the Close icon of a window.
You should normally call Wimp_CloseWindow using the returned block. You may also need to issue further calls of Wimp_CloseWindow to close any dependent windows, e.g. panes. However, if you do not want to close the window immediately, you could open an error box, or ask the user for confirmation.
Programs such as Edit conventionally open the directory which holds the edited file if its window is closed using the Adjust button. This is done by calling Wimp_GetPointerInfo when the Close_Window_Request is received, and performing the appropriate action.
| R1 + 0 | window handle |
This event code is returned when the pointer has left a window's visible work area. You might use it to make the pointer revert to its default shape when it is no longer over your window's work area. However, it is not recommended that you use it to make dialogue boxes disappear as soon as the mouse pointer leaves them.
Note that this event doesn't only occur when the pointer leaves the window's visible work area, but whenever the window stops being the most visible thing under the pointer. So, for example, popping up a menu at the pointer position would cause this event.
The returned block contains:
| R1 + 0 | window handle |
This event code is returned when the pointer has moved onto a window. You might use it to bring a window to the top as soon as the pointer enters its work area, or to change the pointer shape when it over the visible work area.
As with the previous event type, Pointer_Entering_Window doesn't just happen when the pointer is physically moved into a window's visible work area. It could occur because a menu is removed or a window is closed, revealing a new uppermost window.
The returned block contains:
This event code is returned when:
For example:
The window and icon handles indicate which window and icon the mouse pointer was over when the button change took place. Operations such as highlighting an icon when it is selected and the cancellation of the other selections in the same ESG are all done automatically by the Wimp. See the section on Icon button types for details of the various icon button modes and mouse return codes.
| R1 + 0 | drag box minimum x coordinate (inclusive) |
| R1 + 4 | drag box minimum y coordinate (inclusive) |
| R1 + 8 | drag box maximum x coordinate (exclusive) |
| R1 + 12 | drag box maximum y coordinate (exclusive) |
This event code is returned when you release all the mouse buttons to finish a User_Drag operation. The block contains the final position of the drag box.
A user drag operation starts when the task calls Wimp_DragBox with a drag type of 5 to 11, usually in response to a drag code returned in a Mouse_Click event.
During the user drag operation (particularly with drag type 7), you may wish to keep track of the pointer position. To do this, call Wimp_GetPointerInfo each time you receive a null event from Wimp_Poll. You can use the coordinates returned to redraw the dragged object (use Wimp_UpdateWindow to do this).
When this event code is returned the drag is over; you should then stop reading the pointer information and, if appropriate, redraw the dragged object in its final position.
This event code is returned to tell a task that a key has been pressed while the input focus belonged to one of its windows. The task should process the key if possible. Otherwise the task should pass it to Wimp_ProcessKey so that other tasks can then intercept 'hot key' codes.
If the caret is inside a writable icon, the Wimp automatically processes the keys listed below, and does not generate an event:
| Printable characters | are inserted into the text, if there is room, and the icon is redrawn |
| Delete, <-| | delete character to left of caret |
| Copy | delete character to right of caret |
| <- | move left one character |
| -> | move right one character |
| Shift Copy | delete word (forwards) |
| Shift <- | move left one word (returns &19C if at left of line) |
| Shift -> | move right one word (returns &19D if at right of line) |
| Ctrl Copy | delete forwards to end of line |
| Ctrl <- | move to left end of line |
| Ctrl -> | move to right end of line |
'Printed characters' are those printable ones whose codes are in the ranges &20 - &7E and &80 - &FF.
See the K command on K command for further information.
Clashes could occur between top-bit-set characters (obtained by pressing Alt plus ASCII code on the keypad) and special key codes. The Wimp avoids any such ambiguities by mapping the special keys to these values:
These are set up by Wimp_Initialise. Tasks running under the Wimp are not allowed to change any of these settings. Soft key expansions (outside of writable icons) must be performed by the task accessing the key's expansion string using the Key$n variables.
| R1 + 0 | item in main menu which was selected (starting from 0) |
| R1 + 4 | item in first submenu which was selected |
| R1 + 8 | item in second submenu which was selected ... terminated by -1 |
This event code is returned when the user selects an item from a menu. Selections can be made by the user clicking on an item with any of the mouse buttons. Select and Menu are synonymous; Adjust has a slightly different effect, as discussed below. A press of Return inside a writable menu item also generates this event (though not if it is pressed inside a writable icon inside a menu dialogue box).
The values in the block indicate which item at each menu level was chosen, the first item in each menu being numbered 0. An entry of -1 terminates the list. No handle is used for menus, so the task must remember which menu it last opened Wimp_CreateMenu with.
If the last item specified has submenus (i.e. was not a 'leaf' of the menu tree) then the command may be ambiguous, in which case the task should ignore it. If the command is clear, but not its parameters, then the task may ignore the command, use default parameters, or use the last parameters set, as is most appropriate.
There is a difference, from the user's point of view, between choosing an item with Select and Adjust. In the former case, the selection will also cancel the menu, causing it to be removed from the screen. In the latter case, the menu should stay on the screen (a persistent menu). The application achieves this as follows. Call Wimp_GetPointerInfo to read the mouse button state, and save it. After decoding the menu selection and taking the appropriate action, examine the stored button state. If Select was pressed, just return to the polling loop.
If Adjust was down, however, re-encode the menu tree (reflecting any changes that the previous menu selection effected) and call Wimp_CreateMenu with the same menu tree pointer that was used to create the menu in the first place. The next time you call Wimp_Poll, the Wimp will spot the re-opened menu, and recreate it on the screen. It goes down the tree until the end of the tree is reached, or the tree fails to correspond to the previous one, or until a shaded item is reached.
| R1 + 0 | window handle |
| R1 + 4 | visible area minimum x coordinate |
| R1 + 8 | visible area minimum y coordinate |
| R1 + 12 | visible area maximum x coordinate |
| R1 + 16 | visible area maximum y coordinate |
| R1 + 20 | scroll x offset relative to work area origin |
| R1 + 24 | scroll y offset relative to work area origin |
| R1 + 28 | handle to open window behind (-1 means top of the window stack, -2 means bottom) |
| R1 + 32 | scroll x direction |
| R1 + 36 | scroll y direction |
The scroll directions have the following meanings:
| Value | Meaning |
|---|---|
| -2 | Page left/down (click in scroll bar outer area) |
| -1 | Left/down (click on scroll arrow) |
| 0 | No change |
| + 1 | Right/up (click on scroll arrow) |
| + 2 | Page right/up (click in scroll bar outer area) |
This event code is returned if the user clicks in a scroll area of a window which has one of the 'Scroll_Request returned' bits set in its window flags. It returns the old scroll bar offsets and the direction of scrolling requested. The task should work out the new scroll offsets, store them in the scroll offsets (R1+20 and R1+24) of the returned block, and then call Wimp_OpenWindow.
Remember that the coordinates used for scroll offsets are in OS units. Therefore, if you want to make a click on one of the arrows scroll by, say, one pixel, you must scale the -1 or 1 returned in the event block by the appropriate factor for the current mode. For example, in !Edit the text is aligned with the bottom of the window when scrolling down, and subsequently moves down by one text line exactly. When scrolling up, the text is aligned with the top of the window.
This is returned when the window which owns the input focus has changed. That happens when Wimp_SetCaretPosition is called, either explicitly, or implicitly by the user clicking on a button type 14 or 15 object. The event isn't generated if the input focus only changes position within the same window.
The event warns the task which had the caret (and which may well be retaining it) that something has changed. It can be used to remove a specialised text-position indicator which does not use the Wimp's caret, or its appearance could be altered to show this is where the caret would be if the window still had the input focus.
R1 points to a standard caret block:
| R1 + 0 | window handle that had the input focus (-1 if none) |
| R1 + 4 | icon handle (-1 if none) |
| R1 + 8 | x offset of caret (relative to window origin) |
| R1 + 12 | y offset of caret (relative to window origin) |
| R1 + 16 | caret height and flags (see Wimp_SetCaretPosition) |
| R1 + 20 | index of caret into string (or -1 if not in a writable icon) |
This event is returned to the task which now has the caret, subsequent to a Wimp_SetCaretPosition. The block pointed to by R1 is the same as above, except that the window/icon handle is the caret's new owner.
This facility is not available under RISC OS 2.
If R0 bit 23 was set, the poll word will be scanned before the messages or the Redraw_Window_Requests are delivered. Note that this means that the screen may not yet be up-to-date, and certain messages may not have been delivered (in particular Message_ModeChange).
If the Wimp discovers that the word has become non-zero, it will return the following event from Wimp_Poll:
R0 = 13 (PollWord_NonZero)
[R1+0] = address of poll word
[R1+4] = contents of poll word
This facility is used to transfer control to a task's foreground process, where control is currently in an interrupt routine, service call handler or the like.
For example, the NetFiler module intercepts a special service call which is issued by NetFS whenever a *Logon, *Bye or *SDisc is executed. This tells NetFiler that it should re-scan its list of fileservers and update the icon bar as appropriate, but it cannot do this directly because it needs to get control in the foreground in order to call the Wimp.
It therefore sets a flag in its workspace, which tells it that it should rescan the list the next time the Wimp returns to it from Wimp_Poll. Using the new facility, it can use a 'fast poll' to get the Wimp to tell it before the screen is up-to-date, which means that if the user issues a *Logon from within ShellCLI, the NetFiler can update the icon bar before the screen is redrawn when ShellCLI returns, and so the icon bar does not have to be redrawn twice.
A more normal application for this would be for a background process to buffer incoming data in the RMA, and to signal to its foreground process when there was enough data to use. It would normally use the 'slow' form of polling, so that it could update its window with the new data.
Note that there is no guarantee about how long it will take before the application regains control, since other applications can take control away from the Wimp for arbitrarily long periods of time (e.g. ShellCLI).
The next three event codes (17 - 19) are concerned with the receipt of user messages. Events of type 0 to 12 are normally sent directly from the Wimp to a task in response to some user action. The User_Message event codes are more general purpose, and are sent from Wimp to task, or from task to task. See the description of Wimp_SendMessage and the Messages for more details about the sending of messages and of the various types of User_Message actions which are defined.
One message action that all tasks should act on is Message_Quit, which is broadcast by the Desktop when the user selects the Exit item from the Task manager's Task display.
The returned block contains:
| R1 + 0 | size of block in bytes (20 - 256 in a multiple of four (i.e. words)) |
| R1 + 4 | task handle of message sender |
| R1 + 8 | my_ref - the sender's reference for this message |
| R1 + 12 | your_ref - a previous message's my_ref, or 0 if this isn't a reply |
| R1 + 16 | message action code |
| R1 + 20 | message data (dependent on message action) |
| ... |
This event is returned when another task has sent a message to the current task, to one of its windows, or to all tasks using a broadcast message. The action code field defines the meaning of the message, i.e. how the message data should be processed by the receiver.
If the message is not acknowledged (because the receiving task is no longer active, or just ignores it) then no further action is taken by the Wimp.
The block has the same format as that described above under User_Message. The interpretation of the message action is the same, so the way in which the receiving task handles these two types should be identical. However, the way the Wimp responds differs if the message is not acknowledged.
The receiving task can acknowledge the message by calling Wimp_SendMessage with the event code User_Message_Acknowledge (19) and the your_ref field set to the my_ref of the original. This will prevent the sender from receiving its original message back from the Wimp with the event type 19.
Another way to acknowledge a message (and prevent the Wimp returning it to the sender) is to send a reply message using event code User_Message or User_Message_Acknowledge, again with the your_ref field set to the original message's my_ref.
Both types of acknowledgement must take place before the next call to Wimp_Poll.
The format of the block is as above. This event type is generated by the Wimp when a message sent with event code User_Message_Recorded was not acknowledged or replied to by the receiver. The message in the block is identical to the one sent by the task in the first place.
Note that in User_Messages 17, 18 and 19 a task should ignore any messages it does not understand: it must not acknowledge messages as a matter of course. See Wimp_SendMessage for details.
Starts a redraw of the parts of a window that are not up to date
R1 = pointer to block
R0 = 0 for no more to do, non-zero for update according to returned block
Interrupts are not defined
Fast interrupts are enabled
Processor is in SVC mode
SWI is not re-entrant
The block contains the following:
| R1 + 0 | window handle |
| R1 + 4 | visible area minimum x coordinate |
| R1 + 8 | visible area minimum y coordinate |
| R1 + 12 | visible area maximum x coordinate |
| R1 + 16 | visible area maximum y coordinate |
| R1 + 20 | scroll x offset relative to work area origin |
| R1 + 24 | scroll y offset relative to work area origin |
| R1 + 28 | current graphics window minimum x coordinate |
| R1 + 32 | current graphics window minimum y coordinate |
| R1 + 36 | current graphics window maximum x coordinate |
| R1 + 40 | current graphics window maximum y coordinate |
The window handle at +0 is set on entry, usually from the last call to Wimp_Poll; the rest of the block is filled in by Wimp_RedrawWindow.
Note that this SWI must be called as the first Wimp operation after the Wimp_Poll which returned a Redraw_Window_Request. This means that you cannot, for example, delete or create any other windows between the Wimp_Poll and the Wimp_RedrawWindow. If you need to do any special extra operations in your Wimp_Poll loop, do them just before calling Wimp_Poll, not afterwards.
This call is used to start a redraw of the parts of a window that are not up to date. These consist of a series of non-overlapping rectangles. Wimp_RedrawWindow draws the window outline, issues VDU 5, and then exits via Wimp_GetRectangle, which returns the coordinates of the first invalid rectangle (if any) of the work area, and clears it to the window's background colour, unless it's transparent. It also returns a flag saying whether there is anything to redraw.
The first four words are the position of the window's work area on the screen, i.e. they have the same meaning as those words in the Wimp_CreateWindow and Wimp_OpenWindow blocks.
The last four words describe an area within the visible work area in screen coordinates, not work area relative, possibly the whole thing if the window is not covered. The graphics clip window is set to the returned rectangle. A task could just redraw its entire work area each time a rectangle is returned. However, it is much more efficient if the task takes note of the graphics clip window coordinates and works out what it needs to draw.
By using these two sets of coordinates in conjunction with the scroll offsets, you can find the work area coordinates to be updated:
work x = screen x - (screen x0-scroll x)
work y = screen y - (screen y1-scroll y)
where:
screen x0 = [R1+4]
screen y1 = [R1+16]
scroll x = [R1+20]
scroll y = [R1+24]
The code used to redraw the window was outlined in the Redrawing windows. The expressions above in parenthesis are the screen coordinates of the work area origin.
Starts a redraw of the parts of a window that are not up to date
R1 = pointer to block - see below
R0 and block as for Wimp_RedrawWindow
Interrupts are not defined
Fast interrupts are enabled
Processor is in SVC mode
SWI is not re-entrant
The block contains the following on entry:
| R1 + 0 | window handle |
| R1 + 4 | work area minimum x coordinate (inclusive) |
| R1 + 8 | work area minimum y coordinate (inclusive) |
| R1 + 12 | work area maximum x coordinate (exclusive) |
| R1 + 16 | work area maximum y coordinate (exclusive) |
This call is similar to Wimp_RedrawWindow. The differences are:
The routine exits via Wimp_GetRectangle, which returns the coordinates of the first visible rectangle (if any) within the work area specified on entry.
The code for the task to update the window should follow this scheme:
SYS "Wimp_UpdateWindow",,block% TO more%
WHILE more%
  update the contents of the returned rectangle
  SYS "Wimp_GetRectangle",,block% TO more%
ENDWHILE
A common reason for calling this is to drag an item across a window. Another is to draw a user-defined text cursor instead of using the system one.
None
Returns the details of the next rectangle of the work area to be drawn
R0 and block as for Wimp_RedrawWindow
Interrupts are not defined
Fast interrupts are enabled
Processor is in SVC mode
SWI is not re-entrant
This call is used repeatedly following a call of either Wimp_RedrawWindow or Wimp_UpdateWindow. It returns the details of the next rectangle of the work area to be drawn (if any). If the call follows an earlier call to Wimp_RedrawWindow, then the rectangle is also cleared to the background colour of the window. If however it follows a call to Wimp_UpdateWindow then the rectangle's contents are preserved.
The block contains the following on entry:
| R1 + 0 | window handle |
VDU 5 is asserted at a mode change and in Wimp_RedrawWindow. If you use VDU 4 text in a window (which can only be done when you are sure that the character does not need to be clipped) you should reset to VDU 5 mode before calling Wimp_SetRectangle or Wimp_Poll.
Note that the window handle will be faulted by the Wimp if it differs from the one last used when Wimp_RedrawWindow or Wimp_UpdateWindow was called. This means that a task must draw the whole of a window before performing any other operations.
R1 = pointer to block
R0 corrupted
Interrupts are not defined
Fast interrupts are enabled
Processor is in SVC mode
SWI is not re-entrant
This call returns a summary of the given window's state.
The block contains the window handle on entry, and the following on exit:
| R1 + 0 | window handle (or -2 to indicate the icon bar) |
| R1 + 4 | visible area minimum x coordinate |
| R1 + 8 | visible area minimum y coordinate |
| R1 + 12 | visible area maximum x coordinate |
| R1 + 16 | visible area maximum y coordinate |
| R1 + 20 | scroll x offset relative to work area origin |
| R1 + 24 | scroll y offset relative to work area origin |
| R1 + 28 | handle of window in front of this one (or -1 if none) |
| R1 + 32 | window flags - see Wimp_CreateWindow |
A window handle value of -2 is not available in RISC OS 2.
You can usually find out the window's coordinates without using this call, since Wimp_GetRectangle returns the window coordinates anyway. This call is most useful for reading the window flags, for example to find out if a window is uncovered.
None
Returns complete details of the given window's state
R1 = pointer to block (in RISC OS 2), else in RISC OS 3:
| bit 0 set
| just return window header (without icons) |
| bit 1 | reserved (must be 0) |
| bits 2 - 31 | pointer to buffer to receive data |
R0 corrupted
Interrupts are not defined
Fast interrupts are enabled
Processor is in SVC mode
SWI is not re-entrant
This call returns complete details of the given window's state, including any icons that were created after the window, using Wimp_CreateIcon.
The block contains the following on entry:
| R1 + 0 | window handle (or -2 to indicate the icon bar) |
A window handle value of -2 is not available in RISC OS 2.
The block contains the following on exit:
| R1 + 0 | window handle |
| R1 + 4 | window block - see Wimp_CreateWindow and Wimp_CreateIcon |
R1 = pointer to block
R0 corrupted
The icon's flags are updated
Interrupts are not defined
Fast interrupts are enabled
Processor is in SVC mode
SWI is not re-entrant
This call sets the given icon's state held in its flag word as follows:
new-state = (old-state AND NOT clear-word) EOR EOR-word
The block contains the following:
| R1 + 0 | window handle (-1 or -2 for icon bar) |
| R1 + 4 | icon handle |
| R1 + 8 | EOR word |
| R1 + 12 | clear word |
The way each bit of the icon flags is affected is controlled by the state of the corresponding bits in the EOR word and the Clear word:
| Value of | CE | Effect |
|---|---|---|
| 00 | preserve the bit's status | |
| 01 | toggle the bit's state | |
| 10 | clear the bit | |
| 11 | set the bit |
For example, say you wanted to change an icon's button type (bits 12 - 15) to 10 (%1010 binary). You would set the clear-bits to 1 and the EOR bits to the new value:
Clear = %1111000000000000
EOR = %1010000000000000
The screen is automatically updated if necessary, so the call can be used to reflect a change in a text icon's contents. If you change the justification of a text icon using this call, and the icon owns the caret, you should also call Wimp_SetCaretPosition to make sure that it remains positioned in the text correctly.
None
R1 = pointer to block
R0 corrupted
Interrupts are not defined
Fast interrupts are enabled
Processor is in SVC mode
SWI is not re-entrant
This call returns the given icon's state from its flags word.
On entry the block contains the following:
| R1 + 0 | window handle |
| R1 + 4 | icon handle |
On exit the block contains the following:
| R1 + 0 | window handle |
| R1 + 4 | icon handle |
| R1 + 8 | 32 byte icon block - see Wimp_CreateIcon |
If you want to search for an icon with particular flag settings (for example to find out which icon in a group has been selected), you should use Wimp_WhichIcon.
Returns the position of the pointer and the state of the mouse buttons
R1 = pointer to block
R0 corrupted
Interrupts are not defined
Fast interrupts are enabled
Processor is in SVC mode
SWI is not re-entrant
This call returns information about the position of the pointer and the instantaneous state of the mouse buttons. It enables the task to find out where the mouse pointer is independently of the buttons being pressed or released, for example for dragging purposes.
On exit the block contains the following:
| R1 + 0 | mouse x |
| R1 + 4 | mouse y |
| R1 + 8 | button state |
| R1 + 12 | window handle (-1 for background, -2 for icon bar) |
| R1 + 16 | icon handle (see below) |
The mouse button state (returned in R1+8 to R1+11) can only have bits 0, 1 and 2 set:
| Bit | Meaning if set |
|---|---|
| 0 | Right-hand button pressed (Adjust) |
| 1 | Middle button pressed (Menu) |
| 2 | Lefthand button pressed (Select) |
If the mouse is over a user window (window handle 0) then the icon handle will be either a valid non-negative value for a user icon, or one of the following system values:
| Value | Icon |
|---|---|
| -1 | work area |
| -2 | Back icon |
| -3 | Close icon |
| -4 | Title Bar |
| -5 | Toggle Size icon |
| -6 | scroll up arrow |
| -7 | vertical scroll bar |
| -8 | scroll down arrow |
| -9 | Adjust Size icon |
| -10 | scroll left arrow |
| -11 | horizontal scroll bar |
| -12 | scroll right arrow |
| -13 | the outer window frame |
From RISC OS 3 onwards shaded icons in menus are treated differently from normal shaded icons, in that the latter are treated as being 'invisible' to the Wimp, i.e. Wimp_GetPointerInfo will never return them. In menus, however, the icons are not invisible, but are not allowed to be selected. This allows the interactive help program to see the icons and to ask for help on them.
If the mouse is over a greyed out icon an icon handle of -1 will be returned, unless it is in a menu, where the icon handle is returned.
None
R1 <= 0 to cancel drag operation, otherwise
R1 = pointer to block
R0 corrupted
Interrupts are not defined
Fast interrupts are enabled
Processor is in SVC mode
SWI is not re-entrant
This call initiates a dragging operation. It is typically called as a result of a Mouse_Click event which has reported a drag-type click (i.e. Select or Adjust held down for longer than about 1/5th of a second). A drag spans calls to Wimp_Poll, so the task must maintain information about what is being dragged, etc. Usually the coordinates are not required until the final drag event occurs, at which point the Wimp returns them. Sometimes Wimp_GetPointerInfo should be called in Wimp_Poll null events to track the pointer (especially for type 7 below). A drag is terminated (and reported) when the user releases all of the mouse buttons.
On entry the block contains the following:
| R1 + 0 | window handle (or -2 to indicate the icon bar) for drag types 1 - 4 only |
| R1 + 4 | drag type |
| R1 + 8 | minimum x coordinate of initial position of drag box |
| R1 + 12 | minimum y coordinate of initial position of drag box |
| R1 + 16 | maximum x coordinate of initial position of drag box |
| R1 + 20 | maximum y coordinate of initial position of dra |
| R1 + 24 | minimum x coordinate of parent box (for types 5 - 11 only) |
| R1 + 28 | minimum y coordinate of parent box (for types 5 - 11 only) |
| R1 + 32 | maximum x coordinate of parent box (for types 5 - 11 only) |
| R1 + 36 | maximum y coordinate of parent box (for types 5 - 11 only) |
| R1 + 40 | R12 value for user routine (for types 8 - 11 only) |
| R1 + 44 | address of draw box routine (for types 8 - 11 o |
| R1 + 48 | address of remove box routine (for types 8 - 11 only) |
| R1 + 52 | address of move box routine, or <= 0 if there isn't one (for types 8 - 11 only) |
A window handle value of -2 is not available in RISC OS 2.
The coordinates are passed as screen coordinates, i.e. bottom-left inclusive and top-right exclusive.
The drag is confined to the 'parent box' specified, or to an area computed by the Wimp for types 1 - 4 and 12. The action depends on the drag type:
| Drag type | Meaning |
|---|---|
| 1 | drag window position |
| 2 | drag window size |
| 3 | drag horizontal scroll bar |
| 4 | drag vertical scroll bar |
| 5 | drag fixed size 'rotating dash' box |
| 6 | drag rubber 'rotating dash' box |
| 7 | drag point (no Wimp-drawn dragged object) |
| 8 | drag fixed size user-drawn box |
| 9 | drag rubber user-drawn box |
| 10 | as 8 but don't cancel when buttons are released |
| 11 | as 9 but don't cancel when buttons are released |
| 12 | drag horizontal and vertical scroll bars (not in RISC OS 2) |
These are the 'system' types since they relate to picking up a window, changing its size and scrolling it respectively. In these cases, the bounding box for pointer movement is worked out automatically by the Wimp. For example, type 2 drags are confined to the defined maximum and minimum sizes of the window.
Bits in the WimpFlags CMOS configuration parameter determine the way in which these drags update the screen. There are four bits, 0 - 3, corresponding to drag types 1 - 4. If the bit is clear, then dragging is indicated by a dashed outline box, similar to that used in types 5 and 6 below. An Open_Window_Request event is generated when the mouse button is released to allow the task to update appropriate parts of the dragged window. If the WimpFlags bit is set, continuous update is required, and Open_Window_Requests are generated for every mouse move.
These drag types are useful if you want to allow the user to, for example, pick up a window which does not have a Title Bar (and so is usually unmovable). You could detect clicks in a region of within, say, 32 OS units from the top of the visible work area and instigate a drag type 1 when these occur.
These are 'user' types, where the task decides what the significance of the dragging will be. In these cases you supply the coordinates of the parent box. The box being dragged is constrained to this area. For types 5 and 6 the initial box position is used to draw a box with a dashed border which cycles round.
For type 5 boxes, the relative positions of the mouse pointer and the box are kept constant, so moving the mouse moves the box too.
For type 6, the relative positions of the bottom right corner of the box and the pointer are kept constant, so moving the mouse will increase or decrease the size of the box. Generally you would arrange the initial box coordinates such that this corner is at or near the pointer position reported in the drag-click event. You can alter the moveable corner to the left by reversing the initial x coordinates, and to the top by reversing the initial y coordinates.
In the case of type 7, where there is no dashed box to be dragged, the initial drag box position is ignored and the mouse coordinates are constrained to the bounding box.
These types give the maximum flexibility for dragging objects around the whole screen. Use drag type 7 and Wimp_UpdateWindow to drag an object within a window. They are, though, somewhat more complex to use than the previously described types.
First the application must provide the addresses of three routines which draw, remove and move the user's drag item (it doesn't have to be a box). If no move routine is supplied ([R1+52]  0), the Wimp will use the remove and draw routines to perform the operation.
Note that the user code must not be in application space, but in the RMA. This is because the Wimp doesn't know to page the task in when this code is required.
The user code is called under the following conditions:
SVC mode (so use X-type SWIs and save R14_SVC before hand)
R0 = new minimum x coordinate
R1 = new minimum y coordinate
R2 = new maximum x coordinate
R3 = new maximum y coordinate
R4 = old minimum x coordinate (for move routine only)
R5 = old minimum y coordinate (for move routine only)
R6 = old maximum x coordinate (for move routine only)
R7 = old maximum y coordinate (for move routine only)
R12 = value supplied in Wimp_DragBox call
R0 - R3 actual box coordinates (normally preserved from entry)
The user routines would draw, remove or just move (i.e. remove and redraw) their drag object according to the coordinates passed. These coordinates are derived by the Wimp from mouse movements.
The graphics window is also set up by the Wimp. The user routines must not change this, or draw outside it.
While these drags are taking place, the Wimp still performs its rotating dashed box code, so the routines can take advantage of this. Programming of the VDU dot-dash pattern is performed by the Wimp, so all the user routines have to do is call the appropriate dot-dash line PLOT codes.
The move routine has to deal with two cases: whether the box has moved or not. If the box has moved (i.e. R0 - R3 are not identical to R4 - R7), then the move routine must exclusive-OR once using the old coordinates to remove the box, then EOR again with the new coordinates to redraw it. If the box hasn't changed, the Wimp will have programmed the dot-dash pattern so that a single EOR plot will give the desired shifting effect of the pattern, so this is what the routine should do.
Of course, the foregoing is only applicable to dragged objects which use the dash effect. If you are dragging, say, a sprite, then the move routine only has to do anything when the coordinates have changed, viz restore the background that the sprite overwrote, then save the new background and replot the sprite. When no move has taken place, the routine could do nothing (or change the sprite for an animation effect etc.)
When this call is made the pointer leaves the current window, when the drag ends a pointer entering window event will be generated.
This is similar to types 1 - 4. It is equivalent to an Adjust drag on one of the scroll bars.
This type is not available in RISC OS 2.
None
Forces an area of a window or the screen to be redrawn later
R0 = window handle (-1 means whole screen, -2 indicates the icon bar)
R1 = minimum x coordinate of area to redraw
R2 = minimum y coordinate of area to redraw
R3 = maximum x coordinate of area to redraw
R4 = maximum y coordinate of area to redraw
R0 corrupted
Interrupts are not defined
Fast interrupts are enabled
Processor is in SVC mode
SWI is not re-entrant
This call forces an area of a window or the screen to be marked as invalid, and to be redrawn later using Redraw_Window_Request events.
A window handle value of -2 on entry is not available in RISC OS 2.
If R0 is -1 on entry, then R1 - R4 specify an area of the screen in absolute coordinates. If R0 is not -1, then it indicates a window handle, and R1 - R4 specify an area of the window relative to the window's work area origin.
This call could be used
Two strategies are possible when the task is required to change the contents of a window. These are:
The second method is generally quicker, but involves more code.
Sets up the data for a new caret position, and redraws it there
R0 = window handle (-1 to turn off and disown the caret)
R1 = icon handle (-1 if none)
R2 = x offset of caret (relative to work area origin)
R3 = y offset of caret (relative to work area origin)
R4 = height of caret (if -1, then R2, R3, R4 are calculated from R0,R1,R5)
R5 = index into string (if -1, then R4, R5 are calculated from R0,R1,R2,R3
R2 and R3 are modified to exact position in icon)
R0 - R5 = preserved
Interrupts are not defined
Fast interrupts are enabled
Processor is in SVC mode
SWI is not re-entrant
This call removes the caret from its old position, sets up the data for its new position, and redraws it there. Subsequent calls to Wimp_RedrawWindow and Wimp_UpdateWindow will cause the caret to be automatically redrawn by the Wimp, unless it is marked as invisible.
R4 and R5 can only be set to -1 if the icon handle passed in R1 is non-negative.
Some of the values may be calculated:
In each case, the height of the caret is determined from the bounding box of the font used in the icon (for the system font, a height of 40 OS units is used). The caret's coordinates refer to the pixel at the bottom of the vertical bar. Note that the icon's bounding box and whether it has an outline are also considered.
The font height also contains some flags. Its full description is:
| bits 0 - 15 | height in OS units (0 - 65535) |
| bits 16 - 23 | colour (if bit 26 is set) |
| Bit | Meaning when set |
|---|---|
| 24 | use VDU 5-type caret, else use anti-aliased caret |
| 25 | the caret is invisible |
| 26 | use bits 16 - 23 for the colour, else caret is Wimp colour 11 |
| 27 | bits 16 - 23 are untranslated, else they are a Wimp colour |
If bit 27 is set, then bit 26 must be set and the caret is plotted by EORing the logical colour given in bits 16 - 23 onto the screen. For the 256-colour modes, bits 16 - 17 are bits 6 - 7 of the tint, and bits 18 - 23 are the colour.
If bit 27 is clear, then the caret is plotted such that the Wimp colour given (or colour 11) appears when the background is Wimp colour 0 (white). The Wimp achieves this by EORing the actual colour for Wimp colour 0 and the caret colour together, then EORing this onto the screen.
Esoteric note: to ensure that the caret is plotted in a given colour on a non-white background, you must do the following:
None
Returns details of the caret's state
R1 = pointer to block
R0 corrupted
Interrupts are not defined
Fast interrupts are enabled
Processor is in SVC mode
SWI is not re-entrant
This call returns details of the caret's state. The block contains the following:
| R1 + 0 | window handle where caret is (-1 if none) |
| R1 + 4 | icon handle (-1 if none) |
| R1 + 8 | x offset of caret (relative to work area origin) |
| R1 + 12 | y offset of caret (relative to work area origin) |
| R1 + 16 | caret height and flags or -1 for not displayed |
| R1 + 20 | index of caret into string (if in a writable icon) |
The height and flags returned at R1+16 are as described under Wimp_SetCaretPosition.
R1 = -1 means close any active menu, or
R1 = pointer to menu block (or window handle)
R2 = x coordinate of top-left corner of top level menu
R3 = y coordinate of top-left corner of top level menu
R0 corrupted
Interrupts are not defined
Fast interrupts are enabled
Processor is in SVC mode
SWI is not re-entrant
This call is used to create a menu structure. The top level menu is initially displayed by the Wimp. Having made this call, the task must return to its normal polling loop. While the task calls Wimp_Poll, the Wimp maintains the menu tree, until the user clicks with any of the mouse buttons. If the click was outside the menus, then the Wimp closes all the menus and behaves as if they had not been there. If the mouse is clicked inside a menu, then a Menu_Selection event code is returned from Wimp_Poll, along with a list of selections.
The menu block contains the following:
| R1 + 0 | menu title (if a null string, then the menu is untitled) | |||
| R1 + 12 | menu title foreground and frame colour | |||
| R1 + 13 | menu title background colour | |||
| R1 + 14 | menu work area foreground colour | |||
| R1 + 15 | menu work area background colour | |||
| R1 + 16 | width of following menu items | |||
| R1 + 20 | height of following menu items | |||
| R1 + 24 | vertical gap between items | |||
| R1 + 28 | menu items (each 24 bytes): | |||
| bytes 0 - 3 | menu flags: | |||
| Bit | Meaning when set | |||
|---|---|---|---|---|
| 0 | display a tick to the left of the item | |||
| 1 | dotted line following (separates sections) | |||
| 2 | item is writable for text entry | |||
| 3 | generate a message when moving to the submenu | |||
| 4 | allow submenu to be opened even if this item is greyed out (not in RISC OS 2) | |||
| 7 | this is the last item in this menu | |||
| 8 | in the first menu item only, if this bit is set then the title data at R1+0 is the data as for an indirected text icon (see the chapter entitled Wimp_CreateIcon) | |||
| all others | not used; must be zero | |||
| bytes 4 - 7 | submenu pointer (>= &8000) or window handle (1 - &7FFF) (-1 if none) | |||
| bytes 8 - 11 | menu icon flags - as for a normal icon | |||
| bytes 12 - 23 | menu icon data (12 bytes) - as for a normal icon | |||
If R1 is a window handle, the Wimp will open that window as the menu otherwise the menu structure must remain intact as long as the tree is open. The Wimp does not take a copy, but uses it directly.
If a menu title starts with '\', then it and all submenus opened off it are reversed, so that:
The above only applies from RISC OS 3 onwards.
Pressing Return while the caret is inside a writable item is equivalent to pressing a mouse button, i.e. it selects that item.
A menu is basically a window whose work area is entirely covered by the menu items. The work area colour bytes at R1+14 and R1+15 are therefore not generally used unless the 'gap between items' is non-zero; they are overridden by the items' icons colours. The window has a Title Bar if the string at R1+0 is non-null, otherwise it is untitled. If the title string is not indirected, its maximum length is the smaller of 12 and (item-width DIV 16); it should be terminated by a control code if its length is less than 12.
The menu will be automatically given a vertical scroll bar if it is taller than the current screen mode.
A menu item is a text icon whose bounding box is derived from width and height given at R1+16 and R1+20. Thus all entries in a menu are the same size. They are arranged vertically and lie horizontally between a 'tick' icon on the left and an arrow (submenu indicator) icon on the right, if present.
The menu item flags can alter the appearance of each item, e.g. by telling the Wimp to display the tick, or a separating dashed line beneath it. To shade an item, set bit 22 of the icon flags.
If the submenu pointer for an item is not -1, then it points to a similar data structure describing a submenu. An arrow is displayed to the right of the menu item; if the user moves the mouse pointer over this, then the submenu automatically pops up. Generally, submenu titles are the same as the parent item's text, or can be a prompt like 'Name:'.
The submenu pointer can be a window handle instead. Such a window is known as a dialogue box or dbox for short. In this case, the window is opened (as if it were a menu) when the mouse pointer moves over the arrow. The first writable icon in the window is given the input focus. You cannot close a menu window by clicking in it or pressing Return. Instead you should give it an 'OK' icon and treat clicks over that as a selection. The menu can then be closed using Wimp_CreateMenu with
R1 = -1.
If you want Return to make a selection, use the key-pressed event.
Cancelling a menu-window can be achieved by clicking outside of the menu structure, or by providing a 'Cancel' icon for the user to click on. In the first case, no Close_Window_Request is returned for the window; it is closed automatically by the Wimp.
When a menu window is closed, the caret is automatically given back to wherever it was before the window was opened.
Bit 3 of the menu flags changes the submenu behaviour. If it is set, then moving over the right arrow will cause a MenuWarning message to be generated. The application can respond as it sees fit, usually by calling Wimp_CreateSubMenu to display the appropriate object. Note that in this case the submenu pointer in the menu structure does not have to be valid, but it is passed to the application in the message block anyway. The submenu pointer is important if Wimp_DecodeMenu will be used later on.
Many of the iconic properties of menu items can be controlled, using the icon flags word and icon data bytes. Below is a list of the aspects of an icon that a menu item may or may not exhibit:
The icon data contains either the actual text (0 to 12 characters, control-code terminated if less than twelve) or the three indirected icon information words. A validation string can naturally be used for writable items.
A menu item can only usefully contain a sprite if it is a sprite-only (no text) indirected icon. This allows for a sprite control block pointer to be given in the middle word of the icon data. Typically this is +1 for a Wimp sprite, or a valid user-area pointer.
If the task can create more than one menu, it must remember which menu is displayed, as the Wimp does not return this when a selection has been made. It must also scan down its data structure to determine which submenus the numbers relate to, before it can decide what action to take. Wimp_DecodeMenu can help with this.
It is recommended that tasks use a 'shorthand' for defining menus, which is translated into the full form required by the Wimp when needed. But menus must be held in semi-permanent data structures once created, since the Wimp accesses them while menus are open.
Note that if a menu selection is made using Adjust, it is conventional for the application to keep the menu structure open afterwards. What happens is that the Wimp marks the menu tree temporarily when a selection is made. The application should call Wimp_GetPointerInfo to see if Adjust is pressed. If so, it should call Wimp_CreateMenu before returning to Wimp_Poll, which causes the tree to be re-opened in the same place.
The menu structure may be modified before re-opening, in which case any changes are noted by the Wimp, for example if menu entries become shaded. If the application does not call Wimp_CreateMenu, then the Wimp will delete the menu tree on the next call to Wimp_Poll, as the tree was marked temporary when the selection was made.
See the chapter entitled Menus for more information about menus.
None
Converts a numerical list of menu selections to a string containing their text
R1 = pointer to menu data structure
R2 = pointer to a list of menu selections
R3 = pointer to a buffer to contain the answer
R0 corrupted
buffer updated to contain menu item text, separated by '.'s
Interrupts are not defined
Fast interrupts are enabled
Processor is in SVC mode
SWI is not re-entrant
This call converts a numerical list of menu selections to a terminated string containing the text of each successive menu item, e.g. Display.Small icons for a typical Filer menu selection.
None
None
R0 = window handle (or -2 to indicate the icon bar)
R1 = pointer to block to contain the list of icon handles
R2 = bit mask (bit set means consider this bit)
R3 = bit settings to match
R0 corrupted
block at R1 updated to contain a list of icon handle words, terminated by -1
Interrupts are not defined
Fast interrupts are enabled
Processor is in SVC mode
SWI is not re-entrant
This call compares the flag words of all of the icons belonging to the given window with the pattern given in R3. Each icon whose flags match has its handle added to the block pointed to by R1.
A window handle value of -2 on entry is not available in RISC OS 2.
The mask in R2 is used to determine which bits are to be used in the comparison. The icon's handle is added to the list if (icon-flags AND bit-mask) = (bit-settings AND bit-mask). For example:
SYS "Wimp_WhichIcon",window,buffer,1<<21,1<<21
On exit a list of icon handles whose selected bit (21) is set will be in the buffer.
Similarly, to see which is the first icon with ESG number 1 that is selected:
SYS "Wimp_WhichIcon",window,buffer,&003F0000,&00210000
!buffer now contains the handle of the required icon, or -1 if none is selected.
R0 = window handle
R1 = pointer to block
R0 corrupted
Interrupts are not defined
Fast interrupts are enabled
Processor is in SVC mode
SWI is not re-entrant
This call sets the work area extent of the specified window, and usually causes the window's scroll bars to be redrawn (to reflect the new total size of window). The work area extent may not be changed so that any part of the visible work area lies outside the extent, so this call cannot change the current size of a window, or cause it to scroll.
On entry, the block contains:
| R1 + 0 | new work area minimum x |
| R1 + 4 | new work area minimum y |
| R1 + 8 | new work area maximum x |
| R1 + 12 | new work area maximum y |
It is usual to make this call when a document has been extended, e.g. by text being inserted into a word-processor.
Under RISC OS 2 you must set the extent to be a whole number of pixels. If not, strange effects can occur, such as the pointer moving beyond its correct bounding box. If you do this, the Wimp automatically readjusts the extent on a mode change.
From RISC OS 3 onwards the Window extent is automatically rounded to be a whole number of pixels (and is re-rounded on a mode change).
None
R0 = shape number (0 for pointer off)
R1 = pointer to shape data (-1 for no change)
R2 = width in pixels (must be multiple of 4)
R3 = height in pixels
R4 = active point x offset from top-left in pixels
R5 = active point y offset from top-left in pixels
R0 corrupted
Interrupts are not defined
Fast interrupts are enabled
Processor is in SVC mode
SWI is not re-entrant
This call sets the shape and active point of the pointer.
The shape data is a series of bytes giving the pixel colours for the shape. Each row of the shape is given as a whole number of bytes (e.g. 3 bytes for a 12-pixel wide shape). Bytes are given in left to right order. The least significant two bits of each byte give the colour of the leftmost pixel in that group of four (i.e. it looks backwards as you write it down in binary).
In new programs, you should now use the call Wimp_SpriteOp with R0=36 (SetPointerShape) instead of this one. The following principles still apply though.
This convention should be used when programming the pointer shape under the Wimp:
The event codes Pointer_Entering_Window and Pointer_Leaving_Window returned from Wimp_Poll are very useful for deciding when to reprogram the pointer shape.
If you want to use Wimp_SpriteOp for all pointer shape programming, and wish to avoid using *Pointer, you can use the Wimp sprite ptr_default to program the standard arrow shape. Note however that ptr_default does not have a palette, so you would have to reset the pointer palette too if your pointer shape changed it.
None
None
R1 = pointer to template pathname to open
R0 corrupted
Interrupts are not defined
Fast interrupts are enabled
Processor is in SVC mode
SWI is not re-entrant
This causes the Wimp to open the specified template file, and to read in some header information from the file. Only one template file may be open at a time; this is the one used by Wimp_LoadTemplate when that SWI is called.
None
--
R0 corrupted
Interrupts are not defined
Fast interrupts are enabled
Processor is in SVC mode
SWI is not re-entrant
This closes the currently open template file.
None
R1 = pointer to user buffer for template, or 0 to find the size of the template
R2 = pointer to workspace for indirected icons
R3 = pointer to byte following workspace
R4 = pointer to 256 byte font reference array (-1 for no fonts)
R5 = pointer to (wildcarded) name to match (must be 12 bytes word-aligned)
R6 = position to search from (0 for first call)
R0 corrupted
R1 preserved, or required size of buffer (if R1 0 on entry)
R2 = pointer to remaining workspace, or required size of workspace (if R1 0 on entry)
R3, R4 preserved
R5 = pointer to actual name
R6 = position of next entry (0 if no match found)
Interrupts are not defined
Fast interrupts are enabled
Processor is in SVC mode
SWI is not re-entrant
This call loads a template. You must have previously called Wimp_OpenTemplate to open the template.
The space required by the buffer passed in R1 is 88 bytes for the window, 32 bytes for each icon and room for the initial values of all indirected data fields, since all of these things are initially copied into the buffer. The indirected data is then copied by the Wimp into the workspace area pointed to by R2. The font reference array is also updated if fonts are used.
The required sizes of the buffer and workspace area are hard to work out, and so in RISC OS 3 the option was added whereby you can find these values by setting R1 0. You should use this option where possible.
Window templates are created by the template creation utility (FormEd). They are stored in a file, and each template has a name associated with it. Because the search name may be wildcarded, it is possible to search for all templates of a given form (e.g. dialog*) by calling Wimp_LoadTemplate with R6=0 the first time, then using the value passed back for subsequent calls. R6 will be returned as 0 on the call after the last template is found. As the wildcarded name is overwritten by the actual one found, it must be re-initialised before every call and must be big enough to have the template name written into it.
The indirected icon workspace pointer is provided so that when the window definition is read into the buffer addressed by R1, its icon fields can be set correctly. An indirected icon's data is read from the file into the workspace addressed by R2, and the icon data pointer fields in the window definition are set appropriately. R2 is updated, and if it becomes greater than R3, a Window definition won't fit error is given.
The font reference count array is used to overcome the problem caused with dynamically allocated font handles. When a template file is created, font information such as size, font name etc is stored along with the font handle that was returned for the font in FormEd. When a template is subsequently loaded, the Wimp calls Font_FindFont and replaces references to the original font number with the new handle. It then increments the entry for that handle in the reference array. This array should be initialised to zero before the first call to Wimp_LoadTemplate.
When a window is deleted, for all font handles in the range 1 - 255 you should call Font_LoseFont the number of times given by that font's reference count. This implies that a separate 256 byte array is needed for each template loaded. However, this can be stored a lot more compactly (e.g. using font handle/count byte pairs) once the array has been set up by Wimp_LoadTemplate.
An alternative is to have a single reference count array for all the windows in the task, and only call Font_LoseFont the appropriate number of times for each handle when the task terminates.
No errors are generated if the template could not be found. To check for this condition check for R6 = 0 on exit.
If an error occurs you are still expected to close the template file.
No error is generated for objects of type ![[NOT EQUAL]](../symbols/entities/8800.png) 1: the object is simply loaded into the buffer, and no indirected data processing occurs. This is different from RISC OS 2, which reported an error in these circumstances.
1: the object is simply loaded into the buffer, and no indirected data processing occurs. This is different from RISC OS 2, which reported an error in these circumstances.
R0 = character code
R0 corrupted
Interrupts are not defined
Fast interrupts are enabled
Processor is in SVC mode
SWI is not re-entrant
This call has two uses. The first is to make the Wimp return a Key_Pressed event as though the character code passed in R0 was typed by the user. It is useful in programs where a menu of characters corresponding to those not immediately available from the keyboard is presented to the user, and clicking on one of them causes the code to be entered as if typed.
The second use is to pass on a keypress that a task does not understand, so that other applications (with the 'hot key' window flag set) may act on it. The key is passed (via the Key_Pressed event) to each eligible task in turn, from the top of the window stack down. It stops when a task fails to call Wimp_ProcessKey (because it recognises the key), or until the bottom window is reached.
For this to work, it is vital that a task always passes on unrecognised key presses using Wimp_ProcessKey. Conversely, if the program can act on the key stroke, it should not then call Wimp_ProcessKey, as this might result in a single key stroke causing several separate actions.
As a last resort, if no task acts on a function key press, the Wimp will expand the code into the appropriate function key string and insert it into the writable icon that owns the caret, if any.
None
R0 = task handle returned by Wimp_Initialise (only required if R1='TASK')
R1 = 'TASK' (see Wimp_Initialise &400C0)
R0 corrupted
Interrupts are not defined
Fast interrupts are enabled
Processor is in SVC mode
SWI is not re-entrant
This call must be made immediately before the task terminates by calling OS_Exit. If this was the only extant task, the Wimp will reset the soft key and mode settings to their original values (i.e. as they were before Wimp_Initialise was first called). Any application memory used by the task will be returned to the Wimp's free pool.
If the task handle is not given, then the Wimp will close down the currently active task, i.e. the one which was the last to have control returned to it from Wimp_Poll. This is sufficient if the task is loaded in the application workspace (as opposed to being a relocatable module).
Module tasks should always pass their handle to Wimp_CloseDown, as there is no guarantee that the module in question is the active one at the time of the call. For example, a task module would be required to close down in its 'die' code, which may be called asynchronously without control passing to the module through Wimp_Poll.
A Wimp_CloseDown will cause the service call WimpCloseDown (&53) to be generated. See the chapter entitled Relocatable module tasks for details.
R0 = pointer to * Command to be executed
R0 = handle of task started, if it is still alive; 0 otherwise (not available in RISC OS 2)
Interrupts are not defined
Fast interrupts are enabled
Processor is in SVC mode
SWI is not re-entrant
This call is used to start a 'child' task from within another program. The text pointed to by R0 on entry can be any * Command which will cause a Wimp program to be executed, e.g. BASIC -quit myProg.
The Wimp will create a new 'domain' or environment for the task and calls OS_CLI to execute the command. If the new task subsequently calls Wimp_Initialise and then Wimp_Poll, control will return to caller of Wimp_StartTask. Alternatively, control will return when the new task terminates through OS_Exit (which QUIT in BASIC calls).
This call is used by the Desktop and the Filer to start new tasks.
Note that you can only call this SWI:
None
R0 = pointer to standard error block, see below
R1 = flags, see below
R2 = pointer to application name for error window title (< 20 characters)
R0 corrupted
R1 = 0 if no key click, 1 if OK selected, 2 if Cancel selected
Interrupts are not defined
Fast interrupts are enabled
Processor is in SVC mode
SWI is not re-entrant
This call provides a built-in means for reporting errors that may occur during the running of a program. The error number and its text is pointed to by R0. The control code-terminated string pointed to by R2 is used in the Title Bar of the error window, optionally preceded by the text Error from .
The format of a standard error block is:
| R0 + 0 | error number |
| R0 + 4 | zero-terminated error string |
The flags in R1 on entry have the following meanings:
| Bit | Meaning when set |
|---|---|
| 0 | provide an OK box |
| 1 | provide a Cancel box |
| 2 | highlight Cancel (or OK if bit is cleared) |
| 3 | if the error is generated while a text-style window is open (e.g. within a call to Wimp_CommandWindow), then don't produce the prompt Press SPACE or click mouse to continue, but return immediately |
| 4 | don't prefix the application name with Error from in the error window's Title Bar |
| 5 | if neither box is clicked, return immediately with R1=0 and leave the error window open |
| 6 | select one of the boxes according to bits 0 and 1, close the window and return |
| 7 | will not produce a 'beep' even if WimpFlags bit 4 is clear (this bit is reserved in RISC OS 2) |
| 8 - 31 | reserved; must be 0 |
If neither bit 0 or 1 is set, an OK box is provided anyway. Bits 5 and 6 can be used to regain control while the error window is still open, say to implement timeouts (an example is the disc insert box, which polls the disc drive to see if a disc has been inserted), or use keypresses to stand for clicks on either of the boxes. Note though that the Wimp should not be re-entered while an error window is open, so you should always call Wimp_ReportError with bit 6 of R1 set before you next call Wimp_Poll, if you are using bit 5 in this way.
Wimp_ReportError causes the Service WimpReportError (&57) to be generated. See the chapter entitled Relocatable module tasks for details.
If you press Escape when a Wimp_ReportError box is up, the code returned is for the non-highlighted box, i.e. R1=2 if OK is highlighted, and R1=1 if Cancel is highlighted.
Note that RISC OS 2 will always return R1=1 (i.e. OK clicked), even if the Cancel box is highlighted.
Pressing Return selects the highlighted box, and returns 1 or 2 as appropriate.
In either case, if the box that would have been selected is not present, the other box is selected.
None
R1 = pointer to a five-word block
R0 corrupted
The block is updated
Interrupts are not defined
Fast interrupts are enabled
Processor is in SVC mode
SWI is not re-entrant
This call gets the bounding box for a window.
On entry, R1+0 contains the window handle; on exit the block is updated thus:
| R1 + 0 | window handle (or -2 to indicate the icon bar) |
| R1 + 4 | minimum x coordinate of window bounding box |
| R1 + 8 | minimum y coordinate of window bounding box |
| R1 + 12 | maximum x coordinate of window bounding box |
| R1 + 16 | maximum y coordinate of window bounding box |
A window handle value of -2 is not available in RISC OS 2.
The Wimp supplies the x0,y0 inclusive, x1, y1 exclusive coordinates of a rectangle which completely covers the specified window, including its border. This call is useful when you want, for example, to set a mouse rectangle to the same size as a window.
Note that this call will only work after a window is opened, not just created.
None
Polls the Wimp, sleeping unless certain events have occurred
R0 = mask (see Wimp_Poll)
R1 = pointer to 256 byte block (used for return data; see Wimp_Poll)
R2 = earliest time for return with Null_Reason_Code event
R3 = pointer to poll word if R0 bit 22 is set (not in RISC OS 2)
see Wimp_Poll
Interrupts are not defined
Fast interrupts are enabled
Processor is in SVC mode
SWI is not re-entrant
This call performs the same task as Wimp_Poll. However, the caller also specifies an OS_ReadMonotonicTime-type time on entry. The call will not return before then, unless there is a non-null event to be processed. Effectively the caller can 'sleep', not being woken up until the specified time has passed or until it has some action to perform. This gives more processing time to other tasks.
Having performed the appropriate action upon return, the task should add its 'time-increment'; (e.g. 100 for a one-second granularity clock) to the previous value it passed in R2 and call Wimp_PollIdle again.
Note that if the Wimp is suspended for a while (eg the user goes into the command prompt) and then returns, it is possible for the current time to be much later than the 'earliest return' time.
For this reason, it is recommended that (for example) a clock task should cater for this by incorporating the following structure:
SYS "OS_ReadMonotonicTime" TO newtime%
WHILE (newtime% - oldtime%) > 0
  oldtime%=oldtime%+100
ENDWHILE
REM Then pass oldtime% to Wimp_PollIdle
Plots an icon in a window during a window redraw or update loop
R1 = pointer to an icon block (see below)
R0 corrupted
Interrupts are not defined
Fast interrupts are enabled
Processor is in SVC mode
SWI is not re-entrant
This call can be used to plot an icon in a window during a window redraw or update loop. The icon doesn't exist as part of the window's definition. Instead, the data to be used to plot the icon is passed explicitly through R1. The format of the block is the same as that used by Wimp_CreateIcon, except that there is no window handle associated with it (this being implicitly the window which is currently being redrawn or updated):
| R1 + 0 | minimum x coordinate of icon bounding box |
| R1 + 4 | minimum y coordinate of icon bounding box |
| R1 + 8 | maximum x coordinate of icon bounding box |
| R1 + 12 | maximum y coordinate of icon bounding box |
| R1 + 16 | icon flags |
| R1 + 20 | icon data |
See Wimp_CreateIcon on Wimp_CreateIcon for details about these fields.
Under RISC OS 3 this SWI can be called from outside the redraw code of an application. In this case, the block pointed to by R1 should contain screen coordinates instead of window relative ones.
None
R0 = mode number
R0 corrupted
Interrupts are not defined
Fast interrupts are enabled
Processor is in SVC mode
SWI is not re-entrant
This call changes the display mode used by the Wimp. It should not be used by applications (which should be able to work in any mode), unless absolutely necessary. Its main client is the palette utility, which allows the user to change mode as required.
In addition to changing the mode this call resets the palette according to the number of colours in the new mode, reprograms the mouse pointer appropriately and re-allocates the screen memory to use the minimum required for this mode. In addition, the screen is rebuilt (by asking all tasks to redraw their windows) and tasks are informed of the change through a Wimp_Poll message.
Notes: the new mode is remembered for the next time the Wimp is started, but does not affect the configured Wimp mode, so this will be used after a hard reset or power-up. If there is no active task when Wimp_SetMode is called, the mode change doesn't take place until Wimp_Initialise is next called. If there is insufficient memory for the mode change, it is remembered and no error is generated.
On the next call to Wimp_Poll after a mode change, the Wimp issues Message_ModeChanged and Open_Window_Requests for all open windows. If the new mode is smaller than the previous one, the windows are also forced back onto the screen. This does not happen in RISC OS 2.
R1 = pointer to 20-word palette block
R0 corrupted
R1 preserved
Interrupts are not defined
Fast interrupts are enabled
Processor is in SVC mode
SWI is not re-entrant
This call sets the palette.
The block pointed to by R1 contains the following on entry:
| R1 + 0 | Wimp colour 0 RGB value |
| R1 + 4 | Wimp colour 1 RGB value |
| R1 + 8 | Wimp colour 2 RGB value |
| ... | ... |
| R1 + 56 | Wimp colour 14 RGB value |
| R1 + 60 | Wimp colour 15 RGB value |
| R1 + 64 | border colour RGB value |
| R1 + 68 | pointer colour 1 RGB value |
| R1 + 72 | pointer colour 2 RGB value |
| R1 + 76 | pointer colour 3 RGB value |
Each RGB value word has the format &BBGGRR00, i.e. bits 0 - 7 are reserved, and should be 0, bits 8 - 15 are the red value, bits 16 - 23 the green and bits 24 - 31 the blue, as used in a VDU 19,l,16,r,g,b command. The call, whose main user is the palette utility, issues the appropriate palette VDU calls to reflect the new values given in the 20-word block. In modes other than 16-colour ones, a remapping of the Wimp's colour translation table may be required, necessitating a screen redraw. It is up to the user of Wimp_SetPalette to cause this to happen (the palette utility does). Tasks are informed of palette changes through a message event returned by Wimp_Poll.
R1 = pointer to 20-word palette block
R2 = 'TRUE' (&45555254) to return 24 bit palette entries rather than 12 bit
R0 corrupted
R1 preserved
Interrupts are not defined
Fast interrupts are enabled
Processor is in SVC mode
SWI is not re-entrant
This call reads the palette. The 20-word block is updated in the format described under Wimp_SetPalette. However, the bottom byte of the first 16 entries contains the logical colour number that is used for that Wimp colour. This is the same as the Wimp colour in 16-colour modes. In 256 colour modes, bits 0 and 1 are bits 6 and 7 of the tint, and bits 2 - 7 are the GCOL colour.
The values returned from Wimp_ReadPalette are analogous to those returned by OS_ReadPalette, in that they always have the bottom nibbles clear. These colours are not correct for passing to ColourTrans: you have to make the bottom nibbles into copies of the top ones.
However, if R2 is set to 'TRUE' on entry, then the returned palette entries are 24 bit rather than 12 bit, ie &bbggrrnn rather than &b0g0r0nn. This saves having to copy the top nibbles into the bottom nibbles before making ColourTrans calls.
Applications can use this call to discover all of the current Wimp palette settings.
Sets the current graphics foreground or background colour and action
R0 = colour and GCOL action (see below)
R0 corrupted
Interrupts are not defined
Fast interrupts are enabled
Processor is in SVC mode
SWI is not re-entrant
This calls is used to set the current graphics foreground or background colour and action to one of the 16 standard Wimp colours. As described earlier, these map into ECF patterns in monochrome modes, four grey-level colours in four-colour modes, the available colours in 16-colour modes, and the closest approximation to the Wimp colours in 256-colour modes.
The format of R0 is as follows:
| Bits | Meaning |
|---|---|
| 0 - 3 | Wimp colour |
| 4 - 6 | GCOL action |
| 7 | 0 for foreground, 1 for background |
After the call to Wimp_SetColour, the appropriate GCOL, TINT and (in two-colour modes) ECF commands will have been issued. The Wimp uses ECF pattern 4 for its purposes.
None
R0 = event code (as returned by Wimp_Poll - often 17, 18 or 19)
R1 = pointer to message block
R2 =
R0 corrupted
R2 = task handle of destination task (except for broadcast messages)
the message is queued
the message block is updated (event codes 17 and 18 only)
Interrupts are not defined
Fast interrupts are enabled
Processor is in SVC mode
SWI is not re-entrant
All messages within the Wimp environment are generated using this call. The Wimp uses it internally to keep tasks informed about various events through their Wimp_Poll loop.
For a full description of all the message action codes see the chapter entitled Messages.
User tasks can also generate these types of message, with event codes in the range 0 to 12. On entry, R1 should point to a block with the format described under Wimp_Poll. For example, if you send an Open_Window_Request to a task (R0=2), you should point R1 at a Wimp_OpenWindow block.
More often though, Wimp_SendMessage is used by tasks to send events of type User_Message to one another. These differ from the 'system' types, in that the Wimp performs some special actions, e.g. filling in fields of the message block, and noting whether a reply has been received.
There are three variations, depending on the event code in R0 on entry. The first two, User_Message and User_Message_Recorded (17 and 18), send a message to the destination task(s). The latter expects the message to be acknowledged or replied to, and if it isn't the Wimp returns the message to the sender. (See Wimp_Poll event codes 17, 18 and 19.)
Event code User_Message_Acknowledge (19) is used to acknowledge the receipt of a message without actually generating an event at the destination task. The receiver copies the my_ref field of the message block into the your_ref field and returns the message using the task handle of the sender given in the message block. If you acknowledge a broadcast message, it is not passed on to any other tasks.
The format of a user message block is:
| R1 + 0 | length of block, 20 - 256 bytes, a whole number of words |
| R1 + 4 | not used on entry |
| R1 + 8 | not used on entry |
| R1 + 12 | your_ref (0 if this is an original message, not a reply) |
| R1 + 16 | message action |
| R1 + 20 | message data (format depends on the message action) |
Note that the block length should include any string that appears on the end (e.g. pathnames), including the terminating character, and rounded up to a whole number of words.
On exit the block is updated as follows:
| R1 + 4 | task handle of sender |
| R1 + 8 | my_ref (unique Wimp-generated non-zero positive word) |
Thus the receiver of the message will know who sent the message (useful for acknowledgements) and will also have a reference that can be quoted in replies to the sender. Naturally the sender can also use these fields once the Wimp has filled them in.
Note that you can use User_Message_Acknowledge to discover the task handle of a given window/icon by calling Wimp_SendMessage with R0=19, your_ref = 0, and R2/R3 the window/icon handle(s). On exit R2 will contain the task handle of the owner, though no message would actually have been sent.
R1 = pointer to submenu block
R2 = x coordinate of top left of submenu
R3 = y coordinate of top left of submenu
R0 corrupted
Interrupts are not defined
Fast interrupts are enabled
Processor is in SVC mode
SWI is not re-entrant
This call is made when a message type MenuWarning (&400C0) is received by an application. This message is sent by the Wimp when a submenu is about to be accessed by the pointer moving over the right-pointing arrow of the parent menu.
The contents of R1 - R3 are obtained from the three words at offsets +20 to +28 of the message block. However, the submenu pointer does not have to be the same as that given in this block (which is just a copy of the one given in the parent menu entry when it was created by Wimp_CreateMenu). For example, the application could create a new window, and use its handle instead.
R0 = reason code (in the range 0 - &FF, see OS_SpriteOp)
R1 not used
R2 = pointer to sprite name
R3... OS_SpriteOp parameters
R0, R1 corrupted
R2... OS_SpriteOp results
Interrupts are not defined
Fast interrupts are enabled
Processor is in SVC mode
SWI is not re-entrant
This call allows operations on Wimp sprites, without having to specify the Wimp's sprite area pointer. Sprites are always accessed by name (i.e. &100 is added to the reason code given); pointers to actual sprites are not used. Only read-type operations are allowed, except that you may use the reason code MergeSpriteFile (11) to add further sprites to the Wimp area.
The Wimp first tries to access the sprite in the RMA part of its sprite pool. If it is not found there, it tries the ROM sprite area. If this fails, it returns the usual Sprite not found message.
None
Finds the addresses of the ROM and RAM resident parts of the Wimp's sprite pool
--
R0 = base of ROM sprite area
R1 = base of RMA sprite area
Interrupts are not defined
Fast interrupts are enabled
Processor is in SVC mode
SWI is not re-entrant
This can be used to find out the actual addresses of the two areas that make up the Wimp sprite pool, for use with OS_SpriteOp. Note that the RMA area may move around, e.g. after a sprite file has been merged with it. In view of this, you should use Wimp_SpriteOp if possible.
Note: This call should not be used if you are writing applications that you wish to be compatible with future versions of RISC OS.
None
R0 = window handle
R1 = source rectangle minimum x coordinate (inclusive)
R2 = source rectangle minimum y coordinate (inclusive)
R3 = source rectangle maximum x coordinate (exclusive)
R4 = source rectangle maximum y coordinate (exclusive)
R5 = destination rectangle minimum x coordinate
R6 = destination rectangle minimum y coordinate
R0 - R6 = preserved
Interrupts are not defined
Fast interrupts are enabled
Processor is in SVC mode
SWI is not re-entrant
This call copies a block of work area space to another position. The Wimp does as much on-screen work as it can, using the VDU block copy primitive, and then invalidates any areas which must be updated by the application itself. The call is useful for performing insert/delete operations in editors.
All coordinates are relative to the window's work area origin. Note that if any of the source area contains icons, their on-screen images will be copied, but their bounding boxes will not automatically be moved to the destination rectangle. It is up to the application to move the icons explicitly (by deleting and re-creating then) so that they are redrawn correctly.
If the source area contains an ECF pattern, e.g. representing Wimp colours in a two-colour mode, and the distance between the source and destination is not a multiple of the ECF size (eight pixels vertically and one byte horizontally), then the copied area will be 'out of sync' with the existing pattern.
Note that this call must not be made from inside a Wimp_RedrawWindow or Wimp_UpdateWindow loop.
None
Reads or sets the size of the current slot, the next slot, and the Wimp free pool
R0 = new size of current slot (-1 to read size)
R1 = new size of next slot (-1 to read size)
R0 = size of current slot (i.e. memory for current task)
R1 = size of next slot (i.e. desirable allocation for next task)
R2 = size of free pool (i.e. free memory)
R4 corrupted
Interrupts are not defined
Fast interrupts are enabled
Processor is in SVC mode
SWI is not re-entrant
Tasks can use this call to read or set the size of the current slot, i.e. that in which the task is executing, and the next slot (for the next task to start up). It also returns the (possibly altered) size of the Wimp free pool.
If a task wants to alter its memory, it should set R0 to the required amount and R1 to -1.
Next is a number and can be larger than free, in which case next task just gets free. Note that the next slot size does not actually have any effect until the next new task is run. It is simply the amount of the free pool that is allocated to a new task by default.
No tasks should set their current slot size; normally, a new task will call *WimpSlot, which then calls Wimp_SlotSize.
On exit from Wimp_SlotSize, the OS_ChangeEnvironment variables MemoryLimit and ApplicationSpaceSize are updated. Note that it is not possible to change the application space size if this is greater than MemoryLimit. This is the situation when, for example, Twin loads at &80000 and runs another task at &8000, setting that task's memory limit to &80000.
Wimp_SlotSize does not check that the currently active object is within the application workspace, or issue Memory service calls, so it should be used with caution. The same applies to *WimpSlot which uses this SWI.
Possible ways in which this call could be used are:
None
R0 = &0xx if sprite is in the system area
&1xx if sprite is in a user area and R2 points to the name
&2xx if sprite is in a user area and R2 points to the sprite
R1 = 0 if the sprite is in the system area
1 if the sprite is in the Wimp's sprite area
otherwise a pointer to the user sprite area
R2 = a pointer to the sprite name (R0 = &0xx or &1xx) or
a pointer to the sprite (R0 = &2xx)
R6 = a pointer to a four-word block to receive scale factors, 0 do not fill in
R7 = a pointer to a 2, 4 or 16 byte block to receive translation table,
0 do not fill in (must be 16 bytes long)
R0 corrupted
R6 block contains the sprite scale factors
R7 block contains a 2, 4, or 16 byte sprite translation table
Interrupts are not defined
Fast interrupts are enabled
Processor is in SVC mode
SWI is not re-entrant
The purpose of this call is to discover, for a given sprite, how the Wimp would plot it if it was in an icon to give it the most consistent appearance independently of the current Wimp mode. The blocks set up at R6 and R7 on exit can be passed directly to the above mentioned sprite plotting calling.
If the sprite is not found in the passed area, it is then searched for in the Wimp sprite pool - except under RISC OS 2.
The size of the table pointed to by R7 depends on the sprite's mode. Under RISC OS 2 the sprite cannot have 256 colours.
The format of the R6 block is:
| R6 + 0 | x multiplication factor |
| R6 + 4 | y multiplication factor |
| R6 + 8 | x division factor |
| R6 + 12 | y division factor |
All quantities are 32-bits and unsigned.
The format of the R7 block is:
| R7 + 0 | colour to store sprite colour 0 as |
| R7 + 1 | colour to store sprite colour 1 as |
| ... | |
| R7 + 14 | colour to store sprite colour 14 as |
| R7 + 15 | colour to store sprite colour 15 as |
Scale factors depend on the mode the sprite was defined in and the current Wimp mode. The colour translation table is only valid for sprites defined in 1, 2 or 4-bits per pixel modes. The relationships between the sprite colours and the Wimp colours used to display them are:
| Sprite bpp | Colours used |
|---|---|
| 1 | Colours 0 - 1 -> Wimp colours 0, 7 |
| 2 | Colours 0 - 3 -> Wimp colours 0, 2, 4, 7 |
| 4 | Colours 0 - 15 -> Wimp colours 0 - 15 |
| 8 | Translation table is undefined |
So sprites defined with fewer than four bits per pixel have their pixels mapped into the Wimp's greyscale colours.
Use ColourTrans if you want to plot the sprite using the best approximation to its actual colours. This works for sprites in a 256-colour mode as well.
None
Claims the whole of the Wimp's free memory pool for the calling task
R0 = 1 to claim, 0 to release
R1 = amount of memory required
R0 corrupted
R1 = amount of memory available (0 if none/already claimed)
R2 = start address of memory (0 if claim failed because not enough)
Interrupts are not defined
Fast interrupts are enabled
Processor is in SVC mode
SWI is not re-entrant
This call is analogous to OS_ClaimScreenMemory. It allows a task to claim the whole of the Wimp's free memory pool (the 'Free' entry on the Task Manager display) for its own use. There are restrictions however: the memory can only be accessed in processor supervisor (SVC) mode, and while it is claimed, the Wimp can't use the free pool to dynamically increase the size of the RMA etc. For the second reason, tasks should not hang on to the memory for any longer than absolutely necessary. They should also avoid calling code which is likely to have much to do with memory allocation, e.g. code which claims RMA space. In other words, do not call Wimp_Poll while the free pool is claimed.
Opens a text window in which normal VDU 4-type output can be displayed
R0 = operation type, see below
R0 corrupted
Interrupts are not defined
Fast interrupts are enabled
Processor is in SVC mode
SWI is not re-entrant
This call opens a text window in which normal VDU 4-type output can be displayed. It is useful for running old-fashioned, text-based programs from within the Wimp environment. The exact action depends on R0 as follows.
| R0 > 1 | R0 is treated as a pointer to a text string. This is used as the title for the command window. However, the command window is not opened immediately; it is just marked as 'pending'. It does not become 'active' until the next call to OS_WriteC. When this occurs, the window is opened and the VDU 4 text viewport is set to the same area on the screen. |
| R0 = 1 | The command window status is set to 'active'. However, no drawing on the screen occurs. This is used by the ShellCLI module so that if Wimp_ReportError is called, the error will be printed textually and not in a window. |
| R0 = 0 | The window is closed and removed from the screen. If any output was generated between the window being opened with R0 > 1 and this call being made, the Wimp prompts with Press SPACE or click mouse to continue before re-building the screen. |
| R0 = -1 | The command window is closed without any prompting, regardless of whether it was used or not. |
The Wimp uses a command window when starting new tasks. It calls Wimp_CommandWindow with R0 pointing to the command string, and then executes the command. If the task was a Wimp one, it will call Wimp_Initialise, at which point the Wimp will close the command window with R0 = -1. Thus the window will never be activated. However, a text-based program will never call Wimp_Initialise, so the command window will be displayed when the program calls OS_WriteC for the first time.
Certain Filer operations which result in commands such as *Copy being executed also use the command window facility in this way.
Wimp_ReportError also interacts with command windows. If the window is active, the error text will simply be displayed textually. However, if the command window is pending, it is marked as 'suspended' and the error is reported in a window as usual.
None
R0 = colour
R0 corrupted
Interrupts are not defined
Fast interrupts are enabled
Processor is in SVC mode
SWI is not re-entrant
This call is the text colour equivalent of Wimp_SetColour. It is used to set the text foreground or background colour to one of the 16 standard Wimp colours. As text can't be displayed using ECF patterns, only solid colours are used in the monochrome modes.
R0 on entry has the following form:
| Bits | Meaning |
|---|---|
| 0 - 3 | Wimp colour (0 - 15) |
| 7 | 0 for foreground, 1 for background |
Wimp_TextColour is used by Wimp_CommandWindow and on exit from the Wimp. It can be called by applications that wish to display VDU 4-type text on the screen in a special window.
Copies a block of memory from one task's address space to another's
R0 = handle of source task
R1 = pointer to source buffer
R2 = handle of destination task
R3 = pointer to destination buffer
R4 = buffer length
R0 corrupted
Interrupts are not defined
Fast interrupts are enabled
Processor is in SVC mode
SWI is not re-entrant
This call copies a block of memory from the source task's address space to the destination task. The buffer addresses and the length are byte aligned, i.e. the buffers don't have to start on a word boundary or be a whole number of words long.
This call is used in the memory data transfer protocol, described in the Data transfer protocol. The Wimp ensures that the addresses given are valid for the task handles, and generates the error Wimp transfer out of range if they are not.
None
R0 = information item index
R0 = information value
Interrupts are not defined
Fast interrupts are enabled
Processor is in SVC mode
SWI is not re-entrant
This call is used to obtain information from the Wimp which is not readily available otherwise. The value in R0 on entry indicates which item of information is required; its value on exit is the appropriate value.
Currently defined values for R0 are:
RISC OS 2 does not support values of R0 > 0.
As the call can be used regardless of whether Wimp_Initialise has been called yet, it can be used to see if the program is running from within the desktop environment (R0 > 0 on exit) or simply from a command line (R0 = 0). Note that even if a program is activated from the Task Manager's command line (F12) facility, R0 will be greater than zero.
None
Sets the anti-aliased font colours from the two (standard Wimp) colours specified
R1 = font background colour
R2 = font foreground colour
R0 corrupted
Interrupts are not defined
Fast interrupts are enabled
Processor is in SVC mode
SWI is not re-entrant
This call sets the anti-aliased font colours from the two (standard Wimp) colours specified. It calculates how many intermediate colours can be used, and makes the appropriate Font Manager calls. It takes the display mode into account, so that using this call instead of setting the font colours directly saves the application quite a lot of work.
You should not assume the font colours are as you left them across calls to Wimp_Poll, as another task may have called Wimp_SetFontColours before you regain control. Conversely, you don't have to preserve the colours before you change them, as no-one else will be expecting you to.
This call is less powerful than ColourTrans_SetFontColours, in that it assumes that Wimp colours 0-7 form a grey-scale sequence.
| R0 | = 0 | report current state of tree, ignoring R2,R3
| |
| = 1 | report tree which leads up to R2,R3:
| ||
| R2 = window handle | |||
| R3 = icon handle | |||
| R1 | = pointer to buffer to contain result | ||
R0 corrupted
The tree is put into the buffer in R1 in the same format as that returned by Wimp_Poll event code 9 (Menu_Select), i.e. a list of selection indices terminated by -1.
Interrupts are not defined
Fast interrupts are enabled
Processor is in SVC mode
SWI is not re-entrant
The tree returned will be null:
If the window is a dialogue box, the tree returned will go up to (but not include) the dialogue box.
This SWI is not available under RISC OS 2.
None
Used by the Filter Manager to register or deregister a filter with the Wimp
| R0 = reason code: | |
| 0 register / deregister pre-filter
| |
| 1 register / deregister post-filter
| |
| 2 register / deregister rectangle copy filter
| |
| 3 register / deregister get rectangle filter
| |
| R1 = address of filter, or 0 to de-register | |
| R2 = value to be passed in R12 on entry to filter | |
Registers preserved
Interrupts are not defined
Fast interrupts are enabled
Processor is in SVC mode
SWI is not re-entrant
This SWI is provided for the use of the Filter Manager, and should not be used unless you want to replace the whole filter system. Use the FilterManager to register filters for specific tasks.
This SWI is not available under RISC OS 2.
A pre filter is called whenever a task calls Wimp_Poll:
R0 = event mask as passed to Wimp_Poll
R1 = pointer to User block as passed to Wimp_Poll
R2 = task handle
R12 = value of R2 when registered
SVC mode, interrupts enabled. The task that called Wimp_Poll is paged in.
R0 may be modified by the filter
All other register and processor mode must be preserved
A post filter is called when the Wimp is about to return an event to a task.
R0 = event code for event that is about to be returned
R1 = pointer to Event block for event to be returned (Owner task paged in)
R2 = task handle of task that is about to receive the event
SVC mode, interrupts enabled. The task to which the event is to be returned is paged in.
The filter may modify R0 and the contents of the buffer pointed to by R1, to return a different event.
R1,R2 must be preserved.
If R0 = -1 on exit, the event will not be passed to the task.
None
R0 = pointer to word array of messages to add for task
--
Interrupts are not defined
Fast interrupts are enabled
Processor is in SVC mode
SWI is not re-entrant
This SWI allows you to update the list of messages known by a certain task. This routine updates the messages list for the current task.
This call is of use only for tasks that specified a Wimp version number 300 to Wimp_Initialise.
None
None
Removes messages from the list of those known by a certain task
R0 = pointer to word array of messages to remove from task
--
Interrupts are not defined
Fast interrupts are enabled
Processor is in SVC mode
SWI is not re-entrant
This SWI allows the caller to remove messages from the list specified either on Wimp_Initialise or by Wimp_AddMessages.
This call is of use only for tasks that specified a Wimp version number 300 to Wimp_Initialise.
None
None
Changes the mapping between Wimp colours and physical colours
| R1 | = pointer to palette to be used for converting Wimp colours to physical colours | |
| = -1 the default Wimp palette is used | ||
| = 0 the palette defined by Wimp_SetPalette is used else the table is copied away | ||
| R2 | = pointer to 2 byte array for mapping 1BPP sprites to Wimp colours | |
| R3 | = pointer to 4 byte array for mapping 2BPP sprites to Wimp colours | |
| R4 | = pointer to 16 byte array for mapping 4BPP sprites to Wimp colours | |
| R5,R6,R7 must be 0 | ||
--
Interrupts are not defined
Fast interrupts are enabled
Processor is in SVC mode
SWI is not re-entrant
This SWI is used to change the way in which the Window Manager maps its own Wimp colours to physical colours.
On entry R1 contains a pointer to a 16 word set of physical colours (&BBGGRRxx). When converting a Wimp colour to its physical colour it indirects through this to get the physical colour required. By default this is the same as the palette defined using Wimp_SetPalette.
R2, R3, and R4 point to byte arrays which are used when converting non-paletted sprite colours to their physical colours. Basically, the system uses the values stored within the byte array as an index into the palette being used for ColourTrans calls. Passing 0 indicates no change, -1 indicates the default setting.
None
If a message is sent to a menu window, then it will be delivered to the task which opened the menu tree. This applies to any event code greater than Close_Window_Request, as well as the messages (open, close and redraw are all dealt with automatically by the Wimp).
The following is a description of the currently defined message actions. Some of these are system types, others are generated by particular modules (most notably the Wimp). Any other module or application can send its own private messages, as required. A module is allowed to use its SWI chunk number as a base for the message action values. If you require a message action chunk and do not have a SWI chunk allocated, refer to the SWI chunk numbers and names.
On receiving this broadcast message a task should tidy up (close files, de-allocate memory etc) and close down by calling Wimp_CloseDown and OS_Exit. The task doesn't have any choice about closing down at this stage. Any objections (because of unsaved data etc) should be lodged when it gets the Message_PreQuit (8) described below.
See the chapter entitled Data transfer protocol for details of these message actions.
This broadcast message gives applications the chance to object to a request to close down; for example, if they have modified data which has not been saved. If the task does not mind terminating, it should ignore this message, and eventually a Message_Quit will be received.
To object to the potential closedown, the task should acknowledge the message by calling Wimp_SendMessage with:
R0 = User_Message_Acknowledge (19)
R1 = as returned by Wimp_Poll
R1+12 = R1+8 (i.e. my_ref copied into your_ref)
Note that if the user subsequently selects OK (i.e. discard the data and quit anyway), the task must restart the closedown sequence by issuing a key-pressed event (Ctrl-Shift-F12) to the task which sent it the PreQuit message:
SYS "Wimp_GetCaretPosition",,blk
blk!24=&1FC
SYS "Wimp_SendMessage",8,blk,quitsender
where quitsender is read from sender field of original PreQuit message.
The Task Manager uses the Quit and PreQuit messages when the user selects the Exit option from its menu. The way in which this works (in pseudo-BASIC) is as follows:
REM in CASE statement for Wimp_Poll event type...
WHEN Menu_Selection
PROCdecodeMenu
IF menuChoice$="Quit" THEN
  REM send the PreQuit and remember my_ref
  SYS "Wimp_SendMessage",User_Message_Recorded,PreQuitBlock,0
  PreQuitRef = PreQuitBlock!8
ENDIF
WHEN User_Message_Acknowledge
  REM got one of our messages back. Is it the PreQuit one?
  IF pollBlock!8 = PreQuitRef THEN
    REM no-one objected to PreQuit so safe to issue quit
    SYS "Wimp_SendMessage",User_Message_Recorded,quitBlock,0
    quitRef=quitBlock!8
  ELSE
    REM is it the quit one then?
    REM if so, exit the Desktop
    IF pollBlk!16=Message_Quit AND pollBlk!8=quitRef THEN quit
  ENDIF
WHEN User_Message, User_Message_Recorded
  REM if someone else did a quit, then terminate desktop
  IF pollBlk!16=Message_Quit AND pollBlk!8<>quitRef THEN quit
...
In English, the Task Manager issues a PreQuit broadcast when the Exit item is selected from its menu. If this is returned by the Wimp (because no other task objected), the Task Manager goes ahead and issues a Quit broadcast. When this comes back unacknowledged, the Task Manager checks the reference and quits if it is correct (as all other tasks would already have done).
The Task Manager must also be able to respond to the key-pressed event (Ctrl-Shift-F12) &1FC.
Tasks should automatically restart the quit procedures as described earlier.
If the Task Manager ever gets a Quit that it didn't originate, it will close itself down.
Applications can tell whether they should restart the desktop closedown sequence after prompting the user to save any unsaved data. If bit 0 of the flag word is set, then the task should not send a Ctrl-Shift-F12 Key_Pressed event to the task which sent it the PreQuit message, to restart the closedown sequence, but should instead just terminate itself.
This facility is not available in RISC OS 2.
| R1 + 0 | 24 (size) |
| R1 + 16 | Message_PreQuit (8) |
| R1 + 20 | flag word: bit 0 set just quit this task, else desktop being quitbits 1 - 31 reserved (i.e. ignore them) |
Note that if the flag word is not present (i.e. the block is too small), the task should treat the flag word as having been zero. Following this, the task should display a dialogue box giving the user the chance to either save or discard files, as he sees fit.
This broadcast message is issued by the Palette utility. It should not be acknowledged. The utility generates it when the user finishes dragging one of the RGB bars for a given colour, or when a new palette file is loaded.
If a task needs to adapt to a change in the physical colours on the screen, it should respond to this message by changing any of its internal tables (colour maps etc), and then call Wimp_ForceRedraw to ensure that its windows are redrawn with the new colours. Note though that the palette utility automatically forces a redraw of the whole screen if any of the Wimp's standard colours change their logical mapping, so applications don't have to take further action.
This message is not issued when the Wimp mode changes; Message_ModeChange (&400C1) reports this, so tasks interested in colour mapping changes should recognise this message too.
See the chapter entitled The desktop save protocol for details of this.
| R1 + 0 | 24 (size) |
| R1 + 16 | Message_Shutdown (10) |
| R1 + 20 | flags (all reserved) |
This message is issued when the computer is being forced to shutdown, say due to power failure on a portable machine. It is broadcast as a result of calling the SWI TaskManager_Shutdown with bit 3 of R0 set. Applications receiving this should attempt to ensure any unsaved data.
A task sends this message to a Filer task. It is a request to open a new directory display. The data part of the message block is as follows:
| R1 + 20 | filing system number |
| R1 + 24 | bit 0 set do not canonicalise name before using all other bits reserved |
| R1 + 28 | full name of directory to view, zero-terminated |
The string given at R1+28 must be a full specification of the directory to open including fileserver (if appropriate), disc name, and pathname starting from $, using the same format as the names in Filer windows. Send the message as a broadcast User_Message. If the directory name is invalid (e.g. the filing system is not present), a Wimp_ReportError error will be generated by the Filer.
Note that the Filing System modules (eg. ADFSFiler) do not use a broadcast, but instead discover the Filer's task handle by means of the Service_StartFiler protocol. See the chapter entitled Relocatable module tasks for further details.
This message takes the same form as the previous one. All open directory displays whose names start with the name given at R1+28 are closed.
This is similar to the Filer_OpenDir message but allows you to specify the position and mode for the directory viewer. The format of the message block is as follows:
| R1 + 20 | filing system number | |
| R1 + 24 | must be 0 | |
| R1 + 28 | X position of viewer | |
| R1 + 32 | Y position of viewer | |
| R1 + 36 | width of viewer | |
| R1 + 40 | height of viewer | |
| R1 + 44 | viewmode: | |
| bits 0-1 | display mode | |
| 0 = large icons | ||
| 1 = small icons | ||
| 2 = full info | ||
| 3 - reserved, do not use | ||
| bits 2-3 | sort mode | |
| 0 = sort by name | ||
| 1 = sort by size | ||
| 2 = sort by type | ||
| 3 = sort by date | ||
| bit 4 | ||
| 0 = use default display mode | ||
| 1 = use display mode in bits 0-1 | ||
| bit 5 | ||
| 0 = use default sort mode | ||
| 1 = use sort mode in bits 2-3 | ||
| all other bits reserved and must be 0 | ||
| R1 + 25 | full name of directory to view | |
The Filer Action Window is a module which performs file manipulation operations for the Filer without the desktop hanging whilst they are under way.
The Filer Action Window is not available in RISC OS 2.
To drive Filer_Action you must:
Filer_Action will sort out its own slot size as appropriate. If no messages are sent, then Filer_Action will kill itself.
To set the Filer_Action going, the following messages are sent:
Message_FilerSelectionDirectory (&403)
Message_FilerAddSelection (&404)
Message_FilerAction (&405)
The selection directory is the name of the directory in which the selection of files being operated upon lies. AddSelection sends a set of files which are to be added to the list of files in the selected directory. You should just send a space separated list of leaf names of the selected objects.
FilerAction starts the operation going.
Once the Filer_Action is going it can be controlled by using the Message_FilerControlAction message.
The data for this message should be a null-terminated name of a directory. Sending this message clears out the current selection of files.
This message is not available in RISC OS 2.
The data for this message should be a null-terminated string which is a space separated list of leaf names of objects in the selection directory which are to be operated upon. This adds the given names to the list.
This message is not available in RISC OS 2.
The format of the data for this message takes the following form:
| Word | Meaning | ||
|---|---|---|---|
| 0 | Operation to be performed: | ||
| 0 | Copy | Copy a number of objects from one directory to another | |
| 1 | Move (rename) | Move a number of objects from one directory to another by trying a rename first then doing a copy/delete if that fails | |
| 2 | Delete | Delete a number of objects in a particular directory | |
| 3 | Set access | Set the access of a number of objects to a given value | |
| 4 | Set type | Set the file type of a number of objects to a given value | |
| 5 | Count | Count the file sizes of the selected objects | |
| 6 | Move (by copying and deleting afterwards) | Move a number of objects from one directory by copying them then deleting the source | |
| 7 | Copy local (within directory) | Copy a single object to a different name in the same directory | |
| 8 | Stamp files | Stamp the selected objects with the time when they get stamped | |
| 9 | Find file | Find an object with a given name. | |
| 1 | Option bits: | ||
| Bit | Meaning when set | ||
| 0 | Verbose | ||
| 1 | Confirm | ||
| 2 | Force | ||
| 3 | Newer (as opposed to copying always) | ||
| 4 | Recurse (only applies to access) | ||
| 2 onwards | |||
| Information specific to the particular operation: | |||
| Operation | Meaning | ||
| 0 | Copy | null terminated destination directory | |
| 1 | Move (rename) | null terminated destination directory | |
| 2 | Delete | unused | |
| 3 | Set access | How to set the access The 1st two bytes are the access values to be set The 2nd two bytes are a mask which, when set, disable the corresponding access bit from being set | |
| 4 | Set type | Numeric file type to set | |
| 5 | Count | unused | |
| 6 | Move (copy/delete) | null terminated destination directory | |
| 7 | Copy local | null terminated destination object name | |
| 8 | Stamp | unused | |
| 9 | Find | null terminated name of object to find | |
This message is not available in RISC OS 2.
The 1st word determines what control is to be performed:
| 0 | Acknowledge the control message (to check FilerAction is still going) |
| 1 | Show the action window (turn verbose on) |
| 2 | Hide the action window (turn verbose off) |
This message is sent by the filer to the application, before it starts sending DataLoad messages when a selection has been dragged from the filer to an application. The data block of the message is as follows:
| R1 + 20 | x0 of selection bounding box in screen coordinates | |
| R1 + 24 | y0 of selection bounding box in screen coordinates | |
| R1 + 28 | x1 of selection bounding box in screen coordinates | |
| R1 + 32 | y1 of selection bounding box in screen coordinates | |
| R1 + 36 | width of each selected item | |
| R1 + 40 | height of each selected item | |
| R1 + 44 | view mode for this directory: | |
| bits 0-1 | display mode | |
| 0 = large icons | ||
| 1 = small icons | ||
| 2 = full info | ||
| 3 - reserved, do not use | ||
| bits 2-3 | sort mode | |
| 0 = sort by name | ||
| 1 = sort by size | ||
| 2 = sort by type | ||
| 3 = sort by date | ||
| R1 + 48 | start column | of selection in window |
| R1 + 52 | start row | of selection in window |
| R1 + 56 | end column | of selection in window |
| R1 + 60 | end row of | selection in window |
The NetFiler sends this broadcast message to enable an application to display the text of a *Notify command in some pleasing way. If no-one acknowledges the message, NetFiler simply displays the text in a window using Wimp_ReportError, with the string Message from station xxx.xxx in the Title Bar.
Information about the sender, and the text of the notify, are contained in the message block, as follows:
| R1 + 20 | sending station number |
| R1 + 21 | sending station network number |
| R1 + 22 | LSB of five byte real time on receipt of message |
| R1 + 23 | second byte of time |
| R1 + 24 | third byte of time |
| R1 + 25 | fourth byte of time |
| R1 + 26 | MSB of five byte real time on receipt of message |
| R1 + 27 | message text, terminated by a zero byte |
So if you want to do something with the notify and prevent the NetFiler from displaying it, copy the my_ref field into the your_ref field and send the message back using Wimp_SendMessage User_Message_Acknowledge (19).
The Wimp sends this message when the mouse pointer travels over the right arrow of a menu item to activate a submenu. The menu item must have its 'generate message' bit (3) in the menu flags set for this to happen, otherwise the Wimp will just open the submenu item as normal. (The submenu pointer must also be greater than zero in order for this message to be sent.)
In the message block are the values required by Wimp_CreateSubMenu on entry. The task may use these, or may choose to take some other action (e.g. create a new window and open that as the submenu).
| R1 + 20 | submenu pointer from menu item |
| R1 + 24 | x coordinate of top left of new submenu |
| R1 + 28 | y coordinate of top left of new submenu |
| R1 + 32 | main menu selected item number (0 for first) |
| R1 + 36 | first submenu selected item number |
| ... | |
| R1 + ... | -1 to terminate list |
After the three words required by Wimp_CreateSubMenu is a description of the current selection state, in the same format that would be returned by the Menu_Selection event. This information, in conjunction with the task's knowledge of the menu structure, is sufficient to work out the path taken through the menu so far.
Wimp_SetMode causes this message to be sent as a broadcast. It gives tasks a chance to update their idea of what the current screen mode looks like by reading the appropriate parameters using OS_ReadVduVariables. (Though applications should need to know as little about the display's attributes as possible to facilitate mode independence.)
You should not acknowledge this message.
After sending the message, the Wimp generates an Open_Window_Request event for each window that was active when the mode change occurred. This is because going from a wider to a narrower mode (e.g. 16 to 12) may require the horizontal coordinates of windows to be compressed to fit them all on to the new display. The whole screen area is also marked invalid to force a redraw of each window's contents.
You should take care if, on a mode change, you modify a window in a way that involves deleting it and then recreating with different attributes. This will result in the handle of the window changing just after the Wimp scans the window stack and generates the Open_Window_Request for it, but before it is delivered from Wimp_Poll, and the Wimp will use the wrong handle. In this situation, you should internally mark the window as 'to be recreated' on receipt of the ModeChange message, and then when you receive the Open_Window_Request for that window, carry out the delete/recreate/open action then.
This message is broadcast whenever a task calls Wimp_Initialise. It is used by the Task Manager to maintain its list of active tasks. Information in the message block is as follows:
| R1 + 4 | new task handle (so it appears that the new task sent the message) |
| ... | |
| R1 + 20 | CAO (current active object) pointer of new task |
| R1 + 24 | amount of application memory used by the task |
| R1 + 28 | task name, as given to Wimp_Initialise, control-char-terminated |
This performs a similar task to the one above, keeping the Task Manager (and any other interested parties) informed about the state of a task. It is generated by the Wimp on the task's behalf when it calls Wimp_CloseDown. If a program 'accidentally' calls OS_Exit before calling Wimp_CloseDown, the Wimp will perform the latter action for it. The message block is standard except for
| R1 + 4 | dying task's handle |
i.e. the Wimp makes it look as though the task sent the message itself.
This broadcast is issued whenever Wimp_SlotSize is called. Again, its primary client is the task manager, enabling that program to keep its display up to date. The message block looks like this:
| R1 + 4 | handle of the task which owns the current slot |
| ... | |
| R1 + 20 | new current slot size |
| R1 + 24 | new next slot size |
As with most broadcast messages, you should not acknowledge this one.
This message has two uses. First it allows the Task Manager to discover if an application can cope with a dynamically varying slot size. Second, it is used by the Task Manager to tell a task to change that size if it can.
The message block contains the following:
| R1 + 20 | new current slot size |
| R1 + 24 | handle of task whose slot should be changed |
The receiver should check the handle at R1+24, and the size at R1+20. If the handle is not the task's, it should do nothing (i.e. no acknowledgement).
If the slot size is big enough for the task to carry on running, it should set R0 to this, R1 to -1 and call Wimp_SlotSize. It should then acknowledge the message.
If the slot size is too small for the task to carry on running, it should not call Wimp_SlotSize, but should acknowledge the message if it wants to continue to receive these messages. If ever a Message_SetSlot is not acknowledged, the Task Manager makes that task an undraggable one on its display.
You should be prepared to receive negative values for the slot size (which of course you shouldn't pass to Wimp_SlotSize), so do a proper signed comparison when checking the value in R1+20.
This forms the first of a pair of messages that can be used to find the name of a task given the handle. An application should broadcast this message. It will be picked up by the Task Manager, if running. The Task Manager will respond with a TaskNameIs message (see below). The message block should contain the following information:
| R1 + 20 | handle of task whose name is required |
The Task Manager responds to a TaskNameRq message by sending this message. The message block contains the following:
| R1 + 20 | handle of task whose name is required |
| R1 + 24 | task's slot size |
| R1 + 28 | task's Wimp_Initialise name, control-char-terminated |
The principle user of this message-pair is the !Help application in providing help about ROM modules.
In RISC OS 3 you should use the SWI TaskManager_TaskNameFromHandle (see TaskManager_TaskNameFromHandle) in preference to these messages.
This is sent by the Filer after it has started up all the desktop filers so that the Task Manager can 'renumber' it. This is so that during the deskboot saving sequence, the Filer_Boot and Filer_OpenDir commands are inserted after the logons returned by the NetFiler.
This message is not available under RISC OS 2.
This message is returned by the Wimp, with block+20 = menu pointer for the menu tree that was deleted, in the following circumstances:
In the case of the former two, the message is only sent after the new menu is created.
Note in particular that no message is returned if a menu selection event is returned, or if a menu tree is replaced by another with the same menu pointer.
In addition to the 'normal' user facilities of !Alarm as documented in the RISC OS User Guide, it is also possible for applications to set and receive alarms by using some Wimp messages. These are as follows:
To set an application alarm, send the following message:
| R1 + 16 | &500 indicates message to !Alarm |
| R1 + 20 | 0/1 indicates set an alarm (1 if 5 byte format) |
| R1 + 24 | date/time |
| R1 + 30 | name of application sender, terminated by 0 |
| R1+n | application-specific unique alarm identifier, terminated by 0 |
Date & time must be given in standard 5 UTC byte format if +20 is 1, otherwise the layout is as follows (local time values):
| R1 + 24 | year as low-byte/high-byte |
| R1 + 26 | month |
| R1 + 27 | date |
| R1 + 28 | hour |
| R1 + 29 | minutes |
Neither the name nor the alarm identifier may be longer than 40 chars each.
To cancel the alarm, use the following message block:
| R1 + 16 | &500 indicates message to !Alarm |
| R1 + 20 | 2 indicates cancel an alarm |
| R1 + 24 | name of application, terminated by 0 |
| R1+n | application-specific unique alarm identifier, terminated by 0 |
The name and identifier must match exactly for the alarm to be successfully cancelled. It is not necessary to specify the time of the alarm, as this may have changed due to being deferred by Alarm.
If these messages are sent recorded, !Alarm will acknowledge with 0 if successful, or a 0 terminated error string (message type = &500).
This message is not available in RISC OS 2.
| R1 + 16 | &501 indicates an alarm has gone off |
| R1 + 20 | name of application sender, terminated by 0 |
| R1+n | application-specific unique alarm identifier, terminated by 0 |
If the named application recognises the identifier, it must acknowledge this message, otherwise !Alarm will ask the user to install the named application. If the latter occurs, the alarm is deferred for one minute to allow the application to be installed.
For an application to use interactive help, two application messages are employed. One is used by Help to request the help text, and the other is used by the application to return the text message.
To request help, the Help application must send a message as follows:
| R1 + 16 | &502 - indicates request for help |
| R1 + 20 | mouse x coordinate |
| R1 + 24 | mouse y coordinate |
| R1 + 28 | mouse button state |
| R1 + 32 | window handle (-1 if not over a window) |
| R1 + 36 | icon handle (-1 if not over an icon) |
Locations 20 onwards are the results of using Wimp_GetPointerInfo.
The Wimp will pass this message automatically to the task in charge of the appropriate window/icon combination.
The Help application issues message type &502 every 1/10th of a second to allow applications such as Edit and Draw to change the help text according to the current edit mode. To avoid flicker, the display is only updated when the returned help string changes.
If an application receives a Message_HelpRequest, and wishes to produce some interactive help, it should respond with the following message:
| R1 + 16 | &503 |
| R1 + 20 | help message, terminated by 0 |
The help text may contain any printable character codes (including top-bit-set ones). If the sequence |M is encountered, this will be treated as a line break and subsequent text will be printed on the next line in the window. If !Help needs to split a line because it is too long, it does so at a word boundary (space character).
Once the file to be saved is known, the save protocol can start:
These set the sizes of the 'Next' slot, the font and sprite area sizes, and the RAM disc size, as would be expected. It is not sensible to set the RMA size or the system stack in this way, as they are much more system-dependent than those described above. The screen size cannot be set as it is always reset to the size of the current screen mode by the Task Manager.
If there is not enough memory free to be allocated for a particular slot then, instead of giving errors, the largest amount of memory which is free will be allocated to the slot.
When the user selects Exit or Shutdown from the task manager's menu, it looks to see if the variable SaveDesk$File is set up - if it is, it automatically saves the desktop state in this file before exiting.
Rather than using broadcast messages, the Task Manager talks to all the other tasks by using its list of task handles and names. This ensures that the tasks are asked to restart in the same order as they were originally started (which is not true for broadcasts).
For each task in its list, the task manager sends a Message_SaveDesktop:
| R1 + 16 | Message_SaveDesktop (10) |
| R1 + 20 | (word) file handle of desktop file being written |
| R1 + 24 | flag word: bits 0 - 31 reserved (ignore them) |
Note that this is a RISC OS rather than a C file handle, so fprintf() cannot be used. The RISC OS SWIs OS_BPut or OS_GBPB should be used instead.
This facility is not available in RISC OS 2.
The data is a sequence of *commands suitable for inclusion in a Desktop file, each terminated by a linefeed character (&0A). When the file is run to start the desktop, each command will be executed as a separate Wimp task.
A typical example for a C application follows:
#include <os.h>
#include <swis.h>
os_error *save_desktop(int handle)
{
  char *ptr;
  for (ptr = getenv("Edit$Dir"); *ptr != '\0'; ptr++)
  {
    os_error *error;
    error = os_swi2(OS_BPut, *ptr, handle);
    if (error)
      return error;
  }
  return os_swi2(OS_BPut, 10, handle); /* line terminator */
}
The data the application should add to the boot file is a restart command which is usually a GSTrans'd form of something like /<Edit$Dir>.
Note that since several copies of !Edit can be loaded at once, this GSTrans-ing operation should be done as soon as the application is loaded (and the result stored in a buffer), in case the value of Edit$Dir changes subsequently.
Resident module tasks do not require a restart command of the above form, since they are automatically started when the desktop is entered (by means of the Service_StartWimp protocol). However, if the modules are not stored in the ROM, they will probably be loaded by means of some form of *RMEnsure command in a !foo application, so the !foo application should be re-run instead.
There is a service call provided for modules which need to save some state to the file, e.g. ColourTrans saves its calibration. For details of this call see the chapter entitled Service_WimpSaveDesktop.
Under RISC OS there are a number of devices which can only be used by one task at a time, such as the serial and parallel ports. This protocol provides a method by which a task can claim one of those devices for its exclusive use.
Note: It is legal for a task to claim a device it already owns, as long as it does not object to its own requests.
This protocol can be used under RISC OS 2, but will not be used by applications written for it, such as printer drivers prior to version 2.42.
Currently allocated device numbers are:
| Major device | Minor Device | ||
|---|---|---|---|
| Parallel port | 1 | 0 | Internal port |
| Serial port | 2 | 0 | Internal port |
| Screen palette | 3 | 0 | |
| Midi Interface | 4 | -1 | All ports |
| 0-3 | Port number | ||
| Floppy discs | 5 | -1 | All floppy discs |
| 0-3 | Drive number (:0 - :3) | ||
| Sound system | 6 | 0 | Entire sound system |
The printer drivers use the above protocol in the following way:
The same procedure is followed for the parallel port.
Note: There is no need to release a device after you have finished using it, you should simply stop objecting to other tasks claiming it.
When a task exits, it no longer objects to other tasks claiming devices, and so all the devices it owned are effectively released.
| R1 + 16 | Message_DeviceClaim (11) |
| R1 + 20 | major device number |
| R1 + 24 | minor device number |
| R1 + 28 | zero terminated information string |
This message is broadcast by a task wishing to claim exclusive use of a device.
The information string should contain the name of the application claiming the device.
| R1 + 16 | Message_DeviceInUse (12) |
| R1 + 20 | major device number |
| R1 + 24 | minor device number |
| R1 + 28 | zero terminated information string |
If a task which currently owns a device wishes to prevent another task from claiming the device it should reply with Message_DeviceInUse.
The information string should be used to give information about the task currently using the device (for example, 'Serial terminal connection open' if a terminal currently owns the serial port). This information can then be used by the task trying to claim the device in its error message.
The message-passing system is central to the transfer of data around the Wimp system. This covers saving files from applications, loading files into applications, and the direct transfer of data from one application to another. The last use often obviates the need for a 'scrap' (cut and paste) mechanism for intermediate storage; data is sent straight from one program to another, either via memory or a temporary file.
Data transfer code uses an environment variable called Wimp$Scrap to obtain the name of the file which should be used for temporary storage. This is set by the file !Scrap.!Boot, when a directory display containing the !Scrap directory is first displayed. (Under RISC OS 2 this was done by the file !System.!Boot, when a directory display containing the !System directory is first displayed.) Applications attempting data transfer should check that Wimp$Scrap exists. If it doesn't, they should report the error Wimp$Scrap not defined.
Four main message types exist to enable programs to support file/data transfer. The protocol which uses them has been designed so that a save to file operation looks very similar to a data transfer to another application. Similarly, a load operation bears much similarity to a transfer from another program. This minimises the amount of code that has to be written to deal with all possibilities.
The messages types are:
| 1 | Message_DataSave |
| 2 | Message_DataSaveAck |
| 3 | Message_DataLoad |
| 4 | Message_DataLoadAck |
There are three others which have associated uses: Message_DataOpen, Message_RamFetch and Message_RamTransmit. Before describing the message types in detail, we describe the four data transfer operations.
Note that all messages except for the initiating one should quote the other side's my_ref field in the message's your_ref field, as is usual when replying.
This is initiated through a Save entry in a task's menu. This item will have a standard dialogue box, with a 'leaf' name and a file icon which the user can drag to somewhere on the desktop, in this case a directory window. The following happens:
The last two steps may seem superfluous, but they are important in keeping the application-Filer and application-application protocol the same.
This is initiated in the same way as a Filer save. The following happens:
You can see now that the saving task doesn't need to know whether it is sending to the Filer or something else. In its initial DataSave message, it just uses the window/icon handles returned by Wimp_GetPointerInfo as the destination task (in R2/R3) and the Wimp does the rest. It must, of course, always use the pathname returned in the DataSaveAck message when saving its data.
This is very straightforward. A load is initiated by the Filer when the user drags a file icon into an application window or icon bar icon.
The receiving task is told the window and icon handles of the destination. From this it can decide whether to open a new window for the file (the file was dragged to the icon bar) or insert it into an existing window.
This is simply the case of saving data to another application, but from the point of view of the receiver:
Again, the receiver can decide what to do with the incoming data from the destination window and icon handles.
The messages used in the above descriptions are described below. Messages 1 and 3 are generally sent as User_Message_Recorded, because they expect a reply, and types 2 and 4 are sent as User_Message, as they don't. The message blocks are designed so that a reply can always use the previously received message's block just by altering a couple of fields.
When receiving any message, allow for either type 17 or 18, i.e. don't rely on any sender using one type or the other.
The data part of the message block is as follows:
| R1 + 20 | destination window handle | |
| R1 + 24 | destination icon handle | |
| R1 + 28 | destination x coordinate | (screen coordinates, i.e. not relative to the window) |
| R1 + 32 | destination y coordinate | |
| R1 + 36 | estimated size of data in bytes | |
| R1 + 40 | file type of data | |
| R1 + 44 | proposed leafname of data, zero-terminated |
The first four words come from Wimp_GetPointerInfo. The rest should be filled in by the saving task. In addition to the usual &xxx file types, the following are defined for use within the data transfer protocol:
| &1000 | directory |
| &2000 | application directory |
| &ffffffff | untyped file (i.e. had load/exec address) |
The message block is as follows:
| R1 + 12 | my_ref field of the DataSave message |
| ... | |
| R1 + 20 | destination window handle |
| R1 + 24 | destination icon handle |
| R1 + 28 | destination x coordinate |
| R1 + 32 | destination y coordinate |
| R1 + 36 | estimated size of data in bytes; -1 if file is 'unsafe' |
| R1 + 40 | file type of data |
| R1 + 44 | full pathname of data (or Wimp$Scrap), zero-terminated |
The words at +20 to +32 are preserved from the DataSave message. If the receiver of the file (i.e. the sender of this message) is not the Filer, then it should set the word at +36 to -1. This tells the file's saver that its data is not 'secure', i.e. is not going to end up in a permanent file. In turn the saver will not mark the file as unmodified, and will not use the returned pathname as the document's window title.
The Filer, on the other hand, will not put -1 in this word, and will insert the file's full pathname at +44. The saver can mark its data as unmodified (since the last save) and use the name as the document window title.
From the foregoing descriptions you can see that this message is used in two situations, firstly by the Filer when it wants an application to load a file, and secondly by a task doing a save to indicate that it has written the data to <Wimp$Scrap>. The message block looks like this:
| R1 + 12 | my_ref from DataSaveAck message, or 0 if from Filer |
| ... | |
| R1 + 20 | destination window handle |
| R1 + 24 | destination icon handle |
| R1 + 28 | destination x coordinate |
| R1 + 32 | destination y coordinate |
| R1 + 36 | estimated size of data in bytes |
| R1 + 40 | file type |
| R1 + 44 | full pathname of file, zero terminated |
The receiver of this message should check the file type and load it if possible. After a successful load it should reply with a Message_DataLoadAck.
If the sender of this message does not receive an acknowledgement, it should delete <Wimp$Scrap> and generate an error of the form Data transfer failed: Receiver died.
In RISC OS 3 when the filer sends a data load to an application it appends the position of the file in the current selection to the end of the message so the format of the block becomes:
| R1 + 44 | full pathname of file, zero terminated |
| R1+n | column of file in current selection |
| R1+n+4 | row of file in current selection |
(where n is the length of the full pathname and terminator, plus any padding needed to word align the next entry)
You can check for the existence of these values by comparing the size field of the message with the position of the terminating zero of the pathname.
| R1 + 12 | my_ref from DataLoad message |
| ... | |
| R1 + 20 | destination window handle |
| R1 + 24 | destination icon handle |
| R1 + 28 | destination x coordinate |
| R1 + 32 | destination y coordinate |
| R1 + 36 | estimated size of data in bytes |
| R1 + 40 | file type |
| R1 + 44 | full pathname of file, zero terminated |
Effectively, the file-loading task just changes the message type to 4 and fills in the your_ref field, then sends back the previous DataLoad message to its originator.
| R1 + 12 | reference from DataSave message |
| R1 + 16 | 13 |
In some cases a file can become 'safe' after the DataSaveAck has been sent. This message can be used to tell the originator of the save that the file has become 'safe'. The reference at R1+12 should be the one from the my_ref field of the original DataSave message.
In order to make use of this message, the saving task should store the my_ref value of the DataSave message with each document it tries to save. On receiving the DataSaved message it should compare its reference number with the number stored for each active document, and mark the document as saved if the numbers match. Note that a document can be modified by the user between the time that the DataSave message was sent and the time that the DataSaved message is received; in this case, the task should forget any reference number it holds for the document, and ignore any subsequent DataSaved messages.
The foregoing descriptions rely on the use of the Wimp scrap file. However, task to task transfers can be made much quicker by transferring the data within memory. The save and load protocols are modified as below to cope with this.
This is the same as previously described in the Saving data to another application up until the DataSave message. Then:
Send a RAMFetch for more data
Get and process the data from the RAMTransmit buffer.
So if the first RAMFetch message is not acknowledged (i.e. it gets returned as a User_Message_Acknowledge), the data receiver should revert to the file transfer method. If any of the subsequent RAMFetches are unanswered (by RAMTransmits), the transfer should be aborted, but no error will be generated. This is because the sender will have already reported an error to the user.
The data itself is transferred by the sender calling Wimp_TransferBlock just before it sends the RAMTransmit message. See the description of that call for details of entry and exit conditions.
The termination condition for the saver generating RAMTransmits and the loader sending RAMFetches is that the buffer is not full. This implies that if the amount of data sent is an exact multiple of the buffer size, there should be a final pair of messages where the number of bytes sent is 0.
Here are the message blocks for the two messages:
| R1 + 12 | my_ref field of DataSave/RAMTransmit message | |
| ... | ||
| R1 + 20 | buffer address for Message_RAMTransmit | |
| R1 + 24 | buffer length in bytes | |
This is sent as a User_Message_Recorded so that a lack of reply to the first one results in the file transfer protocol being used instead, and a lack of reply to subsequent ones allows the transfer to be abandoned. No error should be generated because the other end will have already reported one. A reply to a RAMFetch takes the form of a RAMTransmit from the other task. The receiver should also generate an error if it can't process the received data, e.g. if it runs out of memory. This should also cause it to stop sending RAMFetch messages.
When allocating its buffer, the receiver can use the estimated data size from the DataSave message, but it should be prepared for more data to actually be sent.
| R1 + 12 | my_ref field of RAMFetch message |
| ... | |
| R1 + 20 | buffer address from RAMFetch message |
| R1 + 24 | number of bytes written into the buffer |
A data-saving task sends this message in response to a RAMFetch if it can cope with the memory transfer protocol. If the number of bytes transferred into the buffer (using Wimp_TransferBlock) is smaller than the buffer size, then this is the last such message, otherwise there is more to send and the receiver will send another RAMFetch message.
All but the last messages of this type should be sent as User_Message_Recorded types. If there is no acknowledgement, the sender should abort the data transfer and stop sending. It may also give an error message. The last message of this type (which may also be the first if the buffer is big enough) should be sent as a User_Message as there will be no further RAMFetch from the receiver to act as acknowledgement.
Note: The versions of !Edit supplied before RISC OS 3.5 only respond to this message if it is sent as a User_Message_Recorded (ie if acknowledgement is requested).
If Shift is held down when the Close icon of a window is clicked, the Wimp does not close the window, but instead broadcasts a Message_Iconize.
If no iconiser is loaded nothing happens.
If an iconiser is loaded:
| Old application |
|---|
If the application is an old RISC OS 2 one, it will ignore the above message.
The iconiser gets acknowledgement back and uses the information in the first Message_Iconize to iconise the window.
| New application |
|---|
If the application is a new RISC OS 3 application it should react as follows:
This enables applications such as Edit to give a different icon depending on the file type of the file being edited in the window.
Whenever a window is closed the Wimp broadcasts the message Message_WindowClosed.
The iconiser then removes the icon.
The iconiser spots the Message_TaskQuit and remove all the icons for that task.
It broadcasts a Message_WindowInfo with a window handle of 0.
An iconiser receiving this message should reopen all iconised windows.
All applications should ignore such a message.
| R1 + 20 | window handle |
| R1 + 24 | task handle for task which owns the window |
| R1 + 28 | 20 Bytes of title string (last part of first word) |
| R1 + 48 |
This message is not available in RISC OS 2.
| R1 + 20 | window handle |
| R1 + 24 |
This message is not available in RISC OS 2.
| R1 + 20 | window handle |
| R1 + 24 | reserved (must be 0) |
| R1 + 28 | string giving trailing part of sprite name to use, null terminated - sprite name used is ic_string |
| R1 + 36 | string giving title to use, null terminated; this should be as short as possible, and may be truncated by the iconiser (eg Pinboard truncates at a space or at the 10th character, whichever is shorter) |
The printer protocol is used to ensure a uniform procedure by which an application may print files of any type, allowing for the files to be printed immediately or queued by other software for printing later. The printer manager Printers, supplied with RISC OS 3, uses this protocol. The description below assumes that the dialogue is being conducted between an application and Printers (to avoid referring repeatedly to 'the destination of the printer protocol').
The protocol for printing a file is
| DataSave | (the user has dropped a file onto the Printers icon) |
| PrintSave | (the user has initiated an application Print option). |
| PrintError | if there is an error (the protocol is now over) |
| PrintFile |
This stage is present for compatibility with RISC OS 2 applications.
If Printers is not loaded, the message bounces. In this case, the application should do one of two things:
In the first case, the protocol continues as described below.
| PrintTypeOdd | (requesting the application to print the file itself immediately) |
| DataSaveAck | (requesting the application to send the file to Printers for queuing). |
In the first case, PrintTypeOdd is not broadcast, and does not contain valid file type or file name fields. These must not be relied on.
At some future time, the file will rise to the top of the queue (unless the user has removed it manually), and Printers will broadcast a PrintTypeOdd to find an application willing to print the file. (This might be the same application as the one that queued the file, or a different one.) If the PrintTypeOdd is not replied to, Printers will issue the SWI
sprintf(s, "@PrintType_%3.3X %s", file_type, file_name);

_swi(Wimp_StartTask, _IN(0), s);
This should be a command that will cause the application to print the file immediately.
In response to the PrintSave, the printer manager may reply with PrintError (&80144). If the size of this message is 20, this means you are talking to an old printer manager and it is busy. If the size of the message is not 20, there is an error number at offset 20 and null terminated error text at offset 24.
If the application is doing graphics printing, it should print the file without calling Wimp_Poll. Wimp_Poll must not be called when using Printers because when Printers regains control it assumes that the current file has been printed and moves on to the next entry in the queue.
The protocol as described above is the one implemented by Printers. Future versions of printer managing software may take the copy by RAM transfer from applications that support it. To be ready for this, the application should be prepared for a RAMFetch to be sent in the place of the DataSaveAck described above. (By ignoring this RAMFetch, they will revert to the file-based protocol.)
The techniques and calls used to actually print are outlined in the Printing a document from an application.
This message is broadcast as a recorded delivery upon receipt of a DataSave or PrintSave message. The reason for having this message is two-fold:
The format of the message is:
| R1 + 12 | your_ref |
| R1 + 16 | &80140 |
| R1 + 20 | |
| ... | from DataSave/PrintSave block |
| R1 + 44 |
This allows any application to try and do better than !Printers can do with the default actions available to it. Such an application has 3 options:
This message is sent by an application in response to a PrintFile broadcast. The application should then proceed to print the file.
Note: It is recommended that you use the PrintTypeOdd protocol in preference to this message.
The format of this message is:
| R1 + 12 | 0 |
| R1 + 16 | &80142 |
| R1 + 20 | |
| ... | as for Message_DataSave |
| R1 + 44 |
This message allows applications to send files to the printer manager for printing without having to know the task handle, etc, since the message is broadcast. The message simply needs to be broadcast as a recorded delivery, at which point the printer manager will enter the PrintFile dialogue. If the message bounces, the application should complain as the printer manager is not loaded.
This is broadcast when a printer manager is starting up. Any active printer managers should quit quietly upon receipt of this message to avoid a clash occurring.
This message is sent by RISC OS 2 managers in response to a PrintSave if they are already printing (as they can only queue one file at a time). It is known as Message_PrintBusy under RISC OS 2.
With !Printers, this message is sent if an error occurs as a result of one of the other messages being used. The format of the block is:
| R1 + 12 | your_ref |
| R1 + 16 | &80144 |
| R1 + 20 | error number |
| R1 + 24 | error message (null terminated) |
To maintain compatibility with RISC OS 2 printer managers, if the message is the original Message_PrintBusy, the size (in R1+0) will be 20.
1 - Can only print from applications when a printer has been selected
This is sent in reply to a PrintSave when there isn't a selected printer.
This message is broadcast if the filetype is not considered known by !Printers. 'Known' is qualified as being the current printer type: text (FFF), obey (FEB) or command (FFE) files, TaskExec (FD6), TaskObey (FD7), Desktop (FEA) and 1st Word Plus (AF8). The format of the message is:
| R1 + 12 | 0 |
| R1 + 16 | &80145 |
| R1 + 40 | file type of data |
| R1 + 44 | zero terminated filename |
If an application can print this filetype directly, it should respond with PrintTypeKnown. The application can either:
Currently assigned printer type files are PoScript (FF5) and Printout (FF4).
This message is sent by an application in response to a PrintTypeOdd.
This message is broadcast by !Printers when the printer settings or selection has changed.
This message is sent as a recorded delivery by !FontPrint to !Printers when !FontPrint either starts up or receives SetPrinter. The layout of the block is:
| R1 + 12 | 0 |
| R1 + 16 | &8014C |
| R1 + 20 | buffer address (or zero) |
| R1 + 24 | buffer size |
If the buffer address is non-zero, !Printers places the following information into the buffer (all Null terminated):
Regardless of the buffer address, !Printers places the real buffer size into the block and replies with PSPrinterAck.
This message is not available in RISC OS 2.
This is sent by !Printers to !FontPrint in response to PSPrinterQuery. If !FontPrint does not receive this message, it should raise an error to advise the user (e.g. !Printers is required to allow use of !FontPrint).
This message is not available in RISC OS 2.
This is sent by !FontPrint to !Printers when the user clicks on the Save button. !Printers then re-reads the font file and resets the printer's font list.
This message is not available in RISC OS 2.
This is sent by FontPrint to !Printers when the user clicks on the Default button. !Printers then resets the font file, resets the printer's font list and replies with PSPrinterDefaulted.
This message is not available in RISC OS 2.
This is sent by !Printers to !FontPrint when the font file has been reset.
This message is not available in RISC OS 2.
This is sent by !Printers upon receipt of PSPrinterQuery if the currently selected printer is not a PostScript printer.
This message is not available in RISC OS 2.
This can be sent to !Printers to ensure that the printer settings are correct for the currently selected printer.
This message is not available in RISC OS 2.
If !FontPrint receives this message, it will acknowledge it.
This message is broadcast by the Filer when the user double-clicks on a file. It gives active applications which recognise the file type a chance to load the file in a new window, instead of having the Filer launch a new copy of the program.
The message block looks like this:
| R1 + 20 | window handle of directory display containing file |
| R1 + 24 | unused |
| R1 + 28 | x offset of file icon that was double clicked |
| R1 + 32 | y offset of file icon |
| R1 + 36 | 0 |
| R1 + 40 | file type |
| R1 + 44 | full pathname of file, zero-terminated |
The x and y offsets can be used to display a 'zoom-box' from the original icon to the new window, to give a dynamic impression of the file being opened.
If the user double-clicks on a directory with Shift held down, this message will be broadcast with the file type set to &1000.
The file type is set to &3000 for untyped files.
The application should respond by loading the file if it can, and acknowledging the message with a Message_LoadDataAck. If no-one loads the file, the Filer will *Run it.
Note that once the resident application has decided to load the file, it should immediately acknowledge the Data Open message. This is so that if the load fails with an error (eg. Memory full), the Filer will not then try to *Run the file. This would only result in another error message anyway.
This message is used to send input data from Parent to Child.
| R1 + 20 | size of input data |
| R1 + 24 | input data (unterminated, since R1+20 holds its length) |
Input can also be sent via a normal RAM transfer protocol, i.e. send a Message_DataSave, then perform the following two steps until all the data has been sent and received:
See the chapter entitled Memory data transfer for a full description of this protocol.
This message is sent to the Parent when one of its children has produced output.
| R1 + 20 | size of output data |
| R1 + 24... | output data |
This message is sent to the Parent, to inform him of the Child's task-id.
| R1 + 4 | Child's task-id (as filled in by Wimp) |
| R1 + 20 | Parent's txt-handle (as passed to *TaskWindow or *ShellCLI_Task) |
Note that this is the only time the txt-handle is used. It allows the Parent to identify which Child is announcing its task-id.
Note: Versions of Edit supplied before RISC OS 3.5 only respond to this message if it is sent as a User_Message (ie if no acknowledgement is requested).
This message is sent to the Parent when the Child exits.
No data (all necessary information is in the wimp message header).
Note: Versions of Edit supplied before RISC OS 3.5 only respond to this message if it is sent as a User_Message (ie if no acknowledgement is requested).
This message is sent by the Parent to kill the Child.
No data (all necessary information is in the wimp message header).
This message is broadcast by an external task which requires an application (e.g. Edit) to start up a task window. If the receiving application wishes to deal with this request, it should first acknowledge the Wimp message, then issue a SWI Wimp_StartTask with R1+20... as the command.
| R1 + 20... | the command to run |
The command passed is only the head of the command that must be issued via Wimp_StartTask. The full command is:
where xxxxxxxx and yyyyyyyy are the task and txt parameters passed when creating the task window.
Note: Versions of Edit supplied before RISC OS 3.5 only respond to this message if it is sent as a User_Message (ie if no acknowledgement is requested).
This message is sent by the Parent to suspend a Child.
No data (all necessary information is in the wimp message header).
This message is sent by the Parent to resume a suspended Child.
No data (all necessary information is in the wimp message header).
Sets the configured time before a submenu is automatically opened
*Configure WimpAutoMenuDelay delay
delay - time before a submenu is automatically opened, in 1/10 second units
*Configure WimpAutoMenuDelay sets the configured time the pointer must rest over a menu item before its submenu (if any) is automatically opened.
Note that automatic opening of submenus is disabled if bit 7 of the WimpFlags is clear.
This command is not available under RISC OS 2.
*Configure WimpAutoMenuDelay 5
*Configure WimpFlags, *Configure WimpMenuDragDelay
Sets the configured time during which a double click is accepted
*Configure WimpDoubleClickDelay delay
delay - time during which a double click is accepted, in 1/10 second units
*Configure WimpDoubleClickDelay sets the configured time after a single click during which a double click is accepted.
A pending double-click will be immediately cancelled if any of the following occur:
This command is not available under RISC OS 2.
*Configure WimpDoubleClickDelay 12
*Configure WimpDoubleClickMove
Sets the configured distance within which a double click is accepted
*Configure WimpDoubleClickMove distance
distance - distance within which a double click is accepted, in OS units
*Configure WimpDoubleClickMove sets the configured distance from the position of a single click within which a double click is accepted.
If the pointer moves this distance or further from the first click, the double click is cancelled.
This command is not available under RISC OS 2.
*Configure WimpDoubleClickMove 20
*Configure WimpDoubleClickDelay
*Configure WimpDragDelay delay
delay - time after which a drag is started, in 1/10 second units
*Configure WimpDragDelay sets the configured time after a single click after which a drag is started.
This command is not available under RISC OS 2.
*Configure WimpDragDelay 8
*Configure WimpDragMove
Sets the configured distance the pointer has to move for a drag to be started
*Configure WimpDragMove distance
distance - distance the pointer has to move for a drag to be started, in OS units
*Configure WimpDragMove sets the configured distance from the position of a single click that the pointer has to move for a drag to be started.
This command is not available under RISC OS 2.
*Configure WimpDragMove 40
Sets the configured behaviour of windows when dragged, and of error boxes
*Configure WimpFlags
n*Configure WimpFlags sets the configured behaviour of windows when dragged, and of error boxes. Generally, all of bits 0 - 3 will be either set or cleared, depending on whether the user requires continuous updates or outline dragging. Bit 4 controls the action of the standard Wimp error reporting window. Bits 5 and 6 control whether the window can move partly off screen (even if bit 6 is clear). Bit 7 controls whether submenus are automatically opened when the pointer rests over their parent entry for longer than the configured WimpAutoMenuDelay.
*Configure WimpFlags 0
*Configure WimpFlags 15
*Configure WimpAutoMenuDelay, *Status WimpFlags
Wimp_Poll, Wimp_OpenWindow, Wimp_ReportError
Sets the configured time before an automatically opened submenu is closed
*Configure WimpMenuDragDelay delay
delay - time before an automatically opened submenu is closed, in 1/10 second units
*Configure WimpMenuDragDelay sets the configured time before an automatically opened submenu is closed. During this time you can move the pointer over other menu entries without closing the submenu, making it easy to reach the submenu.
Note that automatic opening of submenus is disabled if bit 7 of the WimpFlags is clear.
This facility is not available under RISC OS 2.
*Configure WimpMenuDragDelay 7
*Configure WimpFlags, *Configure WimpMenuDragDelay
*Configure WimpMode screen_mode|Auto
screen_mode - the display mode that the computer should use after a power-on or hard reset, and when entering or leaving the desktop
Auto - automatic setting of appropriate mode using monitor lead
*Configure WimpMode sets the configured screen mode used by the machine when it is first switched on, or after a hard reset, and when entering or leaving the desktop. It is identical to the command *Configure Mode; the two commands alter the same value in CMOS RAM.
You can also set a value of Auto (not available in RISC OS 2). More recent Acorn computers can sense the type of monitor lead connected, and hence set an appropriate mode. If no lead can be sensed, either because none is present or because the computer is of an older design, the mode defaults to mode 12.
Under RISC OS 2, this command only sets the configured screen mode used for the Desktop; *Configure Mode sets the configured screen mode used for the command line. If you leave the Desktop and then re-enter it before powering on again or pressing Ctrl Break, the mode used is the one that was last used by the Desktop.
*Configure WimpMode 15
*Configure Mode
Wimp_SetMode
None
*Desktop [command|-File filename]
command - a * Command which will be passed to Wimp_StartTask when the Desktop starts up
filename - a valid pathname specifying a file, each line of which will be passed to Wimp_StartTask when the desktop starts up
*Desktop initialises all desktop facilities, then starts the Desktop. The Desktop provides an environment in which Wimp programs can operate.
*Desktop automatically starts resident Wimp task modules such as the filers, the palette utility and the Task Manager. You can also run an optional * Command or each line of a file of * Commands. This is typically used to load applications such as Edit. Any * Commands using files must specify them by their full pathname.
If you do run a file of * Commands when you start the desktop, its first line should run the file !System!Boot, provided with your computer. This is needed by most desktop applications. If you want to start an application that uses fonts, the next line of the start-up file should run !Fonts.!Boot, again provided with your computer. Applications can then be started on the following lines.
The Desktop may also be configured as the default language, using the command *Configure Language (see *Configure Language).
*Desktop
*Desktop !FormEd
*Desktop -File !DeskBoot
*DeskFS, *Desktop_Filer, *Desktop_ADFSFiler et al.
Wimp_StartTask
*Desktop_ADFSFiler, *Desktop_Configure, *Desktop_Draw, *Desktop_Edit, *Desktop_Filer, *Desktop_Free, *Desktop_NetFiler, *Desktop_Paint, *Desktop_Palette, *Desktop_Pinboard, *Desktop_RAMFSFiler, *Desktop_ResourceFiler, *Desktop_TaskManager
None
*Desktop_... commands are used by the Desktop to start up ROM-resident Desktop utilities that appear automatically on the icon bar. However, they are for internal use only, and you should not use them; use *Desktop instead. If you do try to use these commands outside the desktop, an error is generated. For example, *Desktop_Palette will give the error message 'Use *Desktop to start the Palette utility'.
The reason why these commands have to be provided is that it is only possible to start a new Wimp task using a command line.
There is one *Desktop_... command that we've documented, because it appears in desktop boot files. This is *Desktop_SetPalette.
*Desktop, *Desktop_SetPalette
Wimp_StartTask
None
*Desktop_SetPalette RGB0 ... RGB15 RGBbor RGBptr1 ... RGBptr3
All parameters specify palette entries as 6 hex digits of the form BBGGRR.
RGB0 ... RGB15 - 16 parameters giving the palette values for Wimp colours 0 - 15
RGBbor - 1 parameter giving the palette value for the border
RGBptr1 ... RGBptr3 - 3 parameters giving the palette values for pointer colours 1 - 3
*Desktop_SetPalette alters the current Wimp palette.
*Desktop_SetPalette FFFFFF DDDDDD BBBBBB 999999 777777 555555 333333 000000 994400 00EEEE 00CC00 0000DD BBEEEE 008855 00BBFF FFBB00 777777 FFFF00 990000 0000FF
None
None
Merges the sprites in a file with those in the Wimp sprite area
*IconSprites filename
filename - full name of sprite file to load
*IconSprites merges the sprites in a file with those already loaded in the Wimp's shared sprite area. Sprites in this area are used automatically by certain Wimp operations, and because all applications can access them, the need for multiple copies of sprite shapes can be avoided.
Under RISC OS 3 *IconSprites will first try to add a suffix which depends on the properties of the configured Wimp mode, and if this doesn't work will use the original filename as usual.
If the configured Wimp mode is a high resolution mono mode (i.e. bit 4 of the modeflags is set), then it will use the suffix '23'; otherwise the suffix is:
<OS units per pixel (x)><OS units per pixel (y)>
For example:
| Configured Wimp mode | Suffix |
|---|---|
| 23 | '23' |
| 20 | '22' |
| 12 | '24' |
This allows applications to provide an alternative set of icons for high resolution mono modes (when using the new Wimp). For example, an application could provide a set of colour sprites in a file called !Sprites, and an alternative monochrome set in a file called !Sprites23, and then load one set or the other automatically by using *Iconsprites <Obey$Dir>.Sprites.
*IconSprites <Obey$Dir>.!Sprites
*Pointer, *SLoad, *SMerge, *SSave, *ToolSprites
Wimp_SpriteOp
*Pointer [0|1]
0 or 1 or nothing
*Pointer turns on or off the pointer that appears on screen to reflect the mouse position. If you give either no parameter or a parameter of 1, pointer 1 is set to the default shape held in the Wimp sprite ptr_default (a blue arrow) and the sprite colours are set to their default. The pointer is enabled. If you give a parameter of 0, the pointer is disabled.
Wimp programs that re-program the pointer should use shape 2. Pointer shapes 3 and 4 are used by the Hourglass module.
You can move the pointer with OS_Word 21,5 if the mouse and pointer are unlinked. You can read the pointer position at any time using OS_Word 21,6.
*Pointer 0 turn off the pointer
None
OS_Word 21 (OS_Word 21,0), Wimp_SetPointerShape, Wimp_SpriteOp
None
Merges the sprites in a file with those in the Wimp's pool of border sprites
*ToolSprites filename
filename - full name of sprite file containing tools to load
*ToolSprites merges the sprites in a file with those already loaded in the Wimp's pool of border sprites. Sprites in this area are used by the Wimp to redraw window borders.
If you change the border sprites, you should then force a redraw of the screen by changing mode - even if only to the current mode.
The default border sprites are held in the file Resources:$.Resources.Wimp.Tools, and you may use these as an example. Note that this file does not contain an example of every sprite that the Wimp may use; for further details see the chapter entitled RISC OS System Icons.
*ToolSprites <Obey$Dir>.!Sprites
*IconSprites
None
None
*WimpMode screen_mode
screen_mode - the display mode that the Desktop should use
*WimpMode changes the current screen mode used by the Desktop.
It does not alter the configured value, which will be used next time the computer is switched on, or after a hard reset, and when entering or leaving the desktop.
*WimpMode 20
*Configure WimpMode
Wimp_SetMode
None
*WimpPalette filename
filename - pathname of a file of type &FED (Palette)
*WimpPalette uses a palette file to set the Wimp's colour palette. Typically the file would have been saved using the Desktop's palette utility. If the file is not a Palette file, the error message 'Error in palette file' is generated. If no task is currently active, the palette is simply stored for later use. Otherwise it is enforced immediately.
Palette files can be read in either of two formats:
Type (1) is read for backwards compatibility, but since the palette utility always saves files in format (2), you should use this in preference.
The RunType for Palette files is *WimpPalette %0, so you can also set a new palette from the Desktop simply by double-clicking on the file's icon.
*WimpPalette greyScale
None
Wimp_SetPalette
Changes the memory allocation for the current and (optionally) the next Wimp task
*WimpSlot [-min] minsize[K] [-max maxsize[K]] [-next nextsize[K]]
minsize - the minimum amount of application space, in bytes or Kilobytes, that the current Wimp application requires
maxsize - the maximum amount of application space, in bytes or Kilobytes, that the current Wimp application requires
nextsize - the size, in bytes or Kilobytes, that will be allocated - if possible - to the next Wimp application
*WimpSlot changes the memory allocation for the current and (optionally) the next Wimp task. It is typically used within Obey files called !Run, which the Filer uses to launch a new Wimp application. *WimpSlot calls Wimp_SlotSize to try to set the application memory slot for the current task to be somewhere between the limits specified in the command.
If there are fewer than minsize bytes free, the error 'Application needs at least minsizeK to start up' is generated.
Otherwise, if the current slot is smaller than minsize, then its size will be increased to minsize. If the current slot is already between minsize and maxsize, then it is unaltered. If a maxsize is specified, and the current slot is larger than maxsize, then its size will be reduced to maxsize.
The slot size that is set by this command will also apply to the application that the *Obey file finally invokes.
The next slot size is automatically saved in a desktop boot file. You can therefore alter the initial default slot either by dragging the Next slider in the Task manager's Task display window before saving a desktop boot file, or by editing the desktop boot file.
*WimpSlot 32K
*WimpSlot -min 150K -max 300K
*WimpTask
Wimp_SlotSize
*WimpTask command
command - * Command which is used to start up the new task
*WimpTask starts up a new task. It simply passes the supplied command to the SWI Wimp_StartTask.
*WimpTask will exit via OS_Exit if you call it from outside a Wimp task.
In RISC OS 2 the command can only be used from within another task.
*WimpTask myProg
*WimpSlot
Wimp_StartTask
None
*WimpWriteDir 0|1
| 0 | write direction is the default for the current territory |
| 1 | write direction is the reverse of the default for the current territory |
*WimpWriteDir sets the direction of text entry for writable icons to either the default for the current territory, or the reverse of that.
It also affects the direction in which text inside text icons is printed.
This facility is not available under RISC OS 2.
*WimpWriteDir 0
None
None