
|
www.riscos.com Technical Support: |
This chapter describes those features common to all the Desktop non-interactive tools.
As described in the Working with desktop tools, the Desktop programming tools can be divided into two categories: interactive and non-interactive. The non-interactive tools are those which you set options for and then run, not interacting further until the task completes or is halted. An example of a non-interactive tool is the linker Link, whereas the editor SrcEdit is an interactive tool. The chapters following this each describe an individual non-interactive Desktop tool. Further chapters in the accompanying language user guides describe non-interactive tools specific to programming in particular languages; for example, the language compilers and assemblers themselves.
The non-interactive tools can be further divided into two sub-categories: filters and non-filters. The filter tools are those that take a set of input files and process them to produce output files, examples being Link, Libfile, Squeeze and the language processors. The non-filter tools all perform some immediate action, such as examining text files and presenting you with information as text output. The filter tools are intended to be used both managed and unmanaged by Make (an interactive tool described earlier in this user guide), whereas the non-filter tools are normally just used for unmanaged work.
To start unmanaged use of any of the non-interactive tools, you first double-click Select on a tool application name in a directory display. This loads the tool, putting its application icon on the icon bar (just like any other RISC OS application).
When using the filter type of non-interactive tool managed by Make, there is no need to start each tool and put its icon on the icon bar.
All the non-interactive Desktop tools are implemented as command line programs provided with RISC OS desktop interfaces by the FrontEnd relocatable module, but you do not need to be aware of this when using them, as command lines are automatically generated from your settings of the desktop interface of each tool, making the tools appear to be standard RISC OS applications.
The interface of each non-interactive tool can be summarised as follows:
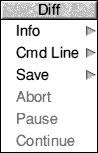
Clicking Menu on the application icon (for example, the Diff tool) gives the following main menu:
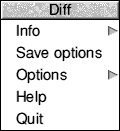
Info returns information about the application.
Save options causes the options in the SetUp box, and all submenu options (meta-options) from this main menu, to be saved in a file for later use as defaults when the tool is restarted.
The Options submenu allows you to set the following options:

Auto Run will cause the command-line command to be run immediately when a file is dragged onto the icon on the icon bar, without first displaying the SetUp dialogue box. Options remain as they are currently set.
Auto Save suppresses the Save as dialogue box of filter tools if a sensible pathname is available to save the output to. For more details on pathnames see the chapter entitled METAOPTIONS section. Note that 'output' here is used to describe a single file which is produced by running the command-line tool.
The Display submenu allows the user to choose whether the tool outputs by default into a text window or a summary window.
Help displays a help file in a scrollable text window, for example:

Quit quits the application.
When working in the unmanaged way, i.e. with the tool application icon on the icon bar, clicking Select on this icon or dragging the name of an input file (if Auto Run is off) to this icon displays the SetUp dialogue box. If the SetUp box was displayed by a filename drag, this filename is displayed in the relevant writable icon. Options appear with the previous settings used, making it easy to repeat the last run of a tool.
When working managed by Make, you specify a 'recipe' of tasks to be followed to construct a program from its sources. This recipe is stored as a Makefile, and can be used later. You specify the recipe in terms of what goes in (source files, libraries, etc.), what comes out (e.g. an executable !RunImage file) and the processes followed. The processes followed include specifying the options to be set for the filter tools when they are used. To set these options you follow the Tool options menu item of Make to a list of tools, then Select on the name of the relevant tool. This brings up the SetUp dialogue box of the relevant tool, whether its application icon is on the icon bar or not. The SetUp box appears with options set to helpful default states for managed use.
A typical SetUp dialogue box is that of the application Diff:
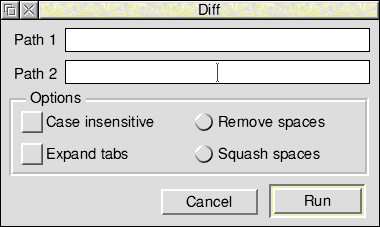
The SetUp box for each application is different, but for unmanaged use they all offer the following two action buttons:
Run runs the tool with the options as set, starting a multitasking task performing the non-interactive job specified. This multitasking depends on the presence of the TaskWindow relocatable module.
Clicking Select on Run removes the dialogue box, clicking Adjust on Run leaves the dialogue box on your screen.
Cancel discards any changes made to the options and closes the SetUp box.
Clicking Menu on the SetUp dialogue box produces a menu with the style of:
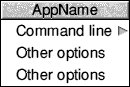
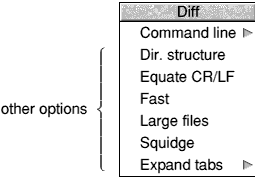
Command line leads to a dialogue box showing the command line equivalent of the options set in the SetUp dialogue box. It also shows any extra options set from the Other options part of the menu.
Other options are a set of options specific to the particular application.
For example:
Two types of output window are available for generated messages; Text and Summary.
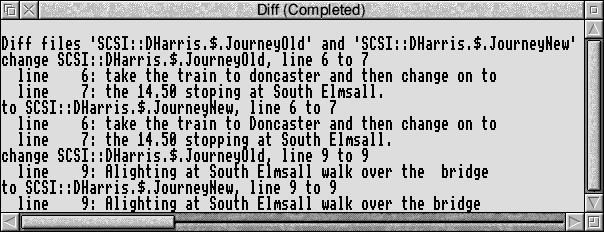
If Text has been chosen from the Display submenu then a scrollable, saveable text window appears when the tool is running. All textual output sent to the screen by the program appears in the text window. This window can be closed at any time, thus aborting the command-line program. The Title bar of this window shows the name of the tool and the state of the text running, i.e. Running, Completed, Aborted or Paused. An example of a Text window using the application Diff is:
Clicking Menu on a text window displays the following menu:
Info gives information about the program being run.
Cmd Line shows the command line generated and used to run the tool.
Save allows the textual output to be saved in a file.
Abort aborts a running program.
Pause pauses a running program.
Continue continues a paused program.
If Summary has been chosen from the Display submenu then a small summary window, similar to the following, appears when the tool is running:
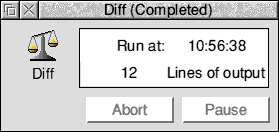
This summary window displays the sprite of the application and the time at which the command was run. The Title bar is the same as for the text window. There are two action buttons, Abort and either Pause or Continue, which allow the program to be aborted, paused, and continued in an identical fashion to the menu on the Text window.
Clicking Menu on the summary dialogue box displays a menu similar to the following:

Info gives information about the program being run.
Cmd Line shows the command line generated to be used to run the tool.
Save allows the textual output to be saved in a file.
To toggle between the Text and Summary windows click Adjust on the output window's close icon.
The numbers and types of files output varies between each filter tool, so for more details see the chapter on the tool in question.
During managed development the saving of processed files is specified by the Makefile, which can be constructed for you by Make.
For unmanaged development, processed files are either saved in positions relative to the work directory, or saved by you from a Save as dialogue box which appears when a job has completed without errors. This box does not appear if you have enabled the Auto save option on the application menu.