
|
www.riscos.com Technical Support: |
The teletext mode, mode 7, is unique in the way it displays text and graphics. Commands such as COLOUR, GCOL, MOVE and DRAW do not work in this mode (or in the Wimp). Instead colourful displays are produced using teletext control codes.
Mode 7 is compatible with the teletext pages broadcast by CEEFAX and Oracle. You can produce your own teletext displays using the limited but effective graphics which are available.
Type in the following program and run it:
10 MODE 7
20 PRINT"THIS";CHR$(129);"demonstrates";CHR$(130);"the";CHR$(131);"use"
30 PRINT CHR$(132);"of";CHR$(133);"control"; CHR$(134); "codes"
The characters 129, etc, which are printed using CHR$(129) are the control codes. Although the control codes are invisible they still take up a character position, so the words are separated by a space.
Each control code affects the way in which the remaining characters on that particular line are displayed. For example, printing CHR$(129) makes the computer display the text in red. The full list of colours and their associated control codes is given overleaf:
| Code | Text colour |
|---|---|
| 129 | Red |
| 130 | Green |
| 131 | Yellow |
| 132 | Blue |
| 133 | Magenta |
| 134 | Cyan |
| 135 | White (default) |
Every line starts off with the text in white. So, if you want several rows of text to appear in red, for example, you must start each of these rows with CHR$(129).
Text can be made to flash. For example:
10 MODE 7
20 PRINT CHR$(136)"Flash";CHR$(137)"Steady";CHR$(136); "Flash"
Flashing coloured text can be produced by using two control codes:
10 MODE 7
20 PRINT "Steady white";CHR$(129);CHR$(136)"Flashing red"
Since each control code occupies a character position, the words white and Flashing are separated by two spaces on the screen.
Double-height text can be produced as follows:
10 MODE 7
20 PRINT CHR$(141)"Double height"
30 PRINT CHR$(141)"Double height"
To obtain double-height text, the same text must be printed on two successive lines beginning with CHR$(141). If the text is only printed once, only the top half of the letters is displayed.
To revert to single-height graphics on the same line, the control code is 140. For example:
10 MODE 7
20 PRINT CHR$(141)"Double Height";CHR$(140); "Single Height"
30 PRINT CHR$(141)"Double Height";CHR$(140); "Single Height"
Changing the background colour requires two codes:
10 MODE 7
20 PRINT CHR$(131);CHR$(157)"Hello"
The first code is for yellow text. The second tells the computer to use the previous control code as the background colour. The net effect of the two codes is to give yellow text on a yellow background as you can see when you run the program above. Hence to print text visibly on a coloured background, three control codes are required, two to change the background colour, and a third to change the colour of the text.
For example:
10 MODE 7
20 PRINT CHR$(131);CHR$(157);CHR$(132)"Blue on yellow"
Certain characters, such as the lower-case letters, may either be printed normally as text or made to appear as graphics shapes by preceding them with one of the graphics control codes. These are:
| Code | Graphics colour |
|---|---|
| 145 | Red |
| 146 | Green |
| 147 | Yellow |
| 148 | Blue |
| 149 | Magenta |
| 150 | Cyan |
| 151 | White |
| 156 | Set background to black |
| 157 | Set background colour to the current foreground colour |
Each line of the teletext display starts with the following attributes: white, alpha (i.e. non-graphics) characters on a black background.
Each graphics shape is based on a two by three grid:
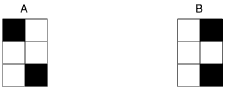
It is possible to calculate the code for any particular graphics shape, since each of the six cells contributes a particular value to the code as follows:

The base value for the codes is 160, so that they lie in the ranges 160 to 191 and 224 to 255. For example,

has a code of 160 + 1 + 8 + 16 = 185 and so may be produced on the screen in red. To do this, type
PRINT CHR$(145);CHR$(185)
Normally, the blocks of colours are continuous. For example,
PRINT CHR$(145);CHR$(255)
produces a solid block of red. Nevertheless, the graphics can be separated, with a thin black line around all the segments. To see the effect of this, try typing
PRINT CHR$(145);CHR$(154);CHR$(255)
So far we have seen that each of the teletext control characters appears on the screen as a space. This means that it is not normally possible to have graphics blocks of different colours touching each other. They have to be separated by at least one space to allow for the graphics colour control codes.
However, if you wish to use different colours next to each other, you can do so by using some of the more advanced teletext controls. For example, try typing
PRINT CHR$(145)CHR$(152)CHR$(255)CHR$(158)CHR$(146) CHR$(147)CHR$(159)
| Code 152 | conceals the display of all graphics characters until a colour change occurs. Hence the solid red graphics block is not displayed. |
| Code 158 | holds the graphics. This means that it remembers the previous graphics character, in this case the solid block, and displays all future graphics shapes and control codes as the remembered character. |
| Code 146 | first colour change. As a result, it reverses the concealing effect of code 152 so that future characters are displayed, and also selects green graphics. |
| Code 147 | control code displayed as a solid graphics block in the current colour which is green. It selects yellow graphics. |
| Code 159 | control code displayed as a solid graphic block in the current colour which is yellow. It releases the graphics, i.e. it reverses the effect of any previous 158 codes. |